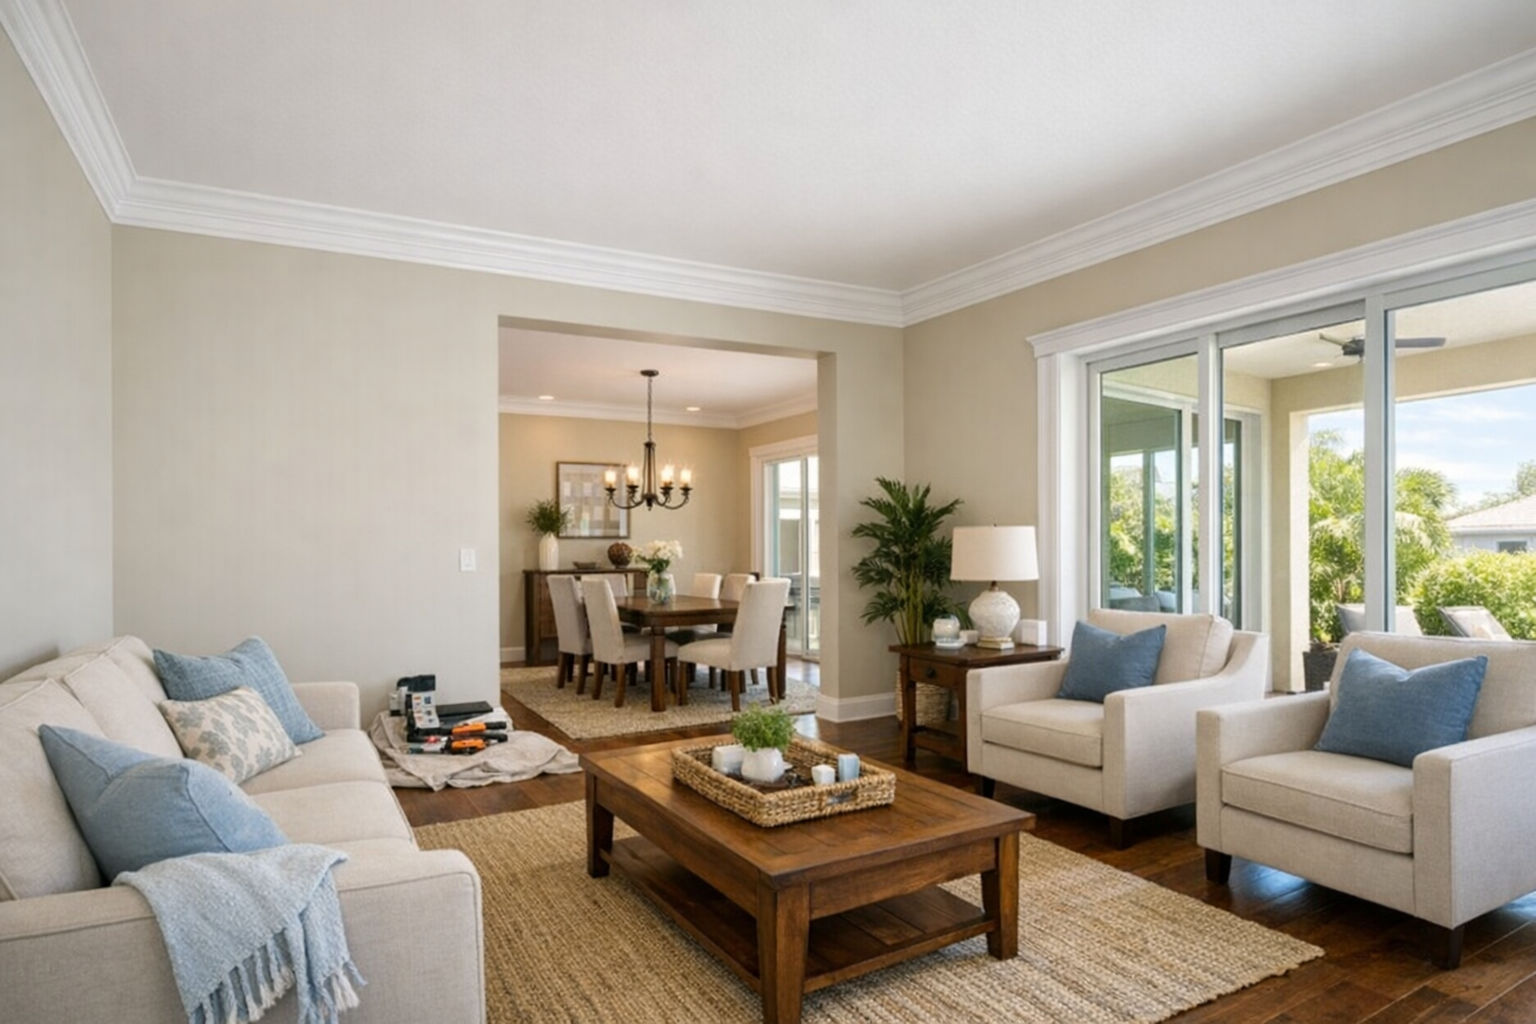
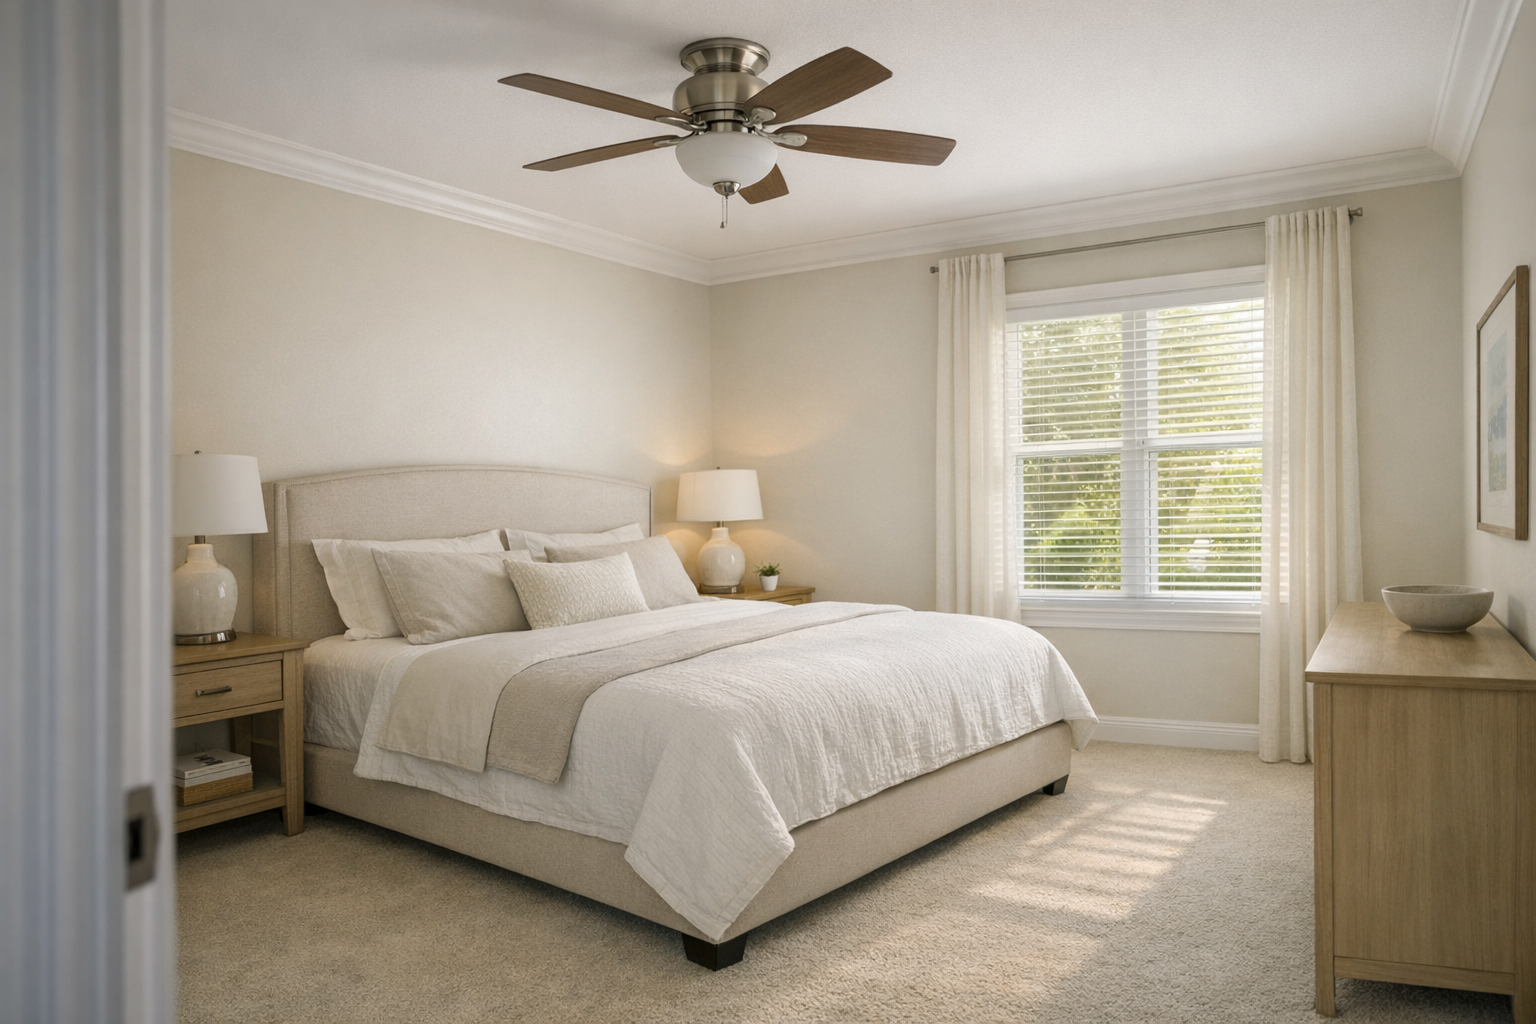
In a North Port room, the first checkpoint is whether the crown profile fits the ceiling height, wall layout, and overall style, not just whether the trim looks good on a sample. For crown molding installation in North Port, FL, the service covers interior spaces such as living rooms, dining areas, bedrooms, entries, rental properties, and other rooms where a cleaner finished edge can make the space feel more complete.
Ready to price your project? Request an estimate and we'll base it on the rooms involved, the molding profile you choose, the condition of the wall and ceiling surfaces, and the finish work needed rather than using a one-size-fits-all number.
A typical project starts with measuring the room, reviewing where the molding will run, and helping you choose a profile. The "profile" is the shape and size of the crown molding: a simple, narrow profile gives a lighter look, while a larger or more detailed profile creates a stronger architectural statement and needs enough wall and ceiling height to feel balanced.
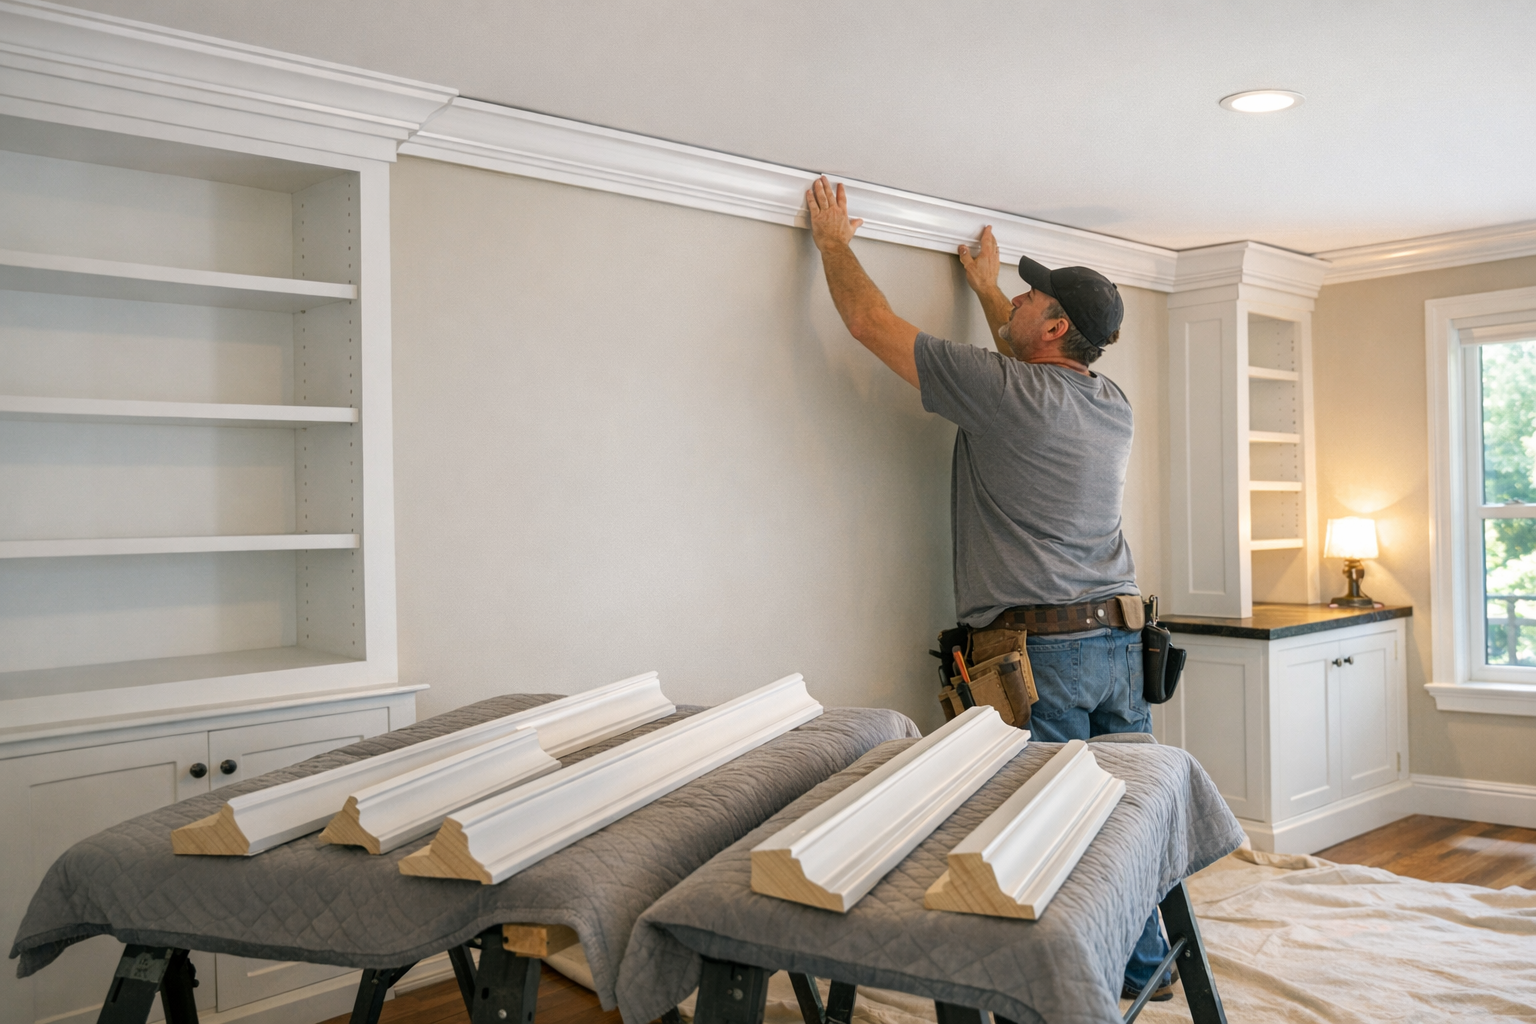
Installation also includes fitting the pieces, setting corners and seams, fastening the trim, and preparing it for a finished appearance. Good finish preparation means nail holes are addressed, seams are treated neatly, and caulk lines are kept smooth so paint or final touch-up work does not have to hide rough installation.
If you want a North Port crown molding installer who can look at the room first and recommend a practical path, the next step is simple: tell us which rooms you want updated, share any style ideas you already have, and request a project-specific estimate.
What Our Crown Molding Installation Service Includes
Before any piece is cut, we map the room: long runs, corner count, ceiling changes, openings, and the spots where seams will be least noticeable. That assessment turns the project into a finished installation plan rather than a material-only order.
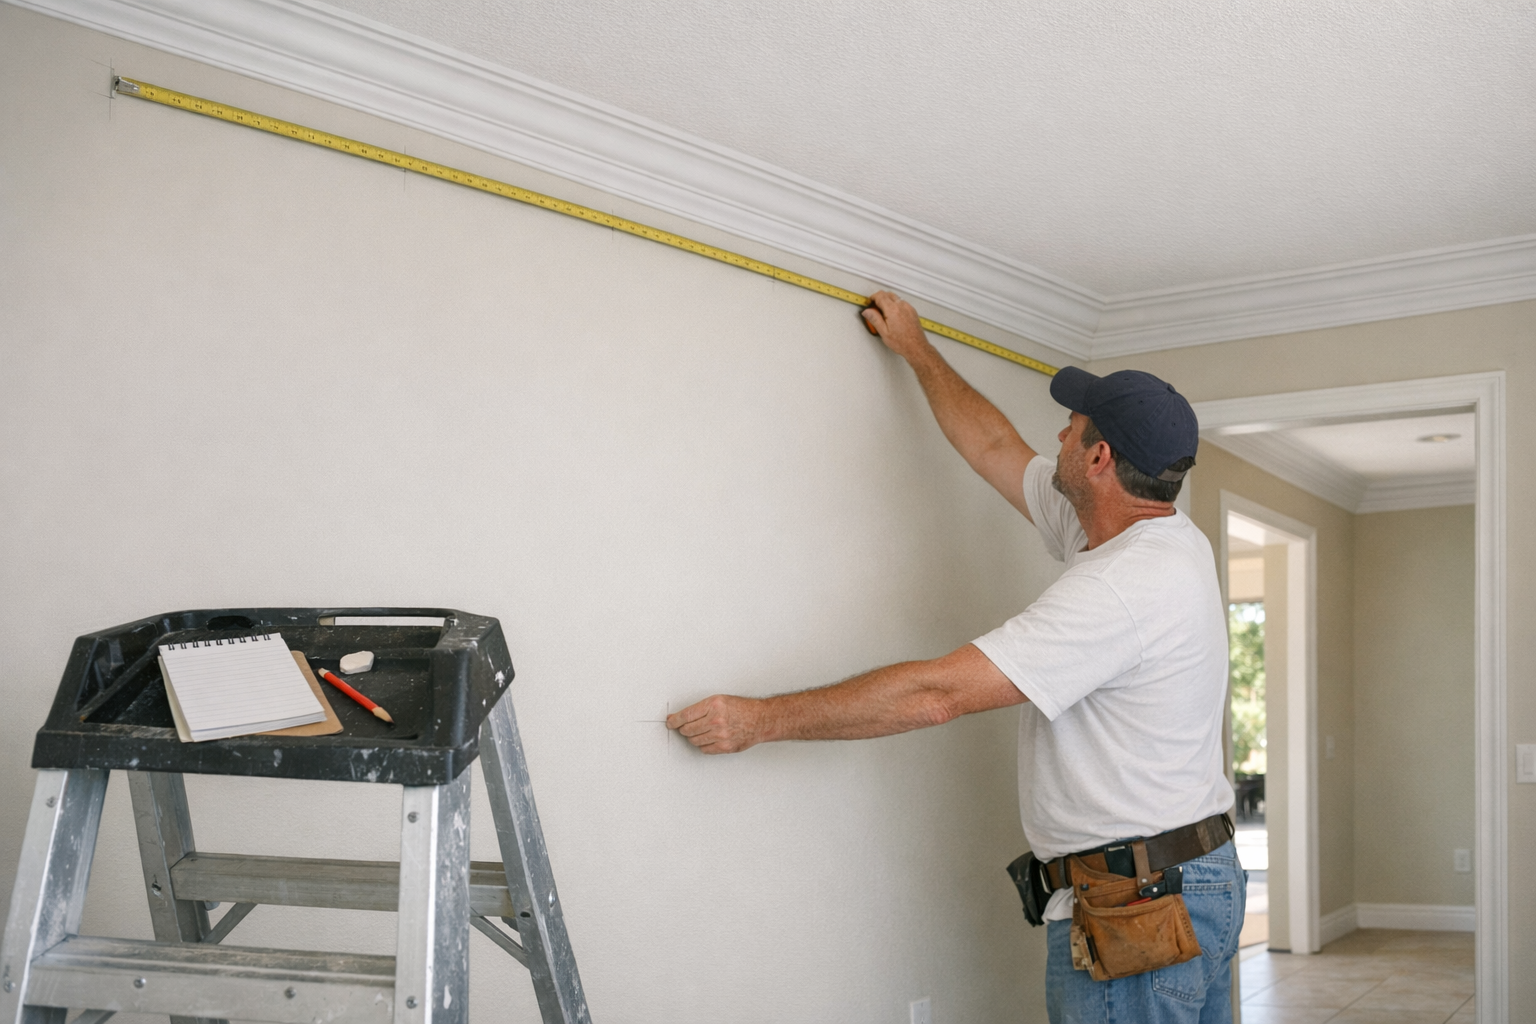
- We start with a site review and measurements. This confirms the rooms involved, wall lengths, ceiling transitions, corners, openings, and any surface conditions that could affect the installation plan.
- We help narrow down profile and material choices. A smaller paint-grade profile can keep a bedroom or hallway simple, while a larger profile may suit a dining room, living room, or taller ceiling where the trim needs more visual weight.
- We handle the finish carpentry work: cutting the molding to fit the room, fitting inside and outside corners, aligning pieces along the wall and ceiling, fastening the trim, and placing seams where they are less noticeable.
- We prepare the installed molding for its final appearance by addressing nail holes, treating seams, and applying clean caulk lines where the trim meets the wall or ceiling.
- We coordinate the installation with painting or staining needs. That means discussing when filling, caulking, priming, painting, staining, or touch-up work should happen so the trim is not treated as an afterthought.
This interior trim installation North Port service can be scaled to fit the project: one room that needs a cleaner ceiling line, several connected spaces, a whole-home update, a rental property refresh, or crown molding added during a broader remodel. For custom crown molding installation, the practical takeaway is simple: the room assessment shapes the scope, the profile affects the look, and the finishing details determine how polished the work feels once everything is painted or stained.
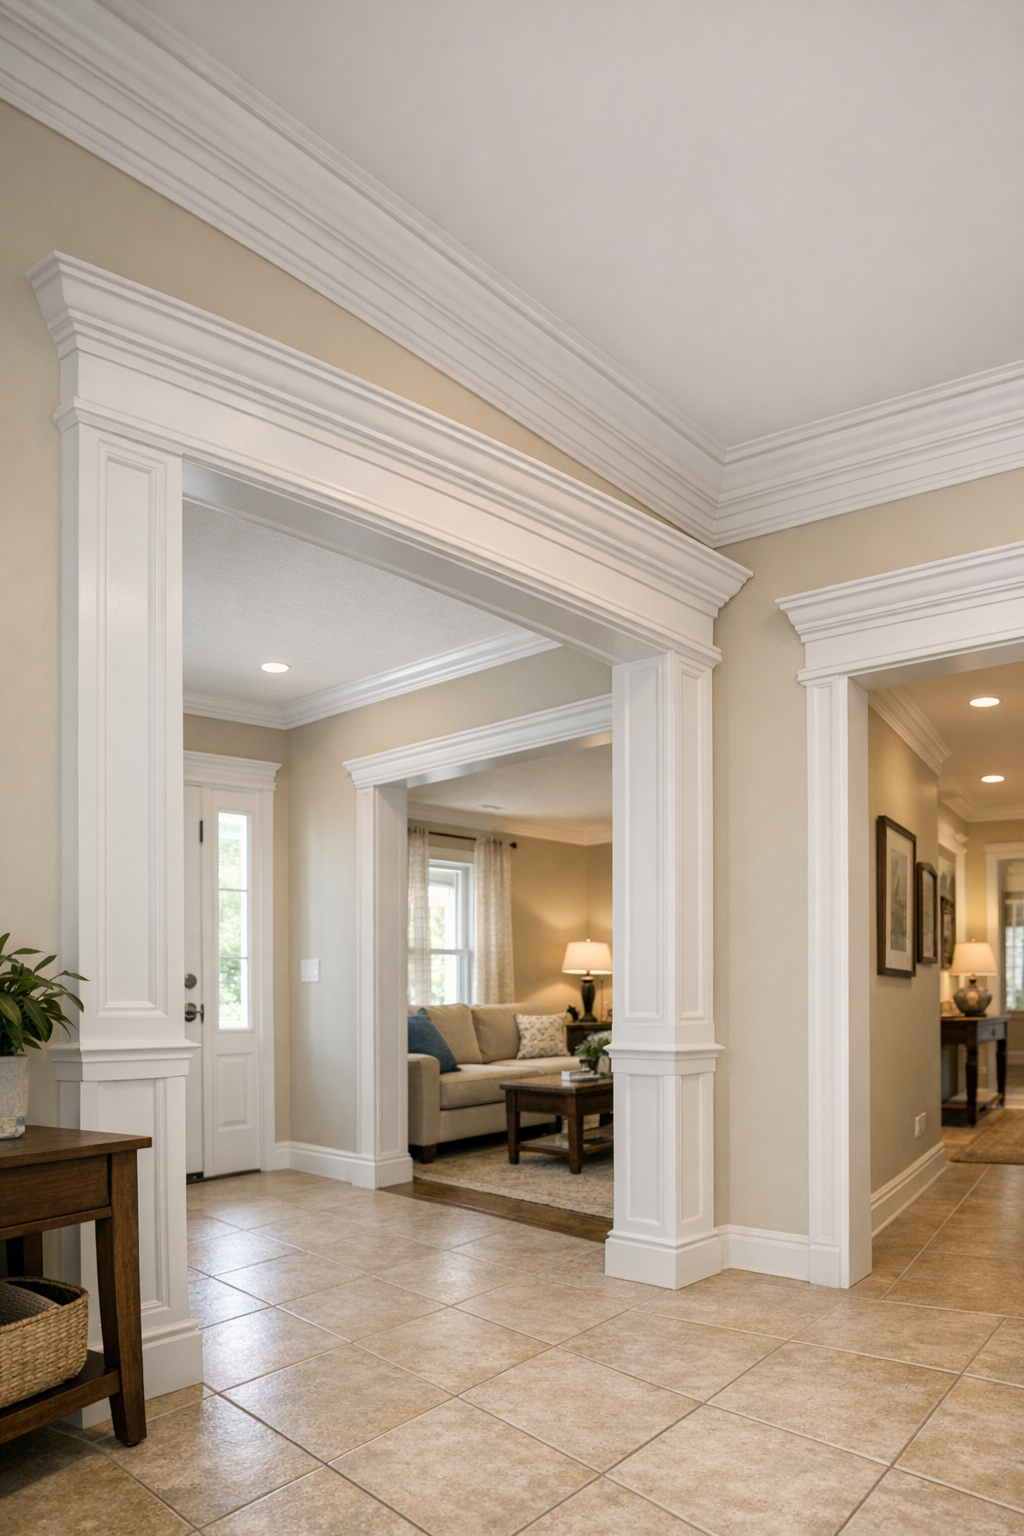
Why Professional Installation Matters for Clean Corners and Straight Lines
Corners are where small errors show first: one short cut can leave a dark gap, and one overfilled joint can make the trim look patched instead of built in. A miter cut is an angled cut used to bring two trim ends together at a turn; a cope cut is shaped so one piece follows the face of another. The practical takeaway is that the cut should fit the corner condition, not just the wall length.
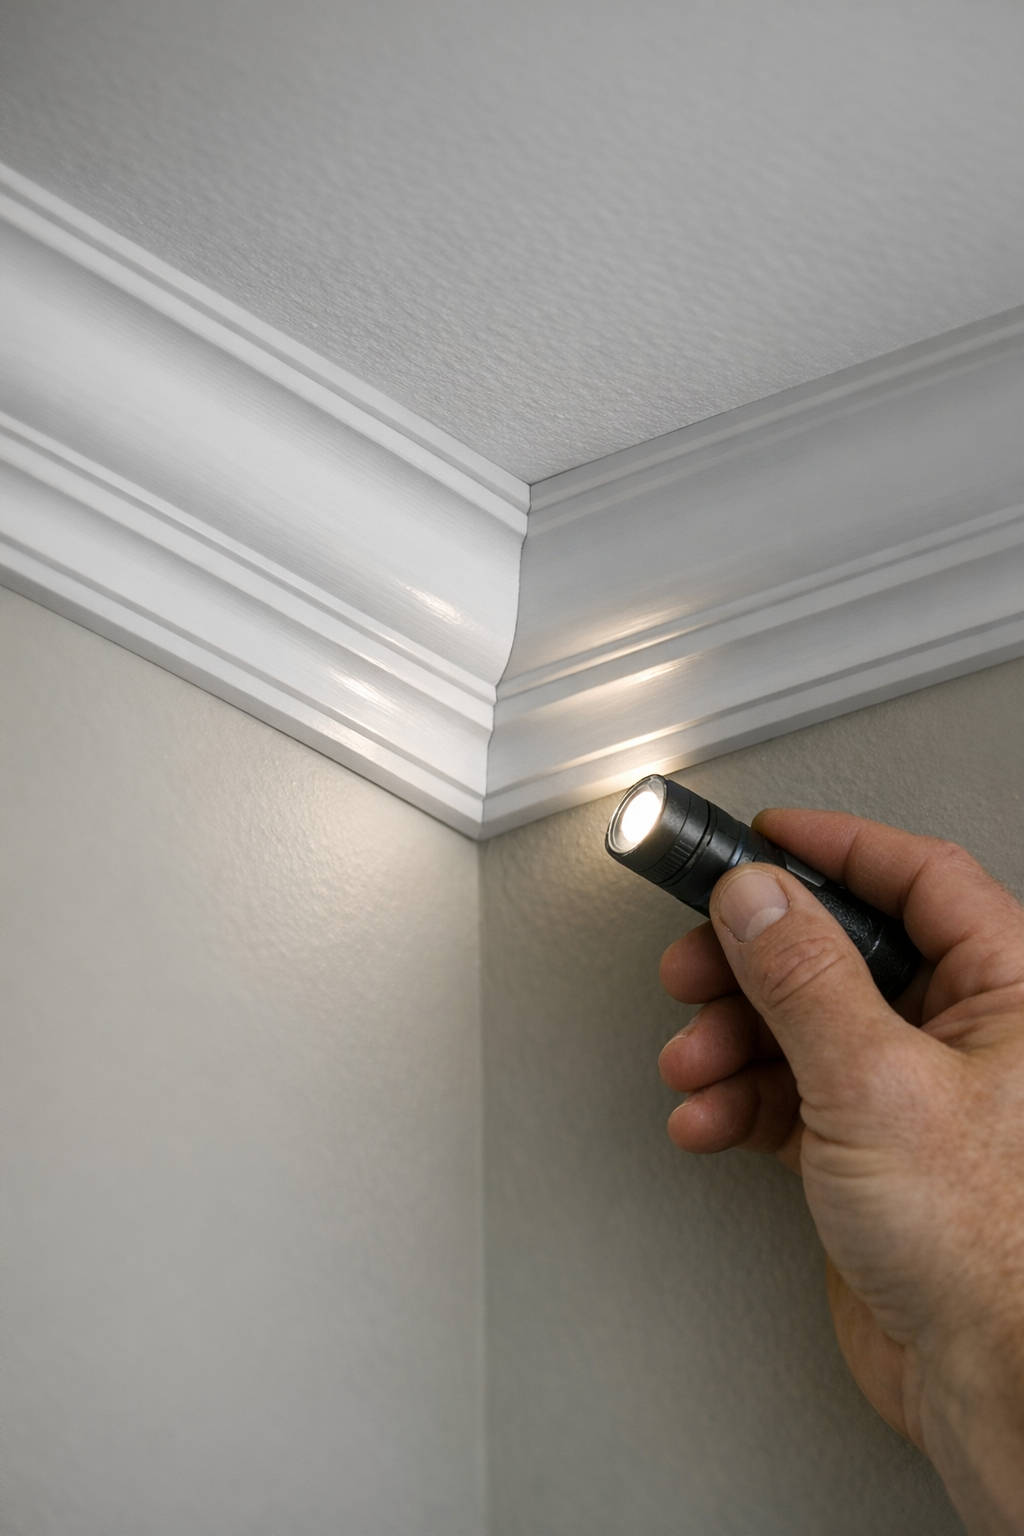
Strong installation shows up in tight inside corners, crisp outside corners, and molding that keeps a consistent reveal along the ceiling and wall. The reveal is the visible spacing or alignment line your eye follows around the room. When it stays even, the molding feels straight and built in; when it waves, dips, or changes from wall to wall, the room can look less finished even if the trim itself is attractive.
Uneven walls and ceilings change how crown molding has to be fitted. A wall may bow slightly, a ceiling line may rise or fall, or a corner may be out of square. Good installation accounts for those conditions with careful fitting, fastening, seam placement, and finish work instead of forcing every piece into place and hoping caulk hides the problem.
- Good signals include joints that close cleanly, seams placed away from obvious sightlines, matching profiles from piece to piece, and smooth caulk lines where the molding meets the wall or ceiling.
- Weak signals include visible gaps, lumpy caulk, mismatched molding profiles, uneven reveals, open corner joints, or seams landing in places where they draw attention every time you enter the room.
For homeowners and property owners, the benefit is simple: the finished trim should guide the eye around the room cleanly, not make you notice every corner, seam, and transition.
Crown Molding Materials and Profile Options for Florida Interiors
Material choice should support the way the room will be finished, not compete with it. Paint-grade trim is made for a painted finish, so it is a practical fit when you want crisp white, soft neutral, or color-matched crown molding that blends with baseboards, door casing, and ceiling paint. Stain-grade trim is selected when the wood grain is meant to stay visible, which can create a warmer, more furniture-like look but usually demands more attention to grain, color, and finish consistency.
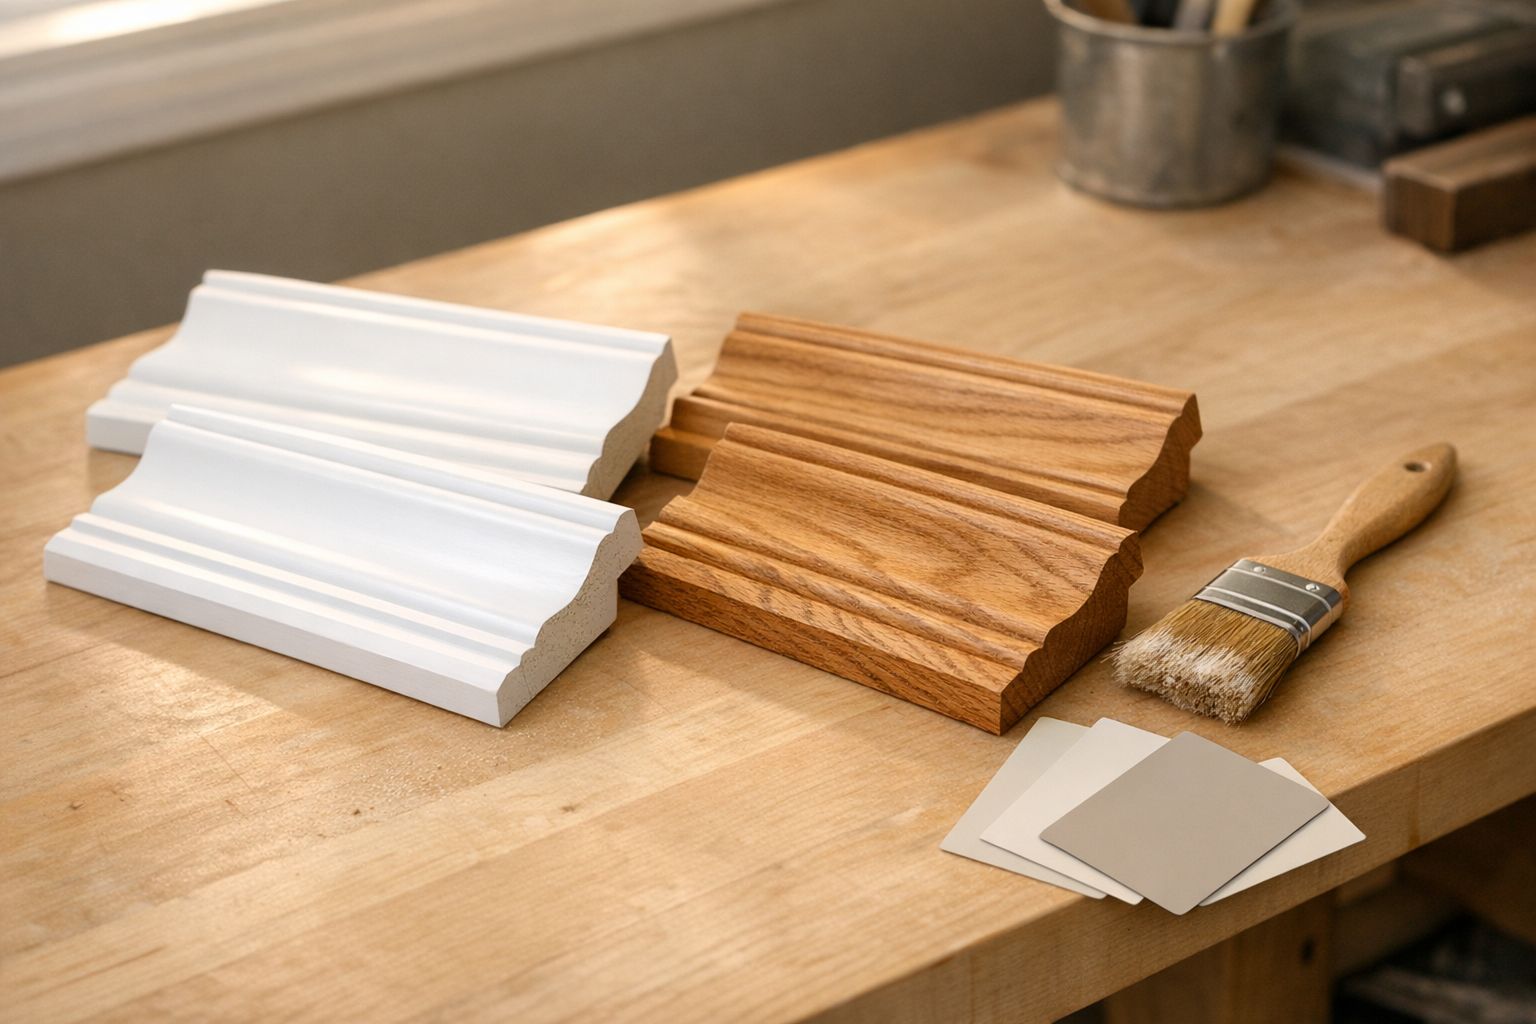
MDF and wood are common choices, and they solve different problems. MDF is often chosen for smooth painted profiles and cost-sensitive projects, while wood is preferred when natural character, staining, or a more traditional trim feel matters. For Florida interiors, humidity is also part of the conversation: the practical goal is to choose a material and finish approach that suits the room conditions, especially in areas near kitchens, baths, laundry spaces, or exterior doors where moisture swings may be more noticeable.
Profile selection is the style decision that changes the whole feel of the room. A smaller, simpler crown can add a clean ceiling transition without making the walls feel shorter, which works well in modest bedrooms, hallways, or rental refreshes. Taller or more decorative profiles can look right in larger living rooms, dining rooms, entries, and spaces with higher ceilings, but they need enough wall height and room volume to feel proportional.
Existing trim should guide the choice, too. If the baseboards and door casing are simple, a very ornate crown may look disconnected; if the home already has detailed trim, a plain profile may feel underbuilt. A good selection balances ceiling height, room size, current trim style, finish color, and how bold you want the detail to be before installation begins.
Rooms and Properties We Can Help Update
Different rooms ask for different crown molding decisions. In a living room or dining room, the trim often acts as a visible frame for the whole space, so profile size and corner layout matter. In bedrooms and primary suites, a simpler profile can soften the ceiling line without making the room feel busy. Entryways usually benefit from clean transitions because they are seen from multiple angles as people move through the home.
Kitchens, bathrooms, laundry areas, and other moisture-prone spaces need more planning than a dry bedroom or hallway. The practical difference is material and finish: the molding should be selected and finished with the room conditions in mind, especially where steam, cleaning, or exterior-door humidity may affect painted trim over time. Good planning here means the crown looks intentional and holds a clean finish instead of feeling like the wrong trim was forced into the room.
We can also help with remodels, investment properties, and homes where you need to match existing crown molding after an addition, repair, or partial room update. Matching is not just finding "something close"; it means comparing height, projection, curve shape, reveal, and how the new pieces meet the old trim. Experienced crown molding installers in North Port can use custom crown molding installation when a standard profile will not blend well, so the update feels connected rather than patched in.
Our Installation Process: From Measurement to Finished Trim
Once the rooms and trim direction are narrowed down, the project moves into a practical planning sequence. We start with a consultation, review the rooms in person or from clear project details, and take measurements so the material order, seam planning, and profile choice fit the actual space. For crown moulding installation in North Port, FL, this early review also helps catch ceiling height changes, long wall runs, built-ins, cabinet returns, and other details that affect how finished trim should land.
Before work begins, we confirm the molding profile, material, finish plan, and schedule. Profile confirmation means making sure the size and shape of the crown match the room rather than overpowering it or looking too small once installed. Finish coordination means deciding whether trim should arrive primed, be painted after it is set, or be matched to existing painted trim; the practical takeaway is that the cleaner the finish plan is upfront, the fewer interruptions there are once cutting and fitting begin.
During the installation phase, the focus is on accurate layout, clean cuts, secure fastening, and consistent alignment around the room. After the trim is set, nail holes are filled, paintable joints are caulked where appropriate, and visible transitions are reviewed before cleanup. A good finish should show smooth caulk lines and blended fill spots, not bulky seams or gaps that draw attention.
Project timing depends on the number of rooms, wall length, ceiling height, profile complexity, material choice, painting needs, and the condition of the walls and ceilings. A single straightforward room is very different from several connected spaces with corners, returns, and finish matching, so the most reliable timeline comes after the room details are reviewed.
What Affects Crown Molding Installation Cost in North Port?
Cost is usually shaped by the parts of the room that change the amount of cutting, fitting, finishing, and material needed. Linear footage is the total wall length where crown will be installed, so a long open living area typically involves more material and more seams than a small bedroom. The number of rooms matters too, because each room has its own layout, setup, corners, and finish details.
Profile complexity also changes the scope. A simple paint-grade crown is usually more straightforward to fit and finish than a larger, layered, or stain-grade profile that needs cleaner grain alignment and more careful touch-up. Painted trim can often be caulked and blended at small joints, while stained trim leaves less room to hide seams, so the finish expectation is different.
Room conditions matter just as much as the molding itself. Higher ceilings can affect access and setup. More inside corners, outside corners, cabinet returns, or angled transitions add layout time. Uneven walls or ceilings may require more careful fitting so the crown does not highlight waves or gaps. Existing trim removal, repairs behind old trim, or matching an older molding profile can also change the work involved.
That is why crown molding installation cost is best estimated after a room-by-room review in North Port rather than quoted as one flat number for every project. After the rooms, profile, surface conditions, and finish requirements are reviewed, you receive a project-specific estimate that reflects the actual installation plan.
Request a Crown Molding Installation Estimate in North Port, FL
The most useful estimate request starts with the basics: where the property is in or near North Port, which rooms you want updated, and whether the work is for a home you live in, a rental, or a property being refreshed for sale. From there, a North Port crown molding installer can connect the estimate to the actual rooms instead of guessing from a generic trim price.
- Share the rooms involved and approximate dimensions if you have them. Even rough wall lengths help separate a small bedroom from a long open living area.
- Send photos of the walls, ceiling lines, corners, built-ins, cabinets, or existing trim so the estimate can account for fitting and finish details.
- Mention the look you prefer: simple painted crown, a larger decorative profile, or stained wood. That choice affects material, seam visibility, and finishing time.
- Note whether painting, staining, caulking, or touch-up should be included, because finish work changes the project scope.
- Include your timeline goals, especially if the project needs to coordinate with painting, flooring, move-in dates, or other interior work.
If you are not sure which profile or material makes sense, that is completely fine. Request an estimate for crown molding installation in North Port, FL, and we can help narrow the choices based on the room size, existing trim, finish preference, and the clean finished look you want.
Plan crown molding installation in North Port, FL
Compare the broader Crown Molding Installation service details, then use the North Port, FL service area page if you want the local overview. When you are ready, request a crown molding installation estimate with the rooms, trim goals, and photos that help explain the scope.
FAQs
What does crown molding installation in North Port, FL include?
Crown molding installation includes a site review, room measurements, profile and material selection, cutting, corner fitting, fastening, seam placement, nail hole filling, and clean caulk lines. It can be done in living rooms, dining areas, bedrooms, entries, rental properties, remodels, and whole-home updates.
How much does crown molding installation cost in North Port, FL?
Crown molding installation cost depends on linear footage, number of rooms, ceiling height, profile complexity, material choice, wall and ceiling condition, and finish work. A project-specific estimate is based on the actual rooms, molding profile, surface conditions, and painting or staining needs.
Can crown molding be installed in rooms with uneven walls or ceilings?
Yes, crown molding can be installed in rooms with uneven walls or ceilings, but it requires careful fitting, fastening, seam placement, and finish work. Bowed walls, rising or falling ceiling lines, and out-of-square corners must be handled so the molding keeps a consistent reveal and does not show gaps.
Do I need to paint before or after crown molding installation?
Painting or staining should be coordinated before installation begins so the trim finish is not treated as an afterthought. The plan should confirm whether the molding arrives primed, is painted after installation, or is matched to existing painted trim, with nail holes, seams, and caulk lines prepared for the final finish.
Is MDF or wood crown molding better for Florida homes?
MDF is often better for smooth painted profiles and cost-sensitive projects, while wood is better when natural grain, staining, or a traditional trim feel matters. In Florida interiors, material and finish should account for humidity, especially near kitchens, bathrooms, laundry areas, and exterior doors.