
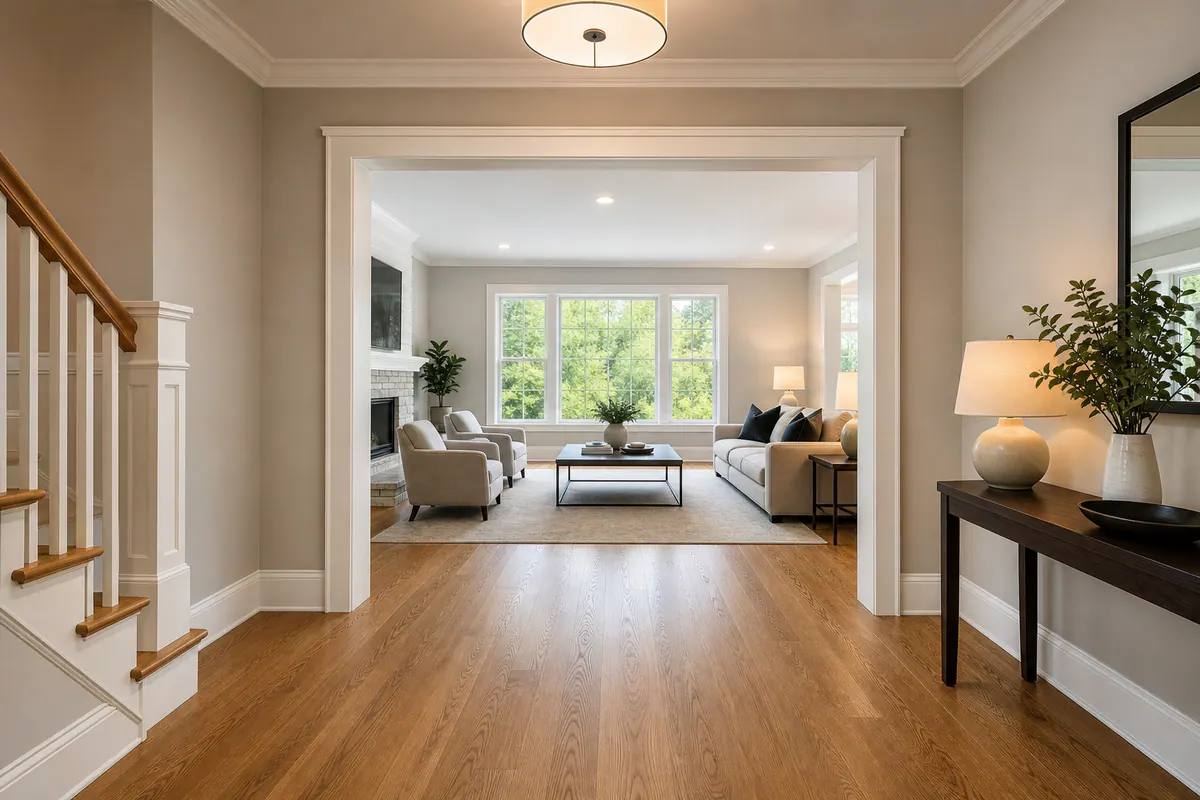
From Builder-Grade to Intentional: What a Trim Upgrade Really Changes
That shift starts with seeing trim as a connected finish system, not just a decorative add-on. Builder grade trim upgrades often replace the narrow baseboards, simple door casing, minimal profiles, and abrupt room-to-room transitions common in newer homes with choices that better fit the house.
“Custom-looking” does not require ornament everywhere. Baseboards create a stronger visual line where walls meet flooring; casing frames doors and windows; crown molding finishes the wall-to-ceiling transition; and selective wall detail can give a large, plain wall structure. The strongest results let those elements share a compatible scale and profile language. A wider casing beside a very small baseboard, for example, can look less intentional than a simpler package sized in proportion.
Ceiling height and room scale matter. Taller or more detailed trim can help a generous living area feel finished, while a compact room may benefit from clean baseboards and casing without crown or elaborate panels. Material, paint sheen, wall condition, existing door jambs, and floor transitions also shape the final look.
A polished installation is visible in consistent reveals, the intentional narrow gaps around openings, clean joints, aligned profiles, smooth transitions, and surfaces ready for paint. SuncoastTrim can help turn those existing conditions into a coordinated plan rather than a collection of isolated upgrades.
Start With the Existing Trim, Openings, and Room Proportions
Before choosing profiles, take a slow room-by-room inventory. Measure the existing baseboard height and note the baseboard profile: its flat or shaped face, thickness, and how it meets the flooring. Record casing width around every door and window, then look at the openings themselves. Jamb depth is the distance from the wall face to the door or window frame; it determines whether new casing can sit cleanly against the opening. A reveal is the deliberately even strip of jamb left visible beside casing. Uneven reveals, patched jamb extensions, or casing that crowds the frame can make an otherwise attractive profile look improvised.

- Photograph floor transitions, especially where wood, tile, carpet, or existing shoe molding meets the baseboard.
- Note wall waves, old caulk lines, nail damage, and paint buildup that may show at the edge of a new, sharper profile.
- Measure ceiling height and identify sightlines through connected rooms, hallways, and the entry.
- Compare paint condition and sheen so the new work has a clear finishing plan rather than stopping at raw installation.
Proportion is the reason a wider casing can feel right around a substantial entry door but heavy on a small bedroom opening. Similarly, taller baseboards can give a tall living room a grounded edge, yet look overbuilt when paired with narrow casing and low ceilings. In open-concept areas, treat the connected rooms as one visual field: abrupt shifts in baseboard height, casing width, or profile shape are noticeable across long sightlines. When upgrading builder grade trim, the goal is not one “correct” size, it is a set of dimensions that relates comfortably to the openings, walls, floors, and neighboring rooms.
Choose the Right Trim Elements: What to Upgrade, What Each One Does, and When to Skip It
Those measurements should determine which elements earn a place in the room. Each trim component solves a different visual problem, so adding more pieces is not the same as creating a more finished result.
- Baseboards establish the room’s lower edge and give walls a deliberate transition to the floor. Taller or more substantial baseboards make the strongest difference in entries, living areas, dining rooms, and primary suites, especially when the existing profile is thin and flat. To upgrade builder grade baseboards successfully, pair their visual weight with casing that does not look undersized beside them. A tall, detailed baseboard beneath narrow, plain door trim often feels mismatched; in a compact bedroom or low-ceiling hall, a simpler profile may be the better choice.
- Door and window casing frames openings, where the eye naturally lands as people move through a home. Wider or more articulated casing can make an entry door, cased opening, or prominent window feel intentional. Custom baseboards and casing work best when their profiles share a similar level of formality: clean-lined casing suits a simple baseboard, while a more layered profile needs enough scale around it. Avoid heavy casing on small windows or tight door groupings, where it can crowd the wall and make the openings appear smaller.
- Crown molding finishes the upper wall-to-ceiling transition. A crown molding upgrade has the most impact in formal living rooms, dining rooms, entries, and rooms with enough ceiling height and open wall area to show it off. It should relate to the baseboard and casing without becoming a competing feature. In a low-ceiling room, a large crown profile can press the ceiling downward; where ceilings are uneven or the room is already visually busy, a restrained ceiling line can look cleaner.
- Shoe molding and quarter round are small transition pieces at the floor line. They can cover a narrow gap between flooring and baseboard or make a flooring transition read more cleanly. Neither is an automatic upgrade: adding it solely for decoration can create an extra stripe at the bottom of the wall. Choose the smaller profile that resolves the transition without overwhelming the baseboard.
- Plinth blocks are thicker blocks at the bottom of door casing that create a formal termination where casing meets the baseboard. They suit substantial openings and more traditional trim schemes. On plain, narrow casing or in a tight hallway, they can look like an unrelated ornament rather than a useful transition.
- Wall details add hierarchy to selected surfaces. Picture-frame molding gives a dining room, stair wall, or foyer a tailored grid; board-and-batten adds vertical rhythm to an entry, hallway, or mudroom; panel molding can lend depth to a larger feature wall. Keep these details subordinate to nearby doors, windows, and built-ins. A small room with crown, elaborate casing, tall baseboards, and a fully paneled wall can feel crowded rather than custom.
The strongest combinations have a clear job: grounded baseboards, openings framed by casing, a ceiling transition only where it suits the room, and wall detail reserved for walls that can carry it. Clean intersections, aligned profile edges, and paint-ready joints are the visible signs that those separate elements were designed to work together.
How to Prioritize Trim Upgrades by Room, Visibility, and Budget
A phased project works best when the first phase reads as a complete decision, not a partial decoration effort. Start where guests enter, gather, and move between rooms: the foyer, main hallway, living room, dining room, and any connected open-concept space. A primary suite is often a worthwhile next priority because it is used every day and can be treated as its own cohesive zone. Secondary bedrooms, closets, and less-visible hallways can follow without making the completed areas feel unfinished.
- Begin with the shared sightlines. Choose one baseboard profile for the entry and main living areas, then carry it through openings and halls visible from those rooms. This avoids the patchwork effect of a substantial new baseboard stopping at a doorway beside older, thinner trim.
- Upgrade casing alongside baseboards when openings are prominent. In a foyer with a front door, a living room with several doorways, or a dining room with large windows, narrow existing casing can make new baseboards look disconnected. Replacing both creates a finished lower edge and a proportionate frame around the features people notice first.
- Use baseboards alone for a controlled first phase when openings are simple or mostly out of view. Replacing builder grade baseboards can be a strong first move in a bedroom wing or a modest hallway if the existing casing is clean, consistent, and not visibly undersized. Select a profile that will still relate to the casing you plan to add later.
Save crown molding and wall details for after the foundational baseboard-and-casing package is established in that area. Crown draws attention upward, while panel molding and board-and-batten make a wall a focal point; neither will solve mismatched openings, interrupted baseboards, or uneven transitions below. A sensible first phase might be coordinated baseboards and casing in the entry, living room, dining room, and main hall, followed by crown in the dining room and selective wall detail in the foyer.
Plan phases around other finish work, too. Flooring replacement may change the gap at the wall line, and new casing can require wall repair and repainting around openings. Grouping those overlapping tasks reduces the chance of paying to patch, paint, or disturb the same surfaces twice. Final scope depends on the existing floors, walls, openings, and the transition points between completed and future rooms.
The Details That Separate a Polished Upgrade From a Cosmetic Change
The final impression is decided at close range: a well-chosen profile can still look temporary if joints open, wall gaps wander, or the paint finish telegraphs every repair.
Material choice should fit both the room and the intended finish. Paint-grade MDF is a smooth engineered product that accepts a crisp painted surface and is available in many consistent profiles, making it a practical value choice for dry, climate-controlled rooms. It is less forgiving where it may repeatedly encounter moisture, such as a poorly ventilated bath or laundry area. Finger-jointed pine joins shorter wood pieces into stable lengths and offers a budget-conscious painted option with the workability of wood. Poplar is a smoother, denser paint-grade hardwood often selected for detailed casing, returns, and profiles that need clean machining. Natural hardwood trim costs more, but its grain can be a feature when the goal is a stained rather than painted finish.
Consistency matters as much as the species or product. Baseboards, casing, and crown do not need to be identical, but their edges, thicknesses, and level of detail should look related. A simple flat-stock casing beside an elaborate crown can work when the room is intentionally restrained; an assortment of unrelated curves and stepped profiles usually reads as pieced together.
- Inside corners: Coping shapes one piece to fit the face of the other, which produces a tighter-looking joint than a weak miter that separates along a long wall.
- Ends and outside corners: Clean returns bring an exposed trim end back to the wall, while tight outside miters keep a profile from looking chipped or unfinished.
- Uneven walls: Scribing trims the back edge to follow a wall’s variation rather than leaving a shadow gap covered with excess caulk.
- Paint readiness: Caulk lines should be narrow and even, nail holes filled smooth, joints sanded flush, and primer and paint applied so the surface reads as one continuous piece.
Look closely before approving the work: profile lines should meet cleanly, corners should stay closed, and caulk should refine small transitions rather than disguise poor fit. Those are the finish details that make builder grade trim upgrades feel built into the home instead of added over it.
Plan a Coordinated Custom Trim Package Before Work Begins
A written trim schedule turns individual selections into a package. Before materials are ordered, it should identify the profile for each area, the planned baseboard and casing dimensions, and where those choices begin and end. For example, an open foyer, hall, and living area may share one baseboard-and-casing combination, while bedrooms use a simpler related version rather than an unrelated profile.

- Transitions: Decide how upgraded rooms meet rooms that remain unchanged. A planned stopping point at a cased opening reads cleaner than an abrupt profile change along an open wall.
- Paint: Select color and sheen together. Using the same trim color with a consistent sheen helps casing, baseboards, crown, and wall details read as one finish layer; a higher sheen makes profile shadows more noticeable but also exposes surface flaws.
- Existing conditions: Record door style, jamb depth, flooring height, damaged drywall, and old paint lines before removal. These details determine whether new trim can cover prior edges cleanly or whether repairs and extensions belong in the scope.
- Exceptions: Narrow returns, arched openings, cabinets near doorways, and uneven ceiling lines need a deliberate detail, not a last-minute decorative addition.
Crown should also relate to the casing below it: a restrained crown can support substantial custom baseboards and casing, while an ornate ceiling profile may overwhelm plain openings. A coordinated custom trim upgrades plan resolves those relationships in advance, so each room feels connected even when the work is completed in phases.
Turn the Plan Into a Finished Upgrade With SuncoastTrim
Bring photos, room measurements, and your priority list to a SuncoastTrim consultation. The conversation can turn a general preference for a more finished home into an installation scope that accounts for the openings, flooring edges, wall repairs, and profile relationships that affect the result.
SuncoastTrim can help you choose proportionate profiles and suitable paint-grade materials, organize the work by room or phase, and carry the plan through clean installation and paint-ready finishing. As work is completed, look for even reveals, tight corners, aligned profile lines, and smooth transitions, details that distinguish a deliberate interior trim upgrade from a surface-level change.
If you are ready to move beyond builder-grade trim, request a consultation or project estimate from SuncoastTrim. Final scope, material choices, timing, and pricing can be shaped around your home’s existing conditions and the rooms you want to improve first.
Plan the next step
When you are ready, request a free estimate with the rooms, trim goals, city, and available photos.
FAQs
Is it worth replacing builder-grade trim?
Replacing builder-grade trim creates stronger wall-to-floor transitions, more intentional door and window frames, and a coordinated finish across connected rooms. The biggest visual improvement comes from proportionate baseboards and casing with consistent reveals, clean joints, and paint-ready surfaces.
How tall should baseboards be in a home with 8-foot ceilings?
Choose a baseboard height that relates to the room size, ceiling height, and casing width rather than using one fixed measurement. In an 8-foot-ceiling room, a clean, simpler baseboard profile usually looks more balanced than an overly tall or detailed profile that can make the room feel crowded.
Can you upgrade baseboards without replacing door casing?
Yes, baseboards can be upgraded alone when existing casing is clean, consistent, and not visibly undersized, especially in bedroom wings or modest hallways. Select a new baseboard profile that will still relate to the casing planned for a later phase.
Is MDF or wood better for painted interior trim?
Paint-grade MDF is a smooth, consistent value option for dry, climate-controlled rooms, while finger-jointed pine offers a budget-friendly painted wood option. Poplar is a denser paint-grade hardwood suited to detailed casing and returns, but MDF is less suitable in poorly ventilated bathrooms or laundry rooms with repeated moisture exposure.
Which rooms should I upgrade first when replacing builder-grade trim?
Start with shared sightlines such as the foyer, main hallway, living room, dining room, and connected open-concept spaces. Upgrade baseboards and prominent casing together in these areas, then add crown molding or wall details after the foundational trim package is complete.