
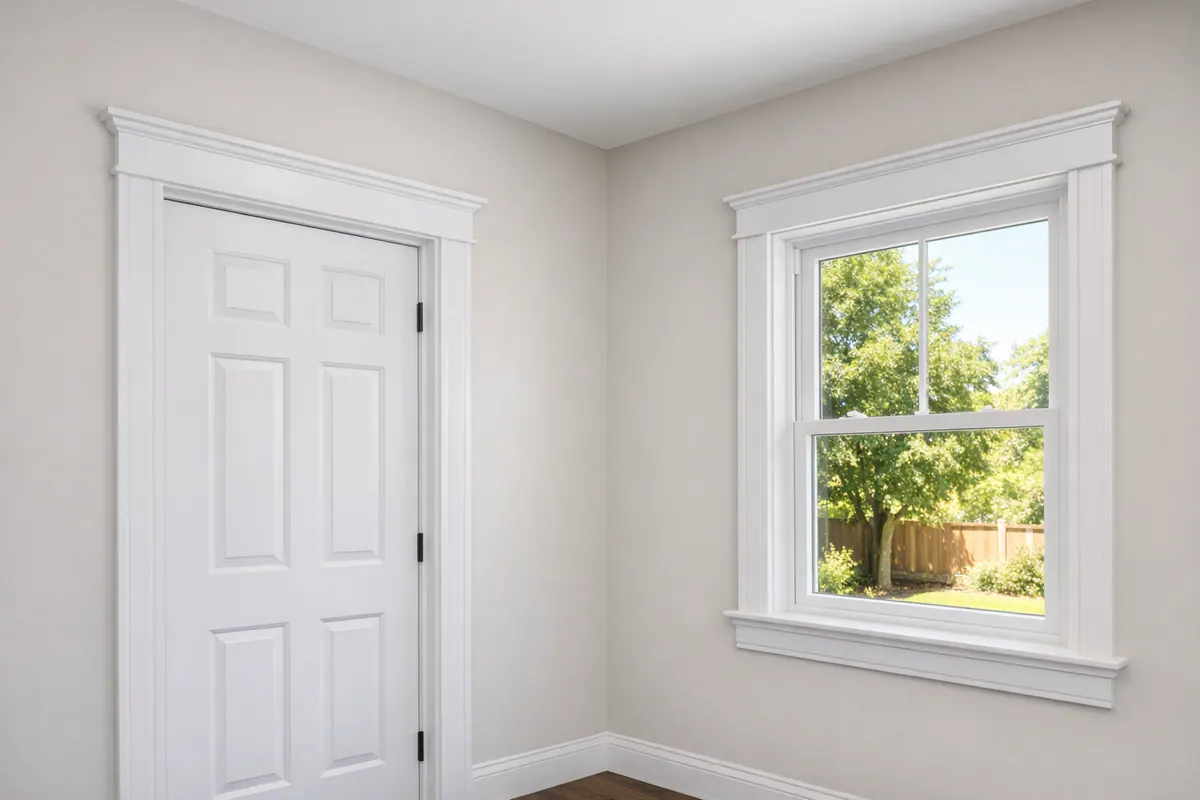
Door and Window Trim: The Finish Detail That Completes a Room
Where the wall surface meets a door or window jamb, casing creates the finished border that conceals the transition. This finish carpentry detail also gives an opening a clear visual edge, tying it to nearby baseboards, crown molding, and built-ins.
That border changes more than a detail at the edge. A narrow, plain casing can keep a small room light and quiet; a wider surround can give a tall doorway enough visual weight to feel proportionate. Coordinated profiles and paint color make separate openings read as part of the same room, while mismatched or heavily painted-over trim can make otherwise sound doors and windows feel unfinished.
This work focuses on the interior finish around a functioning opening, not automatically on replacing the door or window itself. Door and window trim may be refreshed to update a dated profile, cover isolated chips, close untidy finish gaps, or improve the transition after wall repairs. Window trim can also include the interior stool, the horizontal ledge at the bottom, and the apron, the trim board below it. Together, those pieces turn a flat window opening into a composed architectural feature.
Whether the goal is a simple painted frame or a more substantial surround, the most successful result makes the opening look like it belongs with the rest of the home.
What Makes Up a Door or Window Surround?
A surround is assembled from a few distinct parts, and the names make a consultation easier to follow. On a door, the side casing runs vertically along each side, while the header casing crosses the top. These boards may meet in simple miters, or the header may sit across the side pieces for a more linear, substantial look.
Behind the casing is the jamb: the finished interior surface of the opening that the door closes against or the window sits within. The narrow, intentional gap between the jamb and casing is the reveal. A consistent reveal makes an interior door casing look crisp; one that widens or disappears from side to side can draw attention to an uneven wall, jamb, or opening.
When a wall is deeper than the existing jamb, an extension jamb bridges that depth so the casing has a clean, flush surface to meet. It is a functional part of the finish assembly, not merely an extra decorative board. Backband, by contrast, is a narrower molding applied around the outside edge of casing to add shadow lines and depth. It can enrich a formal surround but would often feel too busy around a pared-back flat-stock design.
At the lower corners of a doorway, plinth blocks create a wider base for the casing to terminate against; rosette blocks do similar work at upper corners with a square or decorative block instead of a mitered joint. Both are optional details, useful when their scale relates to nearby baseboards and the room's character.
Windows add their own vocabulary. The interior stool is the horizontal ledge at the bottom of the window; "sill" is often used casually for it, though sill can also refer to exterior window components. The apron is the board or molding directly below the stool. Window casing installation may use only side and header casing, or it may combine all of these pieces for a more complete assembly.
The right combination depends on jamb and wall depth, the condition and straightness of the opening, and the selected casing profile. A simple opening may need only clean casing and an even reveal, while a deeper wall or more layered architectural treatment calls for additional parts.
Choosing a Trim Style: Craftsman, Modern Flat-Stock, Decorative, or Built-Up
Style changes the visual weight of an opening, so the same casing width can feel understated in one room and conspicuous in another. The strongest choice echoes the home's existing millwork rather than treating every door and window as an isolated feature.
Craftsman casing uses broad, square-edged boards and a distinctly stronger header, often set across the tops of the side pieces. Its horizontal and vertical lines give a doorway or window a grounded, substantial presence that works especially well with simple baseboards, built-ins, and bungalow- or Arts-and-Crafts-inspired interiors. It can also suit a newer home that needs more architectural definition. In a small, highly minimal room, however, a very wide header can make an ordinary opening feel top-heavy.
Modern flat-stock casing is the quieter alternative: plain boards, crisp edges, and restrained reveals create a clean border without a molded profile. It is a natural fit for contemporary rooms, simple painted interiors, and openings where the goal is to preserve visual calm. The tradeoff is scale. Narrow flat stock beside tall ceilings, wide openings, or substantial baseboards can look incidental rather than intentional; increasing board width may provide the needed presence without adding ornament.
Decorative surrounds introduce shaped profiles, mitered corners, or rosette blocks for more traditional rooms. These details create shadow lines and a more finished, period-conscious character, particularly when crown molding, paneled doors, or other formal millwork already establish that language. Rosettes can replace angled corner miters with a square accent, while molded casing softens the straight lines of a plain board. On a streamlined contemporary wall, those same features can read as visually busy or disconnected from the rest of the room.
Built-up casing combines layers, such as a primary casing board with backband or an additional outer molding, to create deeper shadow lines, greater width, and more formality. It gives large windows, tall ceilings, and prominent openings the scale that a single board may lack. Because it projects farther and carries more detail, it works best when nearby baseboards, crown, and door styles can support that level of presence. A layered surround around one modest opening, surrounded by otherwise plain trim, can look like an afterthought rather than a coordinated upgrade.
When Door or Window Trim Should Be Repaired, Replaced, or Investigated Further
Damage at an opening is not always a reason to remove every piece of casing. Small dents, nail holes, isolated chips, a split miter at one corner, or a loose board can often be addressed with a localized finish repair and careful reattachment when the surrounding wood is sound and the jamb remains stable. Paint buildup, rough prior touch-ups, and cracked caulk are also surface-level issues when there is no recurring movement behind them. The practical goal is to restore crisp joints, an even paint surface, and a consistent gap around the opening, not to make an unrelated problem disappear under new trim.

Door trim replacement usually creates the cleaner result when damage runs through several pieces, profiles no longer match, repeated paint layers have blurred the edges, or open joints and uneven reveals make the surround look patched together. Replacing a full side-and-header set allows the casing lines and corner treatment to be reset as one coordinated unit. The same reasoning applies to window trim replacement: a single damaged apron or stool may be repairable, but widespread wear, mismatched materials, or a dated surround being redesigned often favors replacing the visible assembly together.
Some signals call for investigation before finish carpentry begins. Soft wood, dark or recurring stains, peeling paint that returns in the same location, or swelling around a window can point to moisture reaching the trim or jamb. Significant rot, damaged jamb material, an opening that has shifted out of square, or a visibly compromised structural frame is beyond a cosmetic casing correction. The moisture source, framing condition, or window performance needs to be assessed before new work is installed.
A door that rubs, will not latch, swings open on its own, or has a loose or damaged jamb likewise needs more than door frame repair at the finished surface. Finish repair can restore the visible trim around a sound opening; it cannot reliably correct a door-operating problem or hidden movement. Separating those conditions at inspection helps preserve repairable trim and avoids installing a polished surround over an unresolved issue.
How to Select Trim That Belongs in Your Home
Begin by looking across the room, not only at the opening being changed. Baseboard coordination matters because casing and baseboards meet at the floor and establish the room's visual weight together. A narrow, plain casing can look under-scaled beside tall, substantial baseboards, while an elaborate surround may overwhelm a compact room with low ceilings. Set profile samples beside existing baseboards and crown molding to compare edge shape, thickness, and scale before committing.

Matching existing millwork is usually the clearest route when only a few doors or windows are changing, especially in a hall or open room where old and new trim will sit in the same sightline. Exact matching may require recreating an unavailable profile. A deliberately updated trim package can be equally successful when it is carried through a visible area: repeating the same casing width, header treatment, and finish across connected doors and windows makes the change read as intentional rather than pieced together.
Architecture and formality should guide the amount of detail. Broad, linear casing can suit a Craftsman-influenced home; restrained flat stock supports a cleaner contemporary room; layered profiles belong where other millwork already has depth and ornament. Ceiling height and opening size affect proportion: a larger or taller opening can carry a wider surround, whereas heavy trim around a small opening can crowd the wall.
Finish also shapes material selection for custom door and window trim. Paint-grade material is chosen for a smooth, opaque painted surface, where filled joints and a consistent color matter most. Stain-grade wood is selected when its grain will remain visible, so boards need a more uniform appearance and carefully matched tone. Reviewing samples under the room's lighting helps ensure the finish relates to floors, doors, and nearby millwork before interior trim installation begins.
What Professional Door and Window Trim Installation Includes
Installation starts with the opening as it actually exists, not just the trim profile selected. The work scope should include reviewing the casing, jamb, wall surface, and nearby baseboards for unevenness, prior damage, or conditions that could affect the fit. Measurements establish casing width, the depth needed at the jamb, header layout, and where the new trim must land to keep related openings visually consistent.
For replacement work, existing pieces are removed carefully so the wall and jamb can be prepared rather than simply covered. The installer then fits the door and window casing to a deliberate reveal, the narrow, even strip of jamb left visible inside the casing. A consistent reveal makes the surround look square and controlled even when the wall or opening has minor irregularities.
Good interior trim installation also depends on tight miters or clean square header joints, aligned side pieces, and fastening that holds boards securely without distorting their faces. Gaps at a wall transition can be caulked where appropriate; nail holes and small finish imperfections are filled before painting. Stain-grade work calls for cleaner joinery and more careful color matching because the wood remains visible.
The finished scope should make clear who handles final painting or staining, touch-ups, and transitions where casing meets baseboards. Those details are what keep a new surround from looking like an isolated add-on rather than a settled part of the room.
Plan a Door and Window Trim Project Around the Details That Matter
Bring a short, room-by-room list to the consultation: which doors and windows are changing, whether the priority is localized repair or a different look, and photos of trim you like. Note whether you want the casing to blend with the wall or create contrast, and whether the room calls for a simple profile or a more formal surround.
Include related baseboard or crown changes, paint-grade versus stain-grade finish, and any soft wood, recurring stains, sticking doors, uneven gaps, or damaged jamb areas. A site review can separate finish-carpentry work from conditions involving the wall, opening, or moisture source. The proposal should identify the selected door and window trim scope and any issues that need separate attention before cosmetic work proceeds.
Plan the next step
Compare the broader Door and Window Trim service.
When you are ready, request a free estimate with the rooms, trim goals, city, and available photos.
FAQs
Can interior door casing be replaced without replacing the door?
Yes. Interior door casing can be replaced independently when the door and jamb are sound, such as when the profile is dated, paint buildup has blurred edges, or joints and reveals look uneven. Replacement resets the side and header casing as one coordinated surround.
What causes gaps or cracks around door and window casing?
Cracked caulk, split miters, loose boards, paint buildup, and uneven walls or jambs can create visible gaps around casing. Recurring stains, soft wood, swelling, or peeling paint in the same location can indicate moisture reaching the trim or jamb and should be investigated before new trim is installed.
What style of window casing works with Craftsman-style homes?
Craftsman casing uses broad, square-edged boards with a stronger header that often sits across the tops of the side pieces. It works best when coordinated with simple substantial baseboards, built-ins, and other Arts-and-Crafts-inspired millwork.
How should I choose new door and window trim to match my home?
Compare casing samples with existing baseboards and crown molding for width, edge shape, thickness, and visual weight. Choose wider trim for taller ceilings or larger openings, use paint-grade material for an opaque painted finish, and select stain-grade wood when visible grain and matched tone are priorities.