
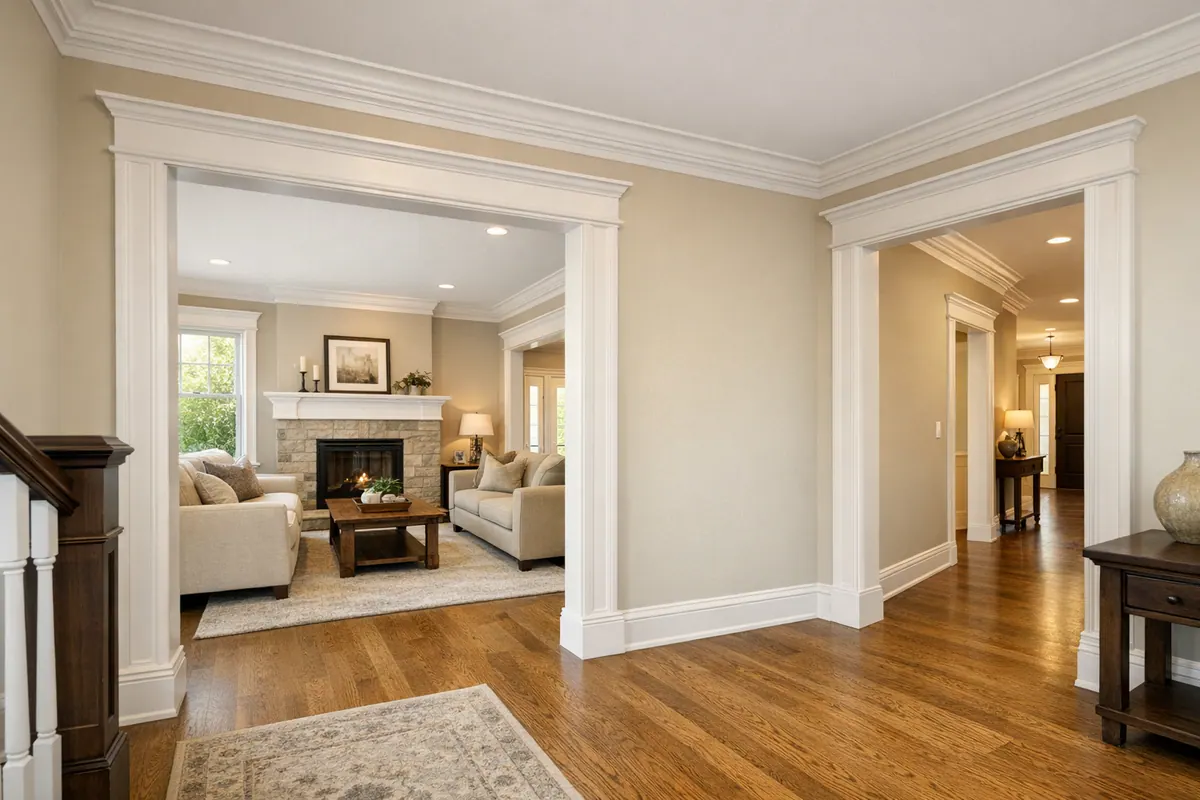
What a Whole-Home Trim Package Can Include
Start with the transitions that need definition: where walls meet floors, openings meet walls, and walls meet ceilings. The selections for those points should read as one system across the house, not as isolated molding purchases.
Baseboards create the finished line where wall meets floor, so they are usually the starting point. Door and window casing frames openings and gives them presence; keeping its profile family related to the baseboard helps a hallway, bedroom, and living area feel connected. Crown molding finishes the wall-to-ceiling transition and can add formality, while window stools and aprons give suitable windows a more built-in, furniture-like treatment.
Optional wall details can carry that direction further. Picture rail, chair rail, panel molding, board-and-batten, and wainscoting turn a flat wall into a deliberate architectural feature, but they are accents rather than mandatory ingredients. A clean, restrained home may use baseboards and casing only, while a formal dining room or entry may be a better place for crown or wall panels.
The right scope responds to the home instead of applying one formula everywhere. For example, consistent baseboards and door casing can run through public rooms, halls, and bedrooms, with crown reserved for taller-ceiling living spaces. Pairing broad, ornate casing with plain flush doors, or adding substantial crown to a low ceiling, can make the details compete instead of connect. The goal is a coordinated interior trim package in which every added element has a clear role.
Build a Compatible Baseboard, Casing, and Crown Molding Hierarchy
Think of the trim as a visual stack: casing gives doors and windows their frame, baseboards hold the room to the floor, and crown, where it suits the space, completes the upper edge. Each piece has a different job, so a coordinated result does not require using the exact same molding shape everywhere.
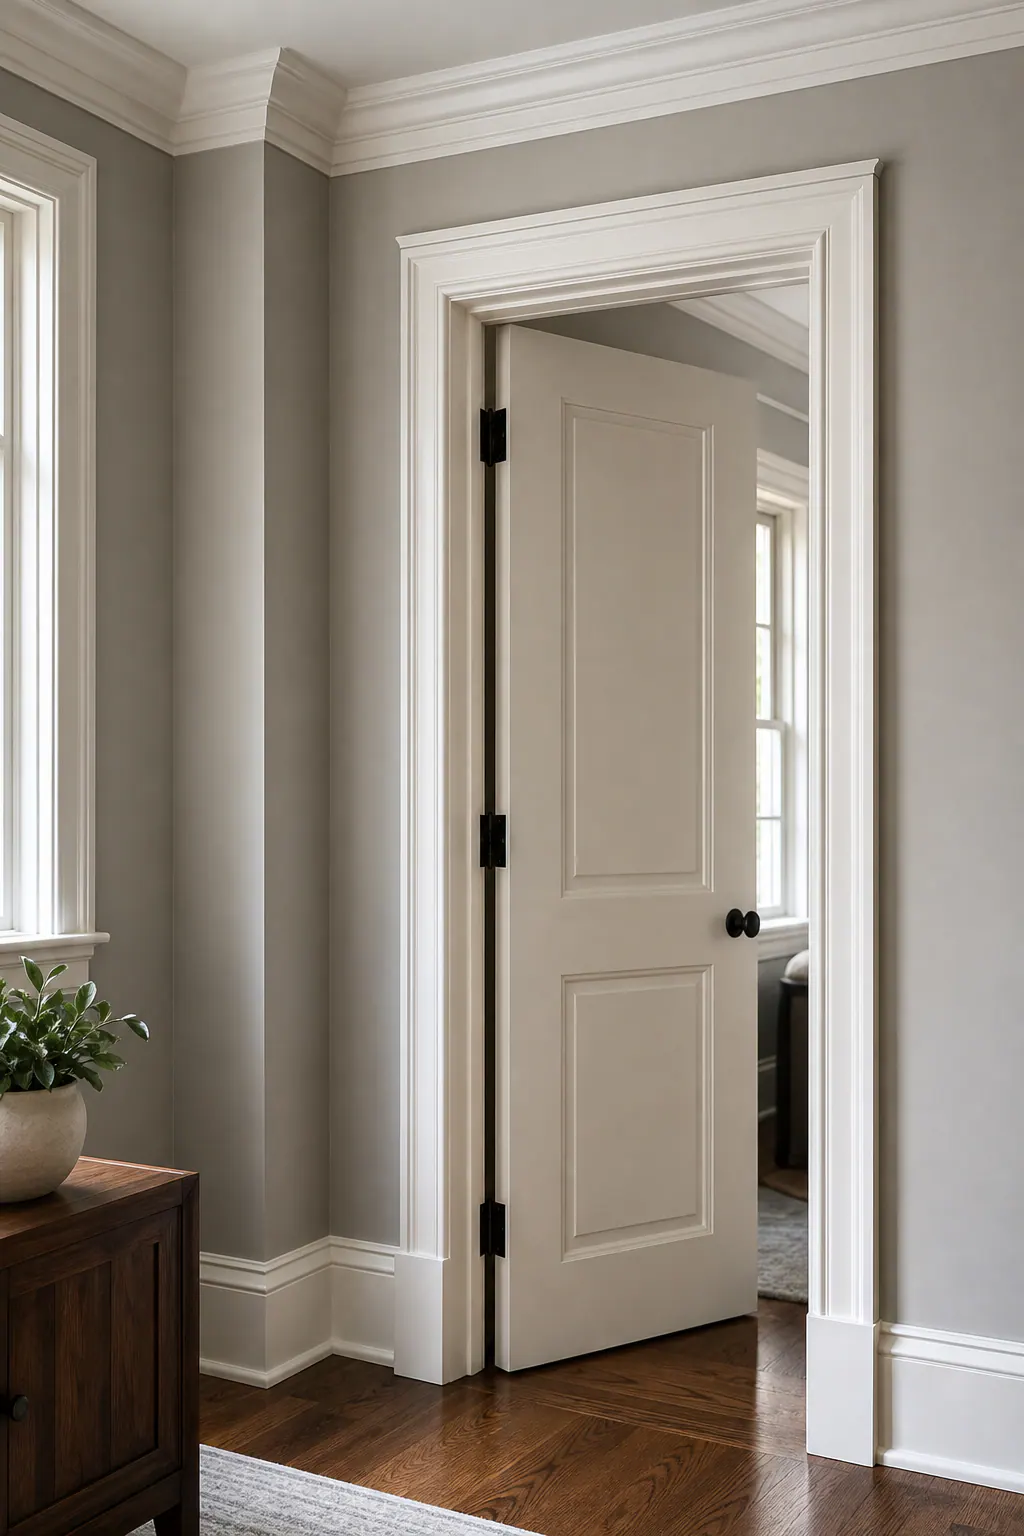
Start with the door and window casing because openings repeat from room to room. Its width and face detail establish how much presence a doorway has. A narrow, square-edged casing reads clean and modern; a wider casing with a small stepped edge or softened bead feels more transitional. The baseboard profile can be taller or simpler, but it should echo that same level of formality. For example, flat casing with crisp edges pairs naturally with a flat or lightly eased baseboard, while a casing with layered steps is better balanced by a baseboard with a related cap or shaped upper edge, not a completely unrelated ornate pattern.
Reveals and returns are the small decisions that make those profiles look intentional. A reveal is the slim, consistent strip of door jamb or wall left visible beside a casing; it creates a clean shadow line rather than making the trim look crowded. A return turns the exposed end of a molding back toward the wall, so an open baseboard end or crown termination has a finished edge instead of a blunt cutoff.
A crown molding profile should be the finishing note, not the loudest element in every room. A simple cove or angled crown can continue a restrained scheme, while a built-up or more detailed crown belongs with substantial casing and enough wall height to let the layers read. Matching means relating proportions, edge details, and overall formality. It does not mean forcing identical profiles onto the floor line, openings, and ceiling transition.
Choose Trim Profiles for Ceiling Height, Door Style, and Architecture
Room proportions should lead the profile decision. Measure ceiling height, wall width, and door and window openings before falling for a molding sample: a profile that looks balanced in a showroom can take over a compact room or disappear beside a tall opening. Larger crown and layered casing need enough open wall area to read as intentional; in a low-ceiling hallway, a modest ceiling transition and clean casing often create a calmer result.
A restrained profile family uses flat faces, square or lightly eased edges, and limited ornament. It works especially well with flush doors, simple Shaker cabinetry, and contemporary interiors because it reinforces their crisp geometry. Transitional trim adds a small bead, step, or softened curve, bringing more depth without becoming formal. More detailed profiles use multiple steps, curves, or built-up layers; they can suit traditional architecture, taller rooms, and paneled doors, but ornate casing around a plain slab door can look like two unrelated design decisions.
Door slabs and windows deserve equal weight in the selection. A six-panel or raised-panel door can support a casing with more contour, while a flat door usually benefits from a quieter frame. Narrow windows or closely spaced openings may not have room for broad casing without making the glass area feel pinched. For a complete home trim upgrade, photos and samples of flooring, cabinetry, door styles, and existing architectural details help test whether the proposed paint-grade trim belongs with the finishes already in view.
Keep the strongest visual signals consistent: the casing family at repeated openings, the baseboard's overall height and formality, and the paint color and sheen. A unified package can still vary deliberately. Main living areas with tall ceilings may carry a larger crown or a built-up header, while bedrooms, closets, baths, and utility areas can use a simplified version with the same squared edge, bead, or stepped motif. That preserves the design language while matching profile scale to each room rather than making every ceiling and doorway perform the same way.
Before committing, compare modest and larger profiles on a scaled elevation or a full-size wall mockup. The useful question is not which sample looks most impressive alone, but whether it leaves comfortable wall space, relates to the openings, and still feels appropriate when repeated throughout the home.
Plan the Scope Room by Room Without Losing Whole-Home Continuity
A room-by-room trim schedule turns the selected profile family into a workable whole house trim replacement. List every space, the trim elements it receives, and the conditions that may change the detail. Entry and main living areas often carry the fullest expression of the plan; hallways need careful casing and baseboard continuity because their repeated openings make inconsistencies obvious. Bedrooms can usually follow the same baseboard and casing language with fewer optional wall details, while closets and utility spaces may use the simplified version rather than becoming visual exceptions.
Bathrooms deserve their own notes because existing tile, vanities, and tight wall returns can limit where baseboard runs or where casing can land. Record whether trim dies into tile, returns at a cabinet, or needs a clean transition to a different floor height. A full home baseboard installation also benefits from noting flooring changes room by room: carpet, tile, hardwood, and luxury vinyl can leave different gaps and transition points at the wall.
Existing interior doors do not automatically need replacement for new casing to be installed around them. If the jamb is sound, the door operates freely, and the chosen casing fits the available wall space, the new frame can refresh the opening without changing the slab. Replacement doors can alter the calculation, though: a new jamb depth, door height, hinge location, or prehung unit may affect casing width, head detail, and nearby baseboard returns.
Field measurements should capture wall lengths, out-of-square corners, uneven walls, window depths, stool projections, and stair details before material is ordered. A window stool and apron may be appropriate where a window has enough lower-wall clearance; a tight sill, deep drywall return, or existing tile backsplash may call for a simpler casing treatment instead. Photograph areas with damaged drywall, removed trim shadows, or tile edges so patching and finish transitions are included in the scope rather than discovered mid-project.
Stairs need special attention at stringers, landings, and newel posts, where baseboard may terminate, step up, or transition into skirt-board details. Putting these decisions into one written schedule lets each room respond to its conditions while the repeated elements still read as one home.
Choose MDF, Wood, and Paint Finishes for the Right Conditions
Material choices are easiest to settle after the room schedule reveals where trim will face moisture, knocks, and close-up scrutiny. MDF trim is a smooth, paint-focused option with crisp factory profiles and no visible grain, making it a natural fit for clean painted casing, baseboards, and built-up details in dry interior areas. Its tradeoff is that damaged edges and moisture exposure deserve more caution than they would in a stable, low-traffic room.
Paint-grade wood trim brings a more durable solid-wood edge to painted work and can be shaped, patched, and adjusted on site when walls or openings are irregular. It is often worth considering at busy entries, stair areas, or locations where luggage, pets, and daily traffic can strike baseboards and casing. Stain-grade wood is selected for its visible grain and finished wood character rather than a perfectly uniform painted surface; boards need thoughtful color matching, grain selection, filling, and clear-coat preparation so adjoining pieces read as intentional.
Bathrooms, laundry rooms, and exterior-adjacent entries should be identified on the schedule before one material is assigned across every room. In Sarasota County homes, humidity, wet shoes, splashing, and drying cycles make edge treatment, sealed cuts, acclimation, and the paint system part of the material conversation, not an automatic reason to choose one trim product everywhere.
Finish samples matter as much as profile samples. A higher-sheen paint reflects more light, which can sharpen a molding's shadow lines but also make seams, nail fills, and wall irregularities easier to notice. Lower-sheen finishes soften reflection and can make broad trim planes feel quieter, while deep or high-contrast colors tend to emphasize both profile detail and surface variation. Compare a finished sample against the wall color and lighting in the actual room before carrying one finish across the whole home.
Sequence a Whole-Home Trim Installation Around Renovation Work and Daily Life
The cleanest results come from treating installation order as a coordination plan, not a fixed script. Finalize the profile schedule, room scope, paint direction, and any door changes before removal begins. Flooring, wall repair, and painting affect the sequence: new flooring may change baseboard height or whether it is installed before the finished floor, while major patching or drywall work should be resolved before finished trim covers the edges.
A typical whole-home interior trim installation starts with removal of included existing trim and repair of the wall damage that removal exposes. Casing and other opening details usually follow, establishing the lines around doors and windows. Baseboards and crown can then be fitted around those established conditions, followed by panel molding, board-and-batten, or other wall details. Before paint, look closely at miter joints, transitions, and each return, the finished end that turns a profile neatly back into the wall rather than leaving an exposed cut. Caulk should close small paintable gaps; nail holes and minor seams should be filled, sanded, and ready for a uniform finish rather than hidden under a heavy coat of paint.
For an occupied home, phasing by zone can keep daily life more manageable: complete bedrooms and a hallway first, for example, then move to living areas, with a bathroom or kitchen-adjacent space scheduled around access needs. Clear furniture away from work walls, identify rooms needed each night, plan a place for pets during cutting and painting, and expect temporary limits on doorways and storage. A room is best handed back only after the trim, touchups, and cleanup are complete, not when the molding is merely fastened in place.
Start With a Whole-Home Trim Plan, Not Individual Room Decisions
Bring a few inspiration images, but also bring the decisions those images cannot show. A productive assessment looks at the existing doors, windows, flooring transitions, and architectural details alongside the rooms that matter most. It should identify the baseboards, casing, crown, or wall treatments you want; compare paint-grade material preferences; flag bathrooms, laundry areas, and entries with different moisture exposure; and establish whether the work happens in one pass or in practical phases.

That conversation turns a collection of preferences into a coordinated interior trim package. For example, a favorite detailed living-room image may point to a simpler related profile for compact bedrooms rather than an unrelated molding choice. Request an assessment for a whole home trim package that considers the complete scope before isolated pieces are selected.
Plan the next step
Compare the broader Whole-Home Trim Packages service.
When you are ready, request a free estimate with the rooms, trim goals, city, and available photos.
FAQs
What is included in a whole-home trim package?
A whole-home trim package can include baseboards, door and window casing, crown molding, window stools and aprons, and optional wall details such as chair rail, panel molding, board-and-batten, or wainscoting. The package should use related profiles, proportions, paint color, and sheen across rooms.
How do you choose matching baseboards, crown molding, and door casing?
Start with door and window casing because openings repeat throughout the home, then choose baseboards with a similar level of formality. Flat, square-edged casing pairs with simple baseboards, while layered casing works best with a related cap or shaped baseboard edge; crown should be scaled to ceiling height and remain the finishing note.
Should every room in a house have the same trim profile?
No, every room does not need identical trim profiles, but repeated elements should share a design language. Living areas with tall ceilings can use larger crown or built-up headers, while bedrooms, closets, baths, and utility rooms can use simplified trim with the same squared edge, bead, or stepped motif.
Can new trim be installed without replacing interior doors?
Yes, new casing can be installed around existing doors when the jamb is sound, the door operates freely, and there is enough wall space for the selected casing width. Replacing doors may change jamb depth, door height, hinge locations, head details, and nearby baseboard returns.
Is MDF or wood better for a whole-house trim replacement?
MDF is best suited to dry interior areas where a smooth, paint-grade finish and crisp factory profile are priorities. Paint-grade wood provides more durable solid-wood edges for busy entries and stairs, while bathrooms, laundry rooms, and exterior-adjacent entries need sealed cuts, acclimation, and a paint system suited to humidity and moisture exposure.