

Professional Crown Molding Installation for a Finished Wall-to-Ceiling Transition
A crown profile has to look right at the line where the wall meets the ceiling. A shallow, clean shape can give a contemporary room a defined edge without adding visual weight, while a deeper treatment can make a taller room feel more finished and connect the ceiling to nearby doors, baseboards, and other trim.
The right profile depends on the room, not a one-size-fits-all formula. Ceiling height, room proportions, architectural character, nearby trim, and the intended finish all affect the choice. A restrained painted profile can keep a smaller contemporary room from feeling crowded, while a taller room may carry a more layered treatment without overwhelming the space.
Crown molding installation begins with measuring the room's actual geometry. Corners are not always square, ceilings and walls are not always straight, and transitions around openings or changes in ceiling plane need to look intentional. Careful fitting, precision corner work, seam treatment, and surface preparation help the molding read as a continuous feature instead of a series of separate pieces.
Finishing is part of the result, not an afterthought. Small gaps can be caulked, minor surface imperfections patched, and joints blended before paint touch-ups create a paint-ready appearance. For stain-grade work, the emphasis shifts to clean cuts, aligned grain, and a finish that keeps the wood's character visible. The goal is molding that fits the room's scale and style while leaving the wall-to-ceiling transition polished.
Choosing a Crown Molding Style That Fits Your Rooms
Start by deciding how much visual weight the ceiling line should carry. A standard single-piece crown is one continuous profile, usually chosen when the room needs a clear finished edge without making the trim the focal point. It suits many everyday living spaces and bedrooms, especially when its projection feels in step with the baseboards and door casing. In a lower-ceiling contemporary room, a restrained profile can add definition while preserving an open feel; an oversized, deeply shaped profile may make that same room feel top-heavy.
Decorative crown molding uses more pronounced curves, steps, beads, or carved-looking detail to create a traditional, formal effect. It has more presence than a simple profile and tends to make the most sense where the architecture already supports it: substantial casing, taller baseboards, classic millwork, and rooms intended to feel more formal. It can be a weaker fit beside thin, flat trim or in a compact room where several competing details would make the perimeter feel busy.
Modern crown molding takes the opposite direction. Its lines are flatter, simpler, and less ornate, creating a crisp shadow line rather than a decorative border. This approach works naturally with contemporary interiors, squared-off casing, and clean painted finishes. Cove molding is another quiet option: its concave curve softens the wall-to-ceiling transition without the layered silhouette of conventional crown. It can suit relaxed, understated spaces, while a homeowner seeking a strong architectural statement may prefer a larger profile.
Custom crown molding combines separate trim pieces into one built-up assembly. A crown profile may be paired with a flat backer, cove, bead, or other bands to create a taller, more tailored treatment. That added scale can give a large formal living room, dining room, or entry the visual weight it needs, particularly when paired with substantial existing trim. The tradeoff is restraint: a layered assembly needs enough ceiling height and wall area to read as intentional rather than crowded.
Bring the room's measurements and nearby trim into the decision. The molding does not need to match every profile exactly, but its scale and character should belong with the baseboards, door frames, ceiling height, and the level of impact you want. Viewing a few profile samples against the actual wall is often the clearest way to distinguish "enough detail" from "too much trim."
Wood, MDF, and Paint or Stain: Material and Finish Considerations
Finish is often the deciding factor in the material choice. Paint-grade molding is selected to receive an opaque painted surface, so its value lies in a smooth, uniform appearance rather than visible grain. MDF crown molding can be a practical paint-grade option when the goal is a consistent profile and a clean painted ceiling line. It is best considered alongside the room environment, the profile's detail, the planned paint system, and the overall project budget, not simply as a substitute for every other material.
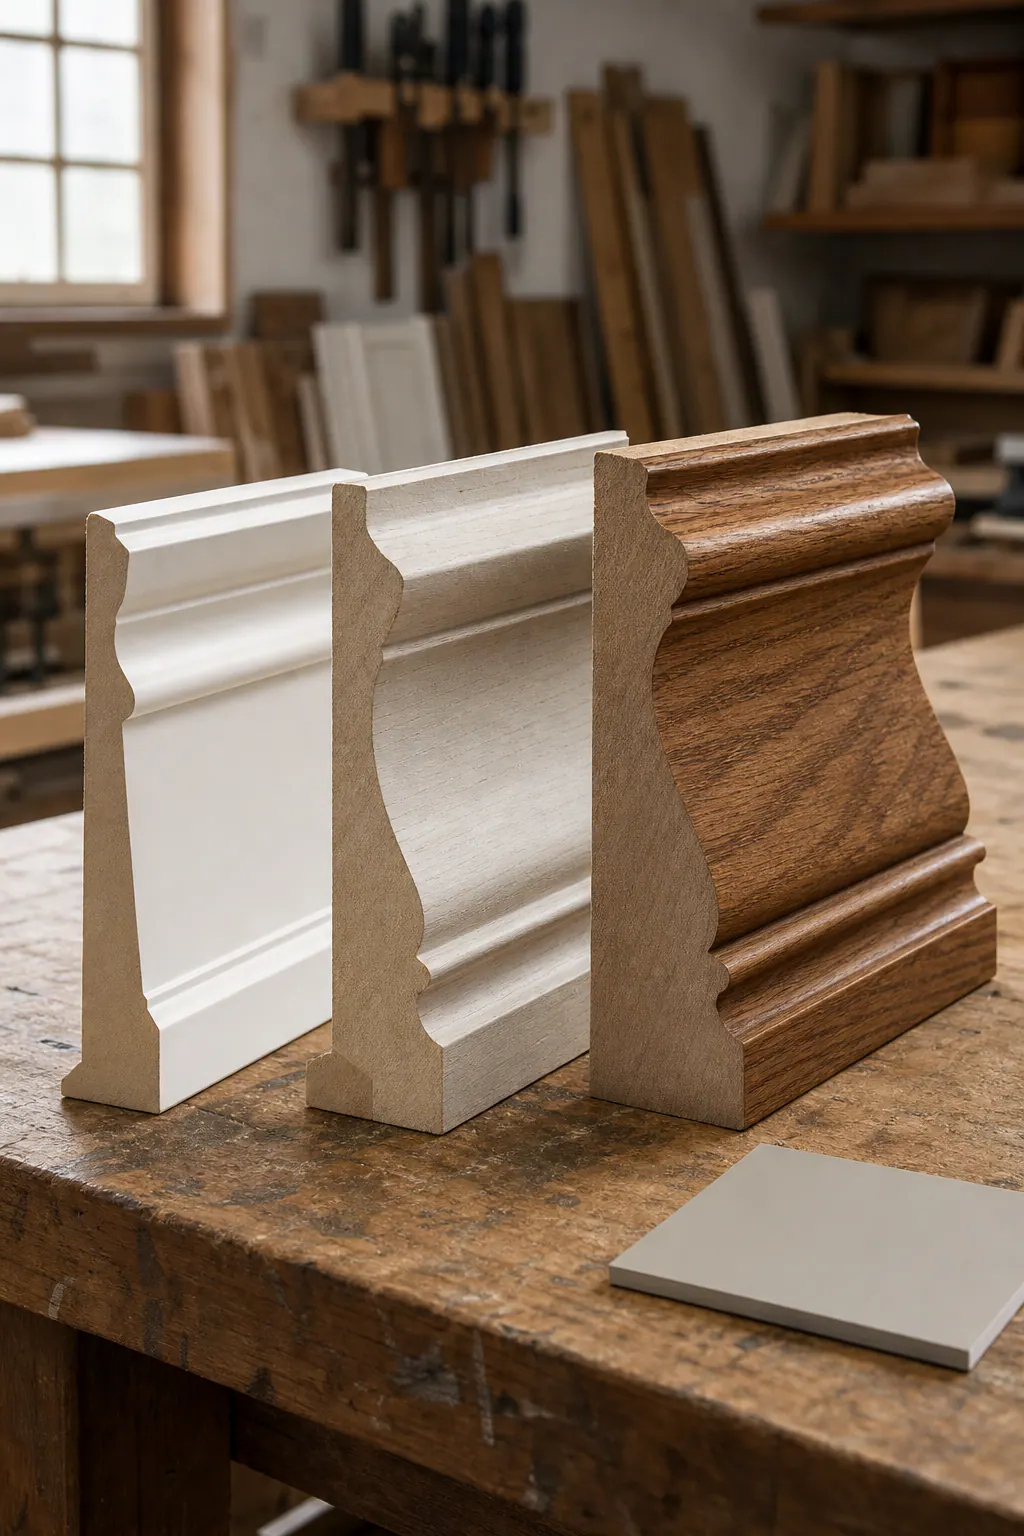
Wood crown molding is often the more natural direction when the finished surface should show grain or when the new crown needs to relate closely to existing stained doors, casing, beams, or cabinetry. Stain-grade work puts more visual attention on the wood itself: color variation, grain direction, clean joints, and the way separate lengths meet all remain visible. A painted profile can be more forgiving of minor filling at seams; a stained finish calls for a more deliberate material match and finish sample before work begins.
The finishing sequence should be part of the plan, not a last-minute decision. Some molding can be primed or painted before installation to make profile coverage easier, then receive final touch-up after fastening and joint work. Painting after installation allows filler, caulk, and patched fastener locations to be coated together for a unified result. A coordinated approach can combine both: pre-finish accessible surfaces, install the pieces, then complete seam filling, caulking where the molding meets the wall or ceiling, and final paint touch-ups.
Look at samples in the actual room before settling on a path. A crisp white painted crown may support a simple contemporary profile, while a stained wood treatment may need to echo the undertone and sheen of nearby millwork. The practical checkpoint is whether the chosen material and finish can deliver the look you expect after joints, transitions, and final detailing are complete, not just how one unfinished sample looks in isolation.
Crown Molding for Standard, Tray, and Vaulted Ceilings
Ceiling shape determines whether crown reads as a quiet finishing line or a defining architectural feature. On a standard flat ceiling, molding follows one continuous perimeter, making it the most straightforward setting for matching the profile's scale to the room. A modest single-piece profile can give a bedroom, hallway, or lower-ceiling living area a finished edge without competing with the rest of the trim.
A tray ceiling adds a second perimeter at a raised center panel, creating changing elevations rather than one uninterrupted run. Tray ceiling crown molding can be placed around the lower room perimeter, the elevated inset, or both, depending on how much definition the design needs. Keeping the profile simple on a ceiling with several steps, lighting features, or strong paint contrast can prevent the composition from feeling crowded. In a taller dining room or formal living space, a built-up treatment at the tray edge can instead emphasize the ceiling's depth and give it more architectural presence.
Vaulted ceiling crown molding calls for different planning because the ceiling slopes, peaks, or changes direction. The angle can shift from one run to the next, and a ceiling transition at a ridge, return, or adjoining flat section should look intentional rather than abruptly stopped. Profile width, projection, and the locations where runs meet all affect the final appearance. Measuring actual angles and elevation changes before crown molding installation helps determine whether a continuous treatment suits the room or whether a clean transition to another trim detail will look more balanced.
Bring the ceiling shape into the design conversation early. A profile that looks proportional on a sample against a flat wall may feel much heavier once it follows a deep tray or steep slope. Looking at the full sightline, from floor trim to wall height to ceiling planes, helps establish whether the molding should visually simplify the room or deliberately frame its architecture.
Why Professional Fitting Matters at Corners, Seams, and Uneven Walls
A crisp ceiling line depends on decisions made before the first length is fastened. The room is laid out so the most visible runs, corners, and length-to-length connections can be planned rather than left to chance. This is especially important where a long wall draws the eye or where crown meets door casing, cabinetry, beams, or another ceiling detail.
Corner treatment changes the look of the finished work. Inside corners can be handled with coping, in which one piece is shaped to follow the face of the adjoining profile, or with precisely cut miter joints, where two angled ends meet. Outside corners use paired angled cuts to wrap a projecting wall edge. The practical goal in each case is a corner that follows the profile cleanly and keeps its detail aligned, rather than one that looks like two unrelated pieces pushed together.
Existing rooms rarely present perfectly straight walls, level ceilings, and square corners. Before fitting begins, visible gaps, changes in plane, and irregular corners should shape the cutting and fastening approach. A small paint-grade gap may be suitable for careful caulking and finish preparation; a wider opening, crumbling surface, or pronounced wall-to-ceiling separation may call for patching or a separate surface-repair discussion. Caulk can soften minor transitions, but it is not a substitute for sound fitting or a cure for every uneven condition.
Where one run must continue into another, the joining seam is positioned and prepared with the final finish in mind. Secure fastening, aligned profile detail, seam treatment, and targeted touch-up work help the molding read as one continuous element after painting. For stained or natural wood, the tolerance for conspicuous seams is often less forgiving, making cut quality, grain direction, and joint placement particularly important to the overall result.
Crown Molding Repair, Recaulking, and Finish Touch-Ups
Not every imperfect ceiling line needs to be removed. Crown molding repair can be a sensible path when the profile is intact and the issue is localized: a separated seam, a small gap at the wall, cracked caulk, a loose short section, or a scuff and dent in an otherwise sound run. The aim is to restore alignment and continuity so the repaired area does not draw the eye away from the room.
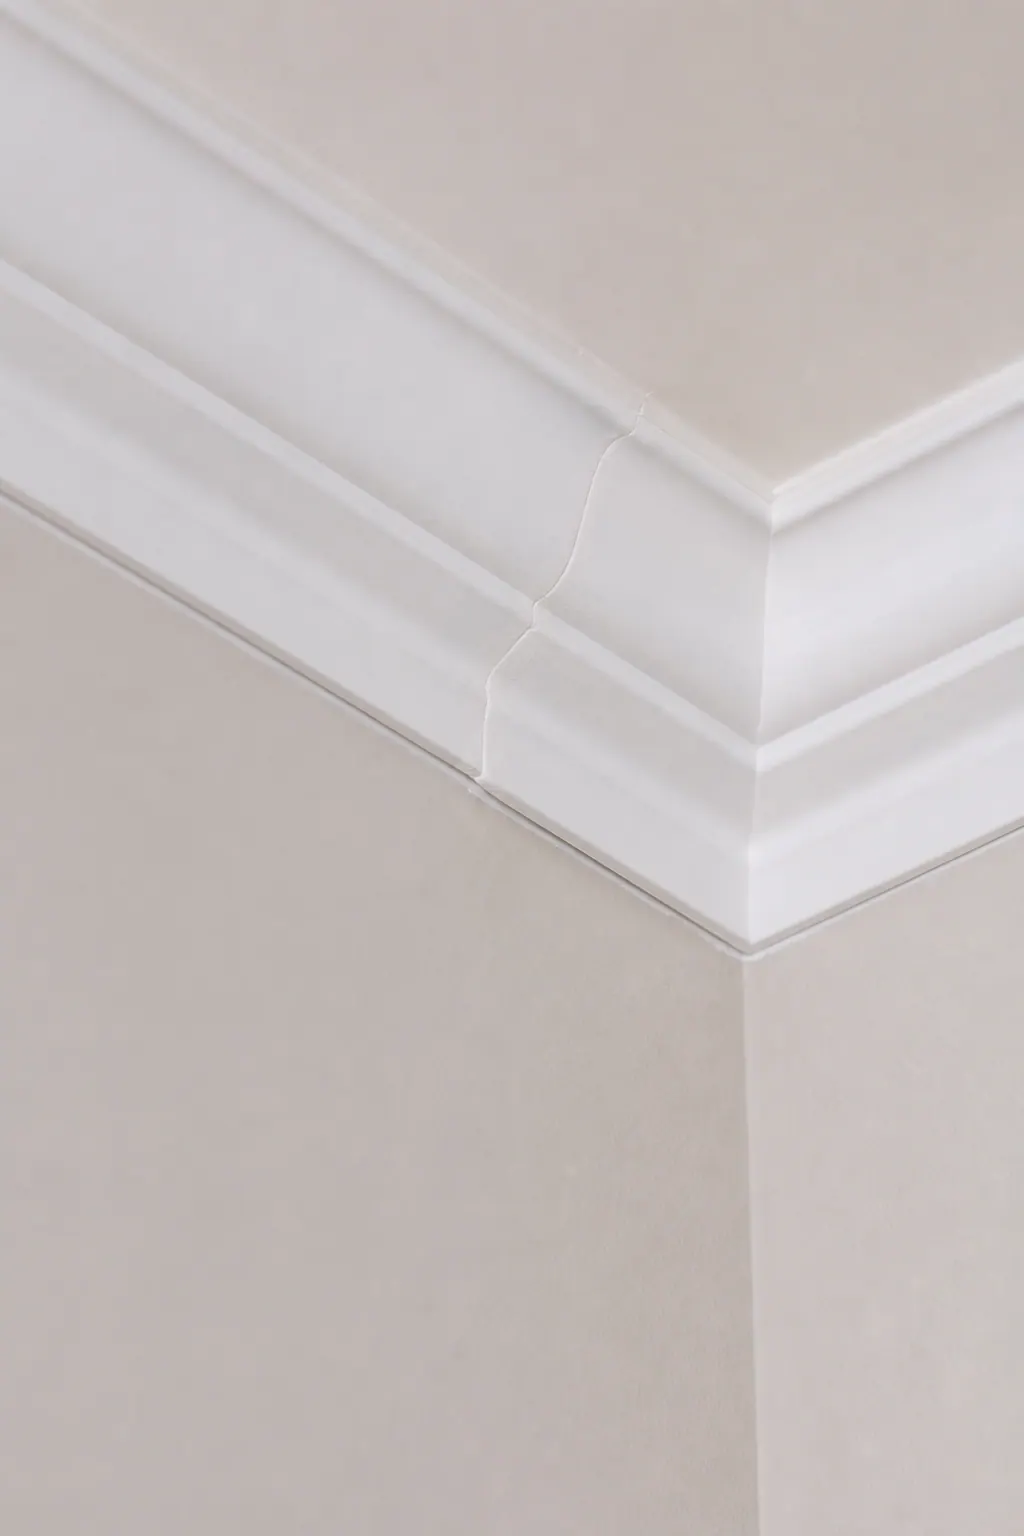
The assessment should separate a cosmetic break from a material or surface problem. Refastening a stable piece, closing a minor joint, patching shallow surface damage, and coordinated paint touch-ups can preserve existing trim. Caulking belongs at the final refinement stage, blending small transitions after the molding is secure; it should not be used to disguise a section that has shifted, a widening gap, or a damaged wall or ceiling surface.
Partial replacement can be the more practical choice when a length is badly damaged but a matching profile can still be obtained. Full replacement may make more sense when water damage has affected the molding or surrounding surface, movement keeps reopening joints, the original profile cannot be matched convincingly, or a planned style change would leave patched areas looking out of place. A careful crown molding repair plan considers the visible profile, adjoining runs, and repainting scope so the finished line reads as intentional rather than pieced together.
Plan a Crown Molding Project That Fits Your Home
A useful consultation starts with a clear picture of what you want each room to accomplish. Identify the rooms to update, note whether each ceiling is flat, tray, or vaulted, and share the ceiling height. Those details help distinguish a restrained profile that preserves an open feel from a larger decorative profile or custom build-up that gives a taller, more formal room greater presence.
- Bring photos or measurements of nearby baseboards, door casing, cabinetry, and beams when the new molding should coordinate with existing trim rather than introduce a contrasting style.
- Decide whether you prefer a painted finish, which creates a continuous color statement, or visible wood grain, which calls for a material and finish that relate to stained millwork.
- Clarify the scope: new crown molding installation, localized repair, replacement of damaged runs, or a layered multi-piece design. That distinction shapes the evaluation of existing surfaces, profile matching, and finishing work.
Profile samples and photos of rooms with similar ceiling conditions can make the choice more concrete than viewing a molding in isolation. If you are seeking a crown molding installer in Venice, FL or elsewhere in Sarasota County, request an evaluation to discuss the rooms, trim details, finish preferences, and level of visual impact that fit your specific space.
Plan the next step
Compare the broader Crown Molding Installation service.
When you are ready, request a free estimate with the rooms, trim goals, city, and available photos.
FAQs
What type of crown molding is best for my ceiling height?
Lower-ceiling rooms usually look best with a restrained single-piece or simple modern profile that adds definition without visual weight. Taller rooms can support deeper decorative crown or a multi-piece built-up treatment, especially when paired with substantial baseboards and door casing.
Can crown molding be installed on vaulted ceilings?
Yes, crown molding can be installed on vaulted ceilings, but each sloped run, peak, ridge, return, and adjoining flat section must be measured for its actual angle and elevation. Profile width, projection, and transition locations should be planned so the molding does not end abruptly or look unbalanced.
Can you add crown molding to a tray ceiling?
Yes, crown molding can be installed around the lower perimeter of a tray ceiling, the raised inset, or both. Simple profiles help prevent stepped ceilings, lighting features, and paint contrasts from looking crowded, while built-up trim can emphasize depth in taller formal rooms.
Can crown molding hide gaps between walls and ceilings?
Crown molding can cover minor irregularities at the wall-to-ceiling transition, and small paint-grade gaps can be caulked after secure installation. Caulk should not be used to conceal wide openings, shifting molding, crumbling surfaces, or pronounced separation between the wall and ceiling.
Is MDF or wood better for crown molding?
MDF is a practical paint-grade choice when the goal is a smooth, uniform painted profile, while wood is better when visible grain must match stained doors, casing, beams, or cabinetry. Stain-grade wood requires cleaner cuts, aligned grain, and less conspicuous seams because joints and material variation remain visible.