
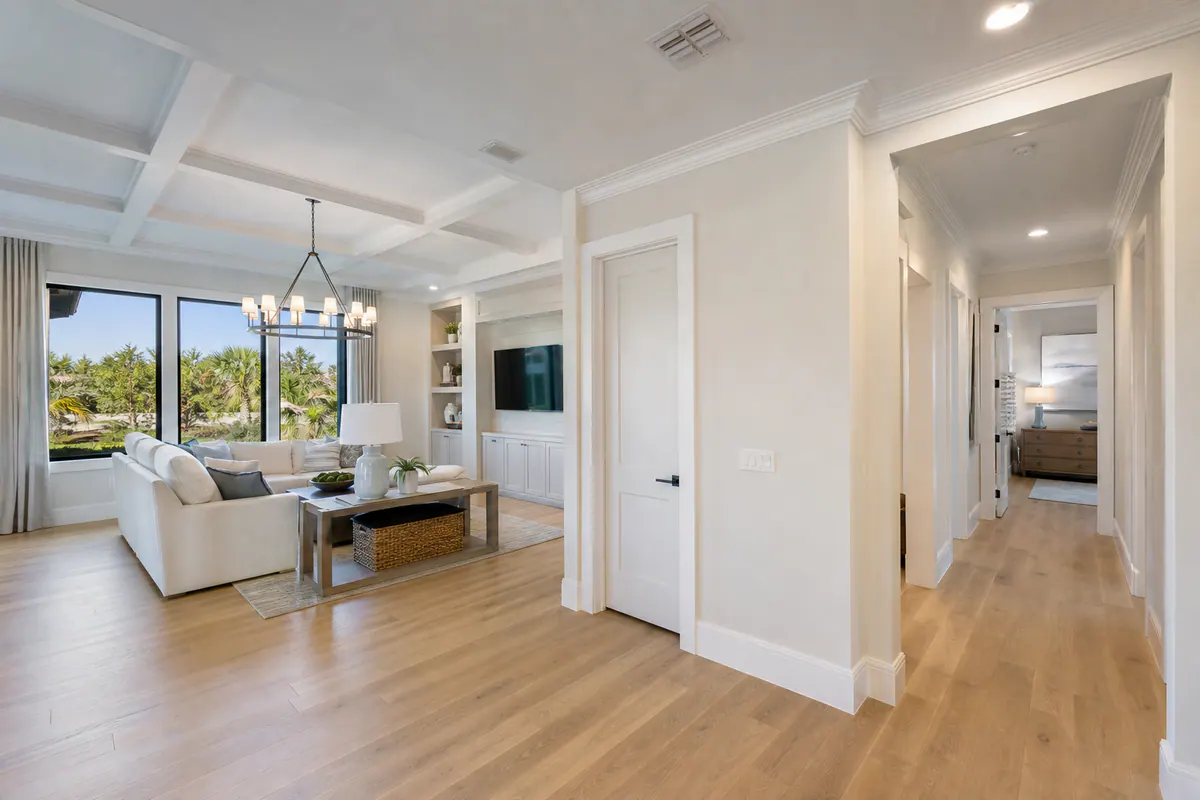
For new construction trim Palmer Ranch projects, the trim package is best planned as one connected interior finish system, not a last-minute baseboard selection. It brings together the architectural direction, interior doors, door and window casing, baseboards, ceiling transitions, and any intentional feature details so rooms feel related as you move through the home.
A clean-lined package may use flat stock, restrained casing, simple square-edge baseboards, and deliberate shadow reveals for a quieter contemporary look. A more traditional direction can use shaped profiles, wider casings, crown molding, or layered assemblies to create more visual depth. Neither approach is automatically better; the useful choice is the one that suits the ceiling height, door style, wall proportions, and the level of detail repeated throughout the plan.
Good coordination makes those choices buildable. The trim scope should identify what is included, where profiles transition, who supplies or installs doors, and when finish carpentry enters the builder's sequence. Tight visual lines, aligned casing, consistent reveals, and joints prepared for paint are stronger signals than a collection of individually attractive pieces that do not relate to one another.
Final scope, selections, timing, and responsibility boundaries are established with the homeowner, builder, designer, and applicable plans, elevations, allowances, and approved selections. That shared direction gives the project team a clear target before the pre-paint review begins.
What a Well-Planned New Build Trim Package Can Include
A room-by-room trim schedule turns design intent into installable decisions. The standard scope may cover baseboards, opening trim, and coordination for interior door installation or door trim. It should also identify the ceiling transition in each area: a simple wall-to-ceiling finish, crown molding, or a deliberate reveal that creates a narrow shadow line.

- Baseboards and casing establish the everyday visual framework. The schedule can name the profile, height or width, and the rooms where it applies, rather than leaving openings for mismatched substitutions.
- Door coordination clarifies whether the trim scope includes hanging interior doors, fitting jambs, installing casing, or working around doors provided by another trade. That distinction prevents a finished opening from falling between scopes.
- Ceiling and wall details include optional crown, recessed transitions, beams, wainscoting, paneled feature walls, and other specialty details. Crown adds a visible line at the ceiling; a reveal or shadow line creates separation with less ornament; wall paneling or beams give selected rooms a stronger focal point.
For Palmer Ranch trim packages, a useful scope matrix separates included trim from upgrades and custom allowances. For example, consistent casing and baseboards throughout may be standard, while a layered mantel wall, beam treatment in a great room, or full-height wainscoting in a dining room is listed as a distinct detail with its own location and drawing reference. Floor plans, interior elevations, reflected ceiling plans, and door schedules give the team a shared way to locate those decisions before installation begins.
Not every room needs crown, a feature wall, or a more elaborate transition. A restrained package can keep the budget focused on clean, repeatable lines, while a custom package can reserve layered details for spaces where scale and visibility justify them. The practical goal is not to add trim everywhere, but to make each included element intentional and reviewable.
Selecting Profiles That Fit the Home’s Architecture and Scale
Proportion is the useful starting point: trim should look sized for the room rather than selected from a catalog in isolation. Taller ceilings and broad great-room walls can carry a taller baseboard, wider casing, or more substantial crown without appearing heavy. In a smaller room or hallway, the same pieces may crowd the wall plane and make door openings feel busy.
A clean-lined package relies on simple geometry, such as square-edge baseboards, flat or lightly detailed casing, and crisp transitions, to keep open-plan sightlines quiet. It often suits slab-front cabinetry, streamlined interior doors, and contemporary interiors because the trim supports those planes instead of competing with them. A layered traditional package uses built-up profiles, stepped casing, or shaped crown to add shadow and formality; it works best when door style, cabinetry, and other architectural details repeat that richer language.
- Baseboard height and casing width should read as related. A generous baseboard paired with very narrow casing can look accidental, while casing that is too small around tall doors can leave the opening visually underframed.
- Crown scale should suit both ceiling height and room volume. In a tall living area, a narrow crown can disappear; in a low-ceiling bedroom, an oversized layered profile can pull the ceiling downward.
- Transitions deserve the same attention as focal rooms. Flooring changes, built-ins, and a shift from an open great room to private spaces may call for a deliberate stop, return, or reveal, not an unexplained profile change.
Strong custom home trim Palmer Ranch selections show repeated profiles where rooms connect, casing lines that align across nearby openings, and intentional reveals at ceilings or built-ins. Weak results are easier to spot: mismatched profile families, trim that feels undersized against tall walls, or added ornament with no visual connection to the doors and cabinetry.
Before ordering, compare physical profile samples against interior elevations and view them at the actual door, floor, and ceiling relationships. An approved mockup can settle questions that drawings alone cannot: whether the casing clears a cabinet edge cleanly, how a baseboard meets flooring, and whether the chosen profile still feels balanced from the main open-plan sightline. Final selections and transition details are then coordinated with the homeowner, builder, designer, and project drawings.
Choosing MDF, Wood, and Moisture-Resistant Trim Materials
Material choice affects how the selected profile reads after paint or stain, how it handles everyday contact, and where it makes sense to use it. MDF trim is often considered for painted interior baseboards, casing, and crown because it can present a smooth, uniform face for a clean painted finish and is available in many repeatable profiles. Its tradeoff is that the planned location matters: edges, impact-prone areas, and any setting with expected moisture exposure deserve a material discussion rather than a default selection.
Wood trim is a natural fit when the design calls for a visible grain, a stain-grade finish, or a custom detail that benefits from milling and selective matching. It can also be used within a painted package when the approved detail, profile availability, or installation condition calls for it. The visual checkpoint is simple: stain-grade pieces should have a deliberate grain and color expectation, while paint-grade pieces should be selected and prepared for a consistent opaque finish, not treated as interchangeable after installation.
- Moisture-resistant materials may be appropriate near baths, laundry areas, exterior-adjacent openings, or other project-specific locations where exposure conditions warrant a more resilient approach. They should be evaluated alongside the room's finish plan and installation details.
- Dent resistance and joint movement affect the long-term appearance of baseboards and casing. A good sample review includes finished corners, end cuts, seams, and the surfaces most likely to be bumped during normal use.
Before release, the homeowner, builder, designer, and trim team should align the approved material schedule with each room's paint or stain expectation, profile, location, and finish standard. Primed or painted samples are especially useful for judging crispness and surface consistency under the home's actual lighting.
Coordinating Finish Carpentry With the Builder and Project Team
Installation goes more smoothly when trim is treated as a scheduled handoff rather than the next trade called to site. The builder or project manager can align finish carpentry with the master sequence, while the trim team works from the approved room-by-room scope and current selection schedules.
A pre-installation readiness review should look at the conditions that determine fit: framing and drywall should be ready for finish work; floor levels and the chosen flooring installation sequence should establish where baseboard lands; and door, jamb, and hardware schedules should define opening sizes, swings, and clearances. Installing casing before those decisions are settled can create avoidable conflicts at hinges, flooring gaps, or uneven reveals.
Cabinetry, built-ins, HVAC grilles, soffits, and ceiling details need the same attention. A cabinet end panel may need to meet casing cleanly, while a built-in may call for a deliberate return or reveal instead of a baseboard that stops without explanation. Ceiling registers, beams, and crown or shadow-line details also affect where pieces begin, end, and align. A trim carpenter for new construction in Palmer Ranch can flag these visible interfaces early, giving the project team time to choose the intended transition.
- Use approved door, hardware, cabinetry, flooring, and paint schedules so the installation reflects current selections rather than assumptions.
- Plan access for cutting, staging, installation, and follow-on paint work, with protection and sequencing suited to the active site conditions.
- Record scope changes, approvals, and punch-list ownership through the builder's established communication chain.
Finish carpentry coordination supports a cleaner construction process, but it does not replace builder oversight, trade coordination, code inspections, or formal project approvals. Final timing, responsibilities, and release decisions remain with the homeowner, builder, designer, and applicable project documents.
Finish Expectations and the Pre-Paint Trim Walkthrough
Before primer and final paint reduce the opportunity to see small defects, the project team can review the installed trim in the same light and sightlines the homeowner will experience every day. This is where a clean profile either carries smoothly through a room or reveals a break in alignment, an uneven reveal, or a transition that needs attention.

A pre-paint trim walkthrough in Palmer Ranch is most useful when it is dated, organized room by room, and supported with marked photos. The goal is to create a clear trim punch list while joints, fasteners, edges, and adjoining surfaces remain accessible for correction.
- Look along baseboards, casing, and crown for consistent profile alignment and visual lines that read plumb and level. Nearby door openings should carry matching casing reveals, the intentional, even strip of jamb left visible inside the casing.
- Review miter joints at outside corners for tight, aligned faces. At inside corners, coping, the shaped fitting of one trim end over the face of the other, should read as a close, continuous connection rather than a distracting open line.
- Note seams, nail holes, and sanding preparation. Filled fastener holes and smooth, feathered seams help the paint finish read as one uninterrupted surface; proud filler, rough sanding, or visible separation needs attention before paint.
- Examine caulk lines where trim meets walls or ceilings, along with baseboard stops, cabinet returns, and other transitions. The desired result is a controlled, consistent line, not excess caulk used to obscure an irregular gap.
- Open and close interior doors to identify clearance concerns, casing interference, or inconsistent spacing at the finished opening.
Photos should identify the room, location, issue, responsible handoff, and completion status so resolved items can be rechecked. This is a finish-quality review for the trim scope, not a substitute for code inspections, the builder's quality-control process, paint-contractor preparation, or final project acceptance. Final responsibilities and release decisions remain defined by the homeowner, builder, designer, and project documents.
Plan the Trim Package Before Installation Begins
Selections made before trim release give the later room-by-room review a clear standard to measure against. Bring floor plans and interior elevations, a door schedule showing opening sizes and swings, finish inspiration, and a named builder contact for scheduling decisions. Together, these items show where casing meets jambs, where baseboards meet finished flooring, and how trim approaches cabinets, soffits, HVAC grilles, and ceiling details.
- Define the included elements by room: baseboard height and profile, door and window casing, crown or another ceiling transition, feature details, plus exclusions and allowances. A primary bedroom may call for a ceiling detail while adjacent secondary bedrooms use the same baseboard and casing without it.
- Approve a physical profile and material sample beside its intended finish. Square-edge painted casing creates a quiet, crisp outline around an opening; layered stain-grade casing adds shadow lines, making grain direction, color variation, and joined corners more visible.
- Resolve interfaces at doors, built-ins, flooring, and wall finishes. Identify where a baseboard stops at cabinetry, whether a casing return is needed at an adjacent wall, and which trade completes each transition.
- Set the builder handoff sequence, then reserve a dated pre-paint review with room names, marked photos, responsible parties, and correction status.
This planning path gives a custom home trim Palmer Ranch package consistent visual logic from the entry through bedrooms instead of isolated selections. A conversation around plans, elevations, finish goals, and builder coordination can turn the intended look into a clear trim scope. Final selections, timing, and responsibilities remain defined by the homeowner, builder, designer, and project documents.
Plan the next step
Compare the broader New Construction Trim Packages service.
Review the Palmer Ranch, FL service area for local planning context.
When you are ready, request a free estimate with the rooms, trim goals, city, and available photos.
FAQs
What is included in a new construction trim package in Palmer Ranch?
A typical trim package includes baseboards, door and window casing, and ceiling transitions such as a simple wall-to-ceiling finish, crown molding, or a shadow reveal. It can also include interior door coordination, beams, wainscoting, paneled walls, and other room-specific feature details.
How do I choose baseboard and door casing profiles for a custom home?
Choose profiles that match the home’s architecture, ceiling height, door style, cabinetry, and wall proportions. Taller rooms can support taller baseboards and wider casing, while smaller rooms usually look better with simpler, lighter-scale profiles.
When should finish carpentry be scheduled in a new build?
Schedule finish carpentry after framing and drywall are ready, floor levels and flooring sequence are established, and door, jamb, and hardware schedules are confirmed. Cabinetry, built-ins, HVAC grilles, soffits, and ceiling details should also be coordinated before trim installation begins.
What should be checked during a pre-paint trim walkthrough?
Review baseboards, casing, and crown for straight visual lines, consistent reveals, tight miter joints, close coped inside corners, smooth seams, filled nail holes, and controlled caulk lines. Open and close interior doors to check for casing interference, clearance issues, and inconsistent spacing around finished openings.
Is MDF or wood better for interior trim in a Florida new construction home?
MDF is commonly used for painted baseboards, casing, and crown because it provides a smooth, uniform surface and repeatable profiles. Wood is better for stain-grade finishes, visible grain, and custom-milled details, while moisture-resistant materials may be appropriate near baths, laundry areas, and exterior-adjacent openings.