

Remodel Trim Packages That Make an Osprey Renovation Feel Complete
For an Osprey renovation to feel finished rather than assembled room by room, trim should be planned as one visual system. A remodel trim package can bring together new or replacement baseboards, door and window casing, crown molding, selected wall details, flooring transitions, caulking, and paint so the updated areas relate naturally to rooms and features that remain.
Each piece has a different job. Baseboards close the wall-to-floor edge; casing frames door and window openings; crown creates a deliberate wall-to-ceiling finish; and wall trim can give a large or plain surface more structure. The value is in the coordination: compatible profile lines, a shared paint approach, and intentional transitions where new flooring, cabinetry, or wall layouts meet existing parts of the home. A simple, consistent package often reads better than adding elaborate molding to only one remodeled room.
Remodel trim in Osprey, FL may mean matching visible retained trim near an addition or renovated bath, or establishing a new look throughout the spaces being changed. Either direction benefits from finish details that are easy to see: casing legs that align beneath the head casing, tightly fitted corners, trim scribed neatly to uneven walls, clean transitions at flooring, narrow controlled caulk lines, filled fastener holes, smooth sanding, and surfaces ready for an even coat of paint. Those details turn separate upgrades into a connected renovation finish.
Decide Whether to Match Existing Trim or Create a New Standard
The most important choice is not whether every piece must be new; it is where differences will be visible. Profile matching means copying the face shape, width, thickness, and visual weight of trim that stays in place. It is often the better route when a remodeled room opens directly into a retained hallway, or when one door opening, window wall, or stair landing makes old and new casing visible at the same time.
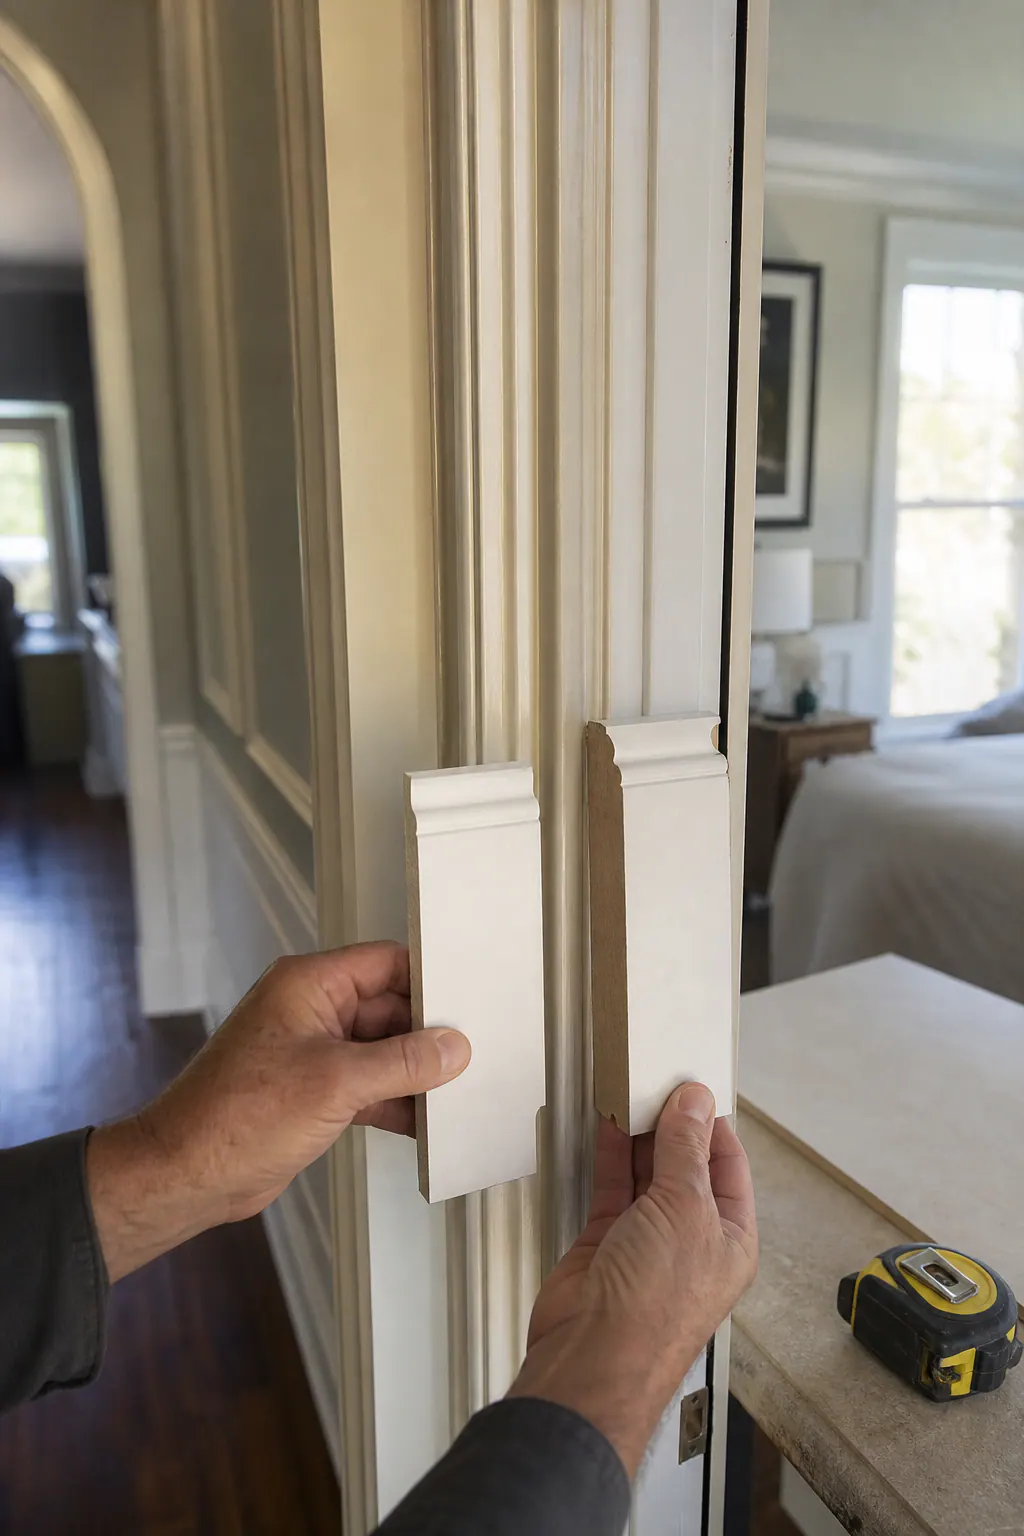
A selective approach can retain sound trim, replace only damaged sections, and add matching pieces where the renovation interrupts an existing run. For trim replacement in Osprey, FL, useful starting information includes straight-on photos of the existing trim, measurements of its overall width and thickness, close-ups of its stepped or curved edges, and a short sample where removal is practical. Paint color can unify nearby pieces, but it cannot hide a noticeably narrower baseboard or a different casing shape at an open transition.
Creating a new standard is often stronger when several rooms are changing at once, especially with new doors, revised wall layouts, or new flooring throughout. In that situation, one consistent baseboard height and casing profile can make the renovated areas read as a deliberate whole. Door casing replacement in Osprey, FL may be part of that reset, rather than an isolated repair.
- Match and retain when adjacent original trim remains prominent and is in good enough condition to keep. The goal is a quiet transition, not a perfect copy in rooms that never visually connect.
- Replace selectively when a piece is cracked, incomplete, heavily altered, or no longer works with the remodeled opening, while the surrounding profile still deserves preservation.
- Standardize renovated areas when the scope crosses multiple connected rooms. This trades exact historic matching for repeated lines, proportions, and finish details across the new work.
Before choosing, walk the sightlines: open doorways, wide cased openings, hall-to-room flooring changes, and walls that continue from old space to new. Those are the places mixed profiles announce themselves. Full replacement is only warranted when it supports the renovation's visual plan; otherwise, careful profile matching and intentional stopping points can preserve character while keeping the scope focused.
Plan Baseboards, Door Casing, Window Casing, and Flooring as One Scope
Flooring decisions set the starting line for baseboard installation Osprey FL homeowners are planning. The finished floor height, not the subfloor height, determines where baseboards land, how much wall edge they cover, and whether a doorway needs a transition strip. Floating floors need perimeter expansion space; baseboard can conceal that gap without being fastened through the flooring. Shoe molding or quarter round is a smaller piece installed at the baseboard's bottom edge. It can cover an irregular flooring gap, but it changes the profile's visual weight, so it should be an intentional detail rather than a last-minute patch.
Map flooring changes before trim is cut. A taller tile floor beside lower engineered wood, for example, may need a threshold or reducer that ends cleanly at the door opening. Baseboards should stop or return in a way that makes that transition look planned. Along uneven walls, a scribed fit follows the wall's contour rather than leaving a wide caulk line. At inside corners, coped joints, where one baseboard profile is cut to fit over the face of the other, usually keep the profile line tighter than a simple miter. Outside corners use miter joints and should meet crisply without a visible open point.
Door casing and window casing deserve the same early decisions. Their width and profile affect how substantial an opening feels: narrow, simple casing suits a restrained room, while wider or layered casing gives doors and windows more presence. New doors, altered jambs, drywall patches, and replacement windows can all change the available wall surface or reveal, the even margin between the jamb and casing. A strong result has matching reveal lines, casing legs that sit squarely beneath the head casing, and trim that is scribed where repaired walls are not flat. Planning this trim work for remodels in Osprey alongside wall repair and paint avoids trying to disguise misaligned openings with caulk or touch-up paint.
Use Crown Molding and Wall Trim Where They Fit the Room
Decorative trim earns its place when it gives a room a clearer sense of proportion. Crown molding frames the ceiling line; a slim, simple profile can make a modest room feel more composed without competing with doors or cabinetry. A wider or built-up crown has more shadow and formality, so it tends to suit taller ceilings and rooms with enough visual space for the detail to read. Installing an elaborate profile in a low-ceiling room can make the ceiling feel closer, while omitting crown can be the stronger choice in a clean, contemporary remodel.
Wall trim should have an equally specific purpose. Wainscoting protects and defines the lower wall area, while a chair rail creates a horizontal break that can organize paint colors or align with nearby features. Panel molding adds framed rectangles or squares for a more architectural treatment. The layout matters as much as the molding itself: panels should have balanced spacing, align thoughtfully with windows, doors, switches, and furniture walls, and stop at logical room boundaries. A design elevation, reference photo, or taped sample layout helps settle panel size and rail height before material is cut.
Walls and ceilings rarely provide perfectly straight reference lines, especially after repairs or layout changes. Careful installation may involve adjusting a panel layout so narrow end panels do not stand out, scribing pieces to follow an uneven surface, and fitting crown joints tightly rather than using caulk to hide large gaps. Controlled caulk lines, filled fastener holes, smooth sanding, and paint-ready surfaces let the detail look intentional. The goal is not to add crown molding or wall trim everywhere, but to use it where it reinforces the remodel's scale, style, and existing trim language.
Select Profiles, Materials, and Finish Levels for the Remodel
A material sample can settle choices that a catalog image cannot. Paint-grade MDF trim gives a smooth, uniform face that suits painted baseboards, casing, and simple wall details; its consistent surface can make long runs look clean. Wood trim brings grain, natural variation, and the option of a stained finish, which can be important when new work must connect visually to retained wood doors, cabinetry, or existing casing. Neither is automatically the better choice: consider the room's moisture exposure, the likelihood of bumps or dents, the need to repair future damage, and whether the new pieces must blend with trim that remains.
Profile construction changes both the look and the amount of fitting involved. A one-piece, simple profile has fewer seams and creates a quieter edge around openings and floors. A built-up profile combines separate boards or moldings to create more width, shadow, and detail; it can give a formal room more presence, but its individual joints need to read as deliberate and remain visually consistent across corners and transitions. For remodel finish carpentry Osprey homeowners can review short sample sections against the actual wall color, flooring, doors, and ceiling height before committing to every room.
Finish level should be chosen before material is ordered. Paint-grade work is intended to be filled, sanded, caulked where appropriate, primed, and painted so fastener holes and small joint variations disappear into a continuous surface. Stain-grade wood trim puts more visual attention on grain direction, color variation, face quality, and the precision of joints because stain does not conceal those details in the same way. A painted MDF trim package may make sense for a newly standardized interior, while wood trim may be the stronger visual connection where stained elements stay in view. Approving a profile-and-finish sample also clarifies sheen, color, and the level of surface refinement expected at handoff.
Coordinate Final Fitting, Prep, Caulking, and Paint
The last stage is where separate pieces begin to read as one finish. Trim fitting should follow the conditions that set its edges: drywall repairs need to be complete, finished flooring establishes the baseboard line, cabinetry fixes nearby returns, and doors and jambs establish casing placement. A written remodel trim installation Osprey scope can assign responsibility for each transition, including who handles final touch-ups after adjacent work is complete.

Before paint, fastener holes should be filled, seams and miter joints should be fitted cleanly, and faces should be sanded until they feel continuous rather than patched. Caulk belongs at small paintable gaps between trim and wall where it creates a controlled shadow line; it should not become a heavy bead used to disguise poor fit. Primer and finish coats then unify baseboards, casing, crown, and wall trim into a coordinated painted system. Retained stained wood or stain-grade elements may need to remain distinct, with their grain, color, and joint quality left visible instead of covered by trim painting.
At the walkthrough, look along the trim rather than only at it straight on. Strong finish signals include even reveals around doors and windows, aligned casing legs and head casing, tight corner joints, smooth paint without visible filled holes, and crisp caulk lines without smears. Baseboards should meet flooring transitions intentionally, while crown and wall details should follow the room's lines without conspicuous gaps or abrupt changes in sheen.
A Practical Process for Planning Remodel Trim in Osprey
A short room-by-room intake prevents trim choices from becoming a string of last-minute add-ons. List each space being remodeled, the baseboards, casing, doors, windows, or wall details that remain, and the elements being replaced. Then choose the visual direction: carry a retained profile into connected rooms, or establish one new standard across the renovation.
- Select profile, material, and paint or stain expectations together, so the finish supports the intended look rather than forcing a compromise later.
- Mark finished flooring, door locations, cabinetry edges, and transitions on the scope before trim is cut or installed.
- Specify which pieces are included, baseboards, door and window casing, crown, wall trim, touch-up preparation, and painting, and identify any retained elements.
- Before closeout, review the rooms in good light for consistent alignment, intentional transitions, smooth prepared surfaces, and a uniform final sheen.
That written plan gives the remodel team a shared reference and gives homeowners fewer piecemeal decisions to revisit. For coordinated remodel trim Osprey FL projects, an on-site discussion can help organize trim replacement, new installation, finish carpentry, and paint planning into one clear scope.
Plan the next step
Compare the broader Remodel Trim Packages service.
Review the Osprey, FL service area for local planning context.
When you are ready, request a free estimate with the rooms, trim goals, city, and available photos.
FAQs
What is included in a remodel trim package in Osprey, FL?
A remodel trim package can include baseboards, door and window casing, crown molding, selected wall details, flooring transitions, caulking, surface preparation, and paint. The package coordinates profiles, paint or stain finishes, and transitions so remodeled spaces connect visually with retained areas.
Can new baseboards be matched to existing door and window casing?
Yes. Accurate matching requires comparing the existing trim’s face shape, overall width, thickness, and stepped or curved edge details, ideally with photos, measurements, and a physical sample. Paint color can unify trim, but it will not hide differences such as a narrower baseboard or different casing profile at an open doorway.
Should baseboards be installed before or after new flooring during a remodel?
Baseboards should be planned around the finished floor height, because the finished surface determines where they land and what gaps they need to cover. Floating floors require perimeter expansion space, which baseboard can conceal without being fastened through the flooring.
How do you install trim neatly on uneven walls and at flooring transitions?
Trim should be scribed to follow uneven wall contours instead of relying on a wide caulk line. Use coped joints for tighter inside baseboard corners, crisp miter joints on outside corners, and planned threshold or reducer details where tile and wood flooring meet.
How do you choose between MDF and wood trim for an interior remodel?
Choose paint-grade MDF for a smooth, uniform painted finish on baseboards, casing, and simple wall details. Choose wood trim when grain, stain, retained wood doors, cabinetry, or existing stained casing must remain visually connected; stain-grade work also requires more precise joints because stain does not conceal flaws.