
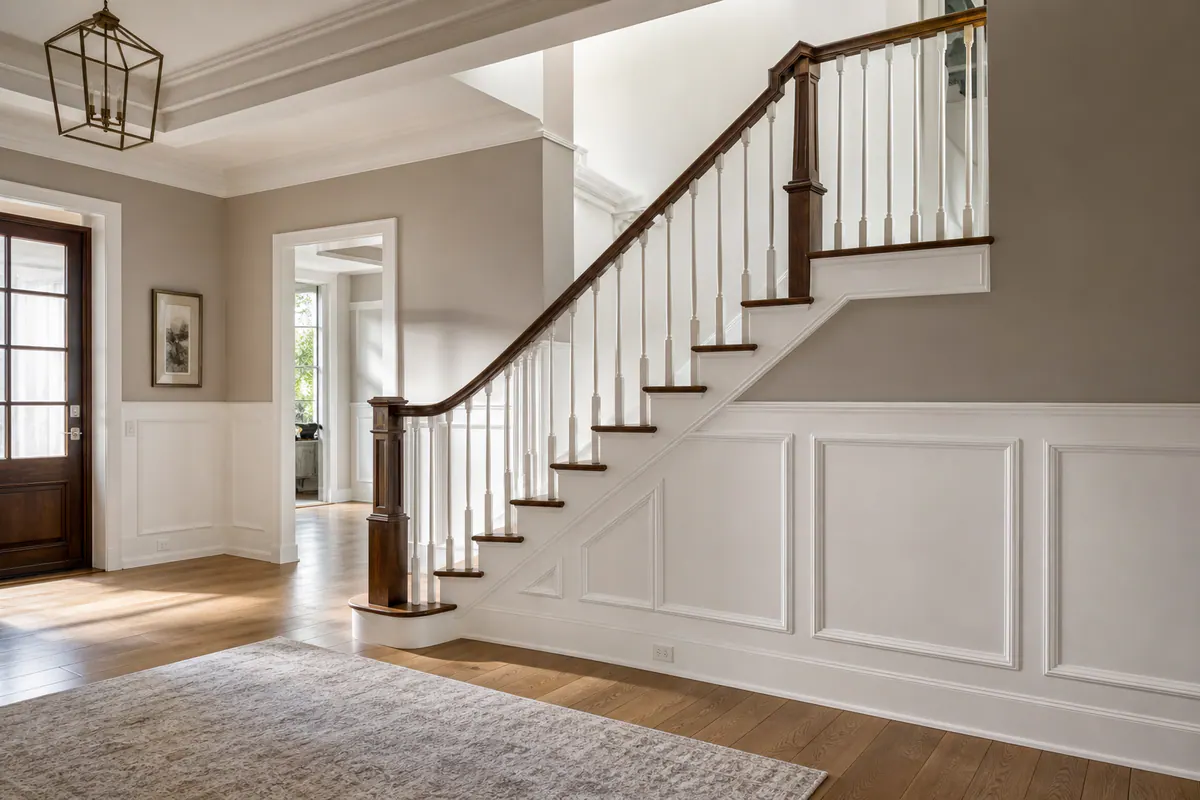
Stair Trim That Makes a Palmer Ranch Entry Feel Finished
A thoughtfully trimmed staircase gives the entry something a coat of paint alone cannot: a sense that the architecture was finished on purpose. A plain foyer stair run, open landing, or two-story hall can become a composed transition between rooms when its wall treatment relates to the baseboards, door casings, interior doors, and paint palette already in view.
For Palmer Ranch homes with open-plan entries and transitional interiors, stair trim is most successful when it is treated as custom finish carpentry rather than decorative wall coverage. The goal is not to fill empty drywall with a repeated pattern. It is to establish an appropriate visual edge along the stair, give the wall measured rhythm, and make the landing feel connected to the surrounding spaces.
A skirt board is the clean trim line that follows the stair's tread-and-riser profile, creating a tailored boundary where the stairs meet the wall. Staircase wainscoting and decorative paneling build outward from that boundary: they can add quiet structure to a broad wall or a more formal focal point in a visible entry. The right treatment should echo nearby millwork without copying every profile or crowding a narrow run.
With stair trim in Palmer Ranch, proportion and transitions matter as much as the individual pieces. Panels should feel deliberate as the wall slopes upward, trim should resolve neatly at a landing, and the new work should meet existing baseboards and handrail areas with a planned visual break. Those details are what make an upgrade read as integrated rather than applied afterward.
What Stair Skirt Boards, Panel Molding, and Wainscoting Each Do
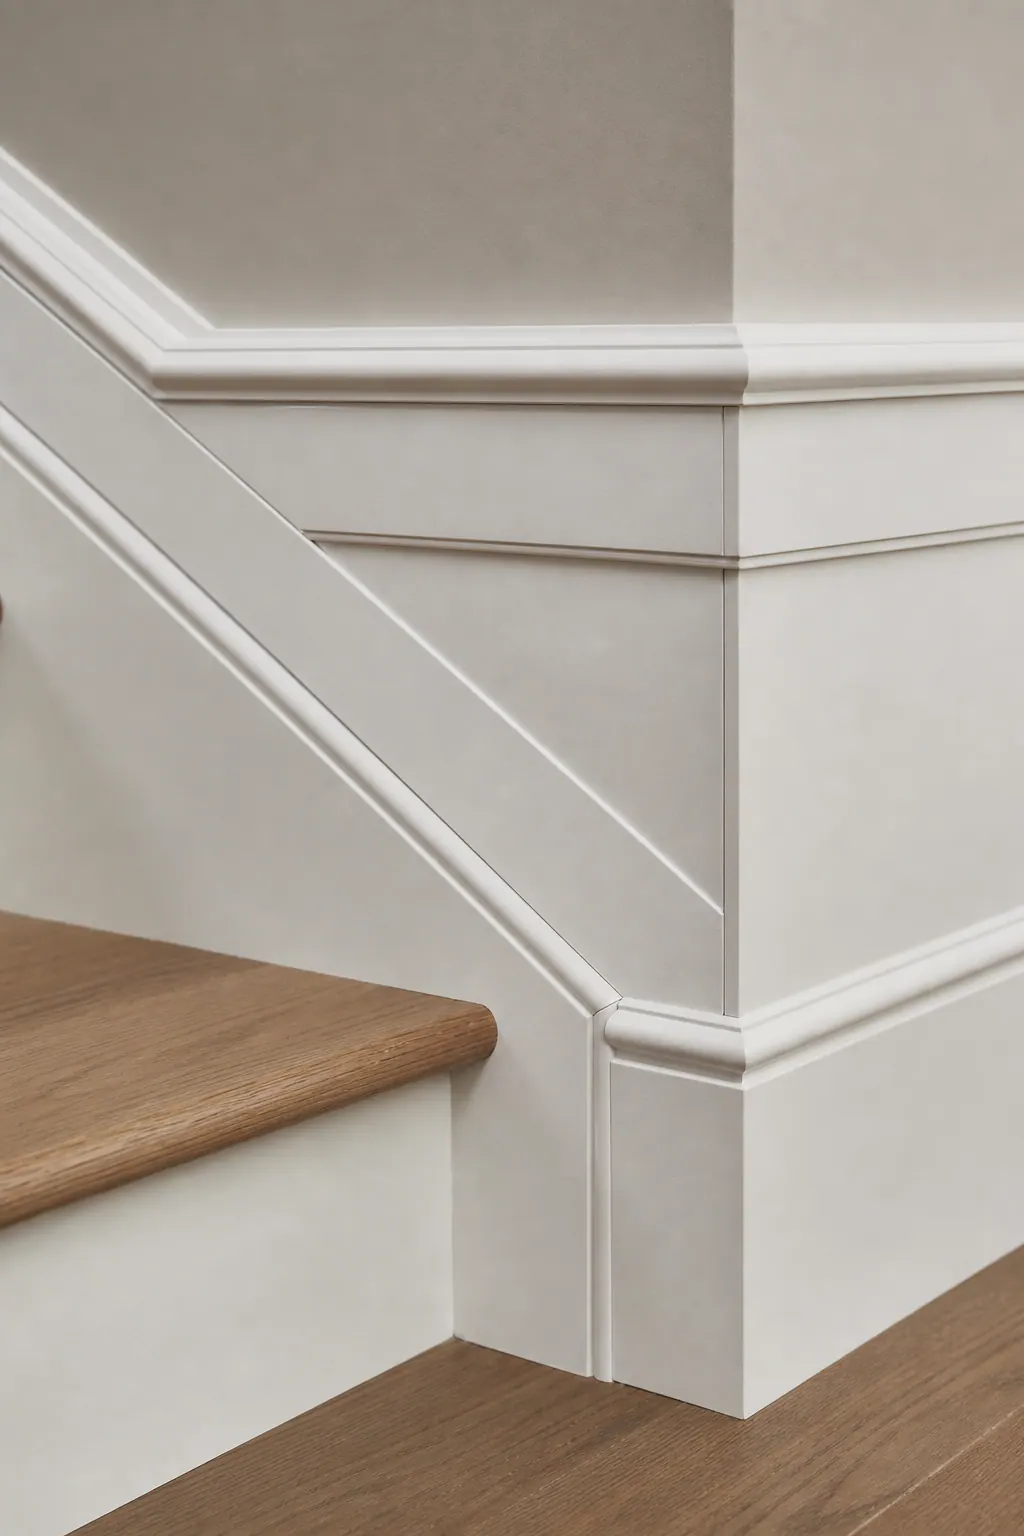
Think of the trim package as a set of connected edges rather than a single decorative addition. The skirt board carries the stair profile, while a baseboard return brings the wall's horizontal base trim cleanly into that profile at the first tread, landing, or adjacent floor. A strong return looks intentional from the entry; an abrupt stop or mismatched thickness can make otherwise polished work feel pieced together.
Panel molding supplies the decorative layer. It creates framed rectangles or squares on the wall, adding rhythm without the depth of traditional raised-panel construction. On a stair wall, staircase panel molding is usually paint-grade and carefully sized so the frames read evenly from below, even as the wall line rises. It works well when the wall has enough uninterrupted area; tightly packed frames on a narrow run can feel busy rather than tailored.
A wall cap, sometimes called a chair rail or top rail, finishes the upper edge of the treatment. It gives the lower wall a clear stopping point and can align with nearby casing details or continue across a landing. Staircase wainscoting in Palmer Ranch is more than a collection of boxes: it is the coordinated relationship among skirt board, base trim, panels, cap, paint finish, and transitions into the landing and adjoining rooms.
The stair structure sets the available canvas. Handrails need a visually clean field behind them, while newel posts and balusters create natural points for a treatment to begin, end, or change direction. Landings often allow level panels and a conventional baseboard transition; the sloped wall beside the run requires trim that follows the stair geometry. The visible stringer, if present, may call for a simpler skirt-board-only approach so competing lines do not crowd the stair.
For stair skirt boards in Palmer Ranch, a useful close-up test is whether the board is tightly scribed along each tread-and-riser step and whether the adjacent baseboard, cap, and panel rails meet it with controlled reveals. Those small intersections determine whether the finished staircase reads as one composed installation.
Choosing the Right Staircase Wainscoting Style
The best style is usually the one that matches the home's existing visual language instead of asking the staircase to carry every decorative detail on its own. Door casing width, baseboard height, interior door profiles, and the amount of open wall around the stair all help determine how much trim the space can comfortably support.
- Skirt-board-only treatment: This is the most restrained choice: a carefully fitted stair edge with clean returns into the baseboard and landing trim. It gives contemporary and transitional interiors a crisp, tailored outline without adding visual weight to a narrow stair hall. It is also a strong fit where nearby walls are plain or where a prominent handrail, open balustrade, or visible stringer already creates enough detail. Adding large panels around it can feel disconnected if the rest of the entry uses simple casing and flat trim.
- Picture-frame molding: Framed wall panels bring a measured, painted finish that suits transitional homes and more formal interiors. The rectangles should echo the scale of nearby doors and casing rather than become a grid of small boxes. Decorative stair paneling in Palmer Ranch often works best when the frames remain broad and calm on a long wall; tightly spaced molding on a short or sloped run can look busy.
- Board and batten: Vertical battens create a more architectural rhythm, making a tall foyer wall feel grounded and giving a simpler trim package added presence. This style tends to read less formal than raised panels, but it needs deliberate spacing and a cap profile compatible with adjacent baseboards and door trim. In a broad entry, wider bays can feel composed; in a confined stairwell, overly heavy battens can make the wall seem crowded.
- Raised-panel wainscoting: Recessed field panels framed by more substantial rails and stiles create the most traditional, formal result. It pairs naturally with detailed casing, substantial baseboards, and classic interior doors. In a large foyer or prominent landing, that depth can look appropriately established. Against thin, contemporary trim or throughout an otherwise casual open-plan home, however, raised panels may appear overbuilt rather than integrated.
For custom stair trim in Palmer Ranch, the useful comparison is not simply simple versus ornate. A successful selection carries its proportions from the first tread through the landing: panel widths stay visually balanced as the wall rises, cap details do not compete with handrail lines, and the treatment ends at a logical architectural break rather than stopping abruptly mid-wall.
Why Staircase Layout Is Different From Flat-Wall Wainscoting
A stair wall changes the geometry of every decorative decision. On a flat wall, panel bays can repeat at one height and one width; along a stair run, the lower boundary climbs step by step while the landing wall remains level. Staircase wainscoting in Palmer Ranch looks composed when those two conditions are drawn as one elevation rather than treated as separate pieces of trim.
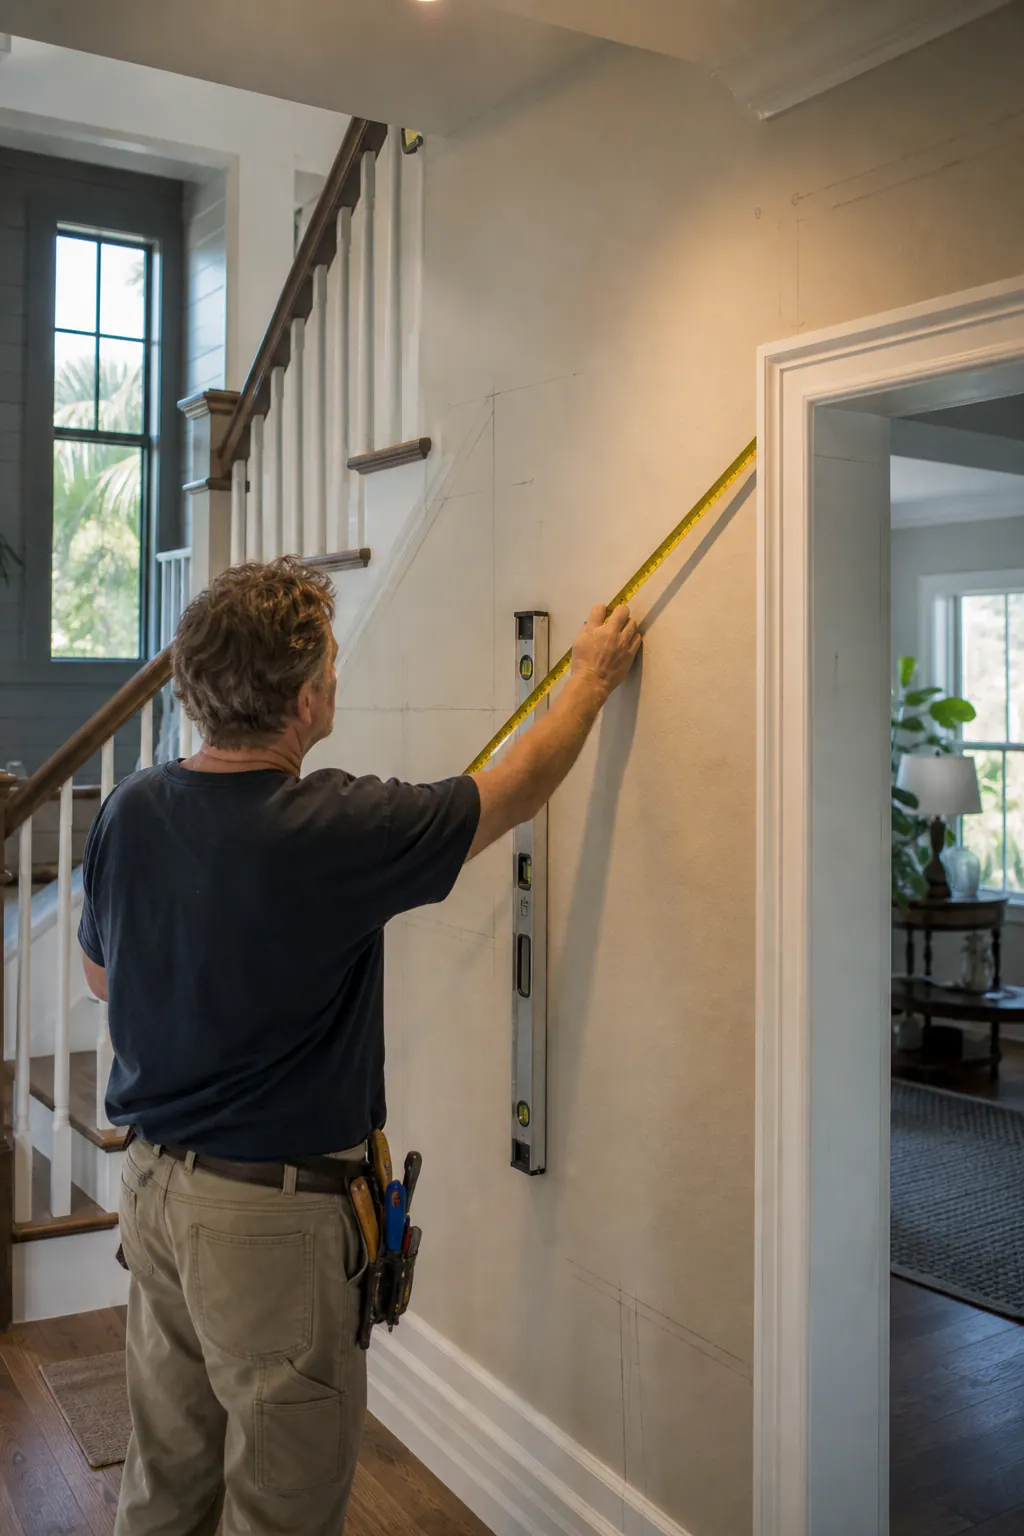
The first layout choice is the cap line. A pitched cap follows the stair angle and can make the treatment feel continuous along a long run, especially when the panel frames are kept simple. A level cap creates a horizontal visual anchor, but it only works where there is enough wall height below it to avoid pinched, wedge-shaped panels. A third approach lets the cap follow the stair pitch, then changes direction at the landing to become level. That turn should occur at a clear architectural point, not wherever the installer happens to reach the corner, so the landing reads as an intentional pause in the composition.
Panel rhythm matters more than identical tape-measure dimensions. On a sloped wall, the visible panel openings may need to vary slightly so they appear balanced from the foyer and from the bottom of the stairs. Narrow slivers at the first tread, a half-panel stranded at a landing, or a frame squeezed against door casing are signs that the layout was forced onto the wall. A stronger plan establishes its starting point at a baseboard return, skirt-board intersection, corner, or door opening, then reserves enough space for a deliberate final bay.
Before installation, scaled marks or a simple taped mockup make the important sightlines visible. They show whether the rising frames feel even from the entry, whether the cap crowds a handrail line, and how the treatment meets level landing walls. They also let the trim plan resolve practical intersections: panel rails can terminate with a controlled reveal at casing, baseboards can return cleanly into the stair edge, and adjacent-room molding can stop or continue without an abrupt change in height. That advance layout is what gives staircase trim its tailored, built-in character rather than the appearance of a flat-wall pattern applied on an angle.
Material and Finish Choices for a Painted Stair Trim Upgrade
Material choice is most noticeable after the paint goes on, when the new trim has to sit comfortably beside the stair's existing skirt boards, handrail components, baseboards, and door casings. For a painted treatment, paint-grade MDF is often a sensible option for straight wall-mounted rails and decorative profiles in stable interior locations. Its uniform surface can support a smooth, crisp painted look, particularly for simple panel frames and caps.
Poplar and other paint-grade woods are useful where a project calls for custom-shaped pieces, tighter edge details, or parts that need to relate closely to existing wood trim. Wood is also the natural direction when a stain-grade result is intended, since MDF is meant to be painted rather than finished to show grain. The practical choice is less about declaring one material "best" and more about matching the location, profile, intended finish, and neighboring millwork.
In active family areas, a restrained profile is easier to keep looking composed than a deep, heavily layered assembly with numerous dust-catching ledges. Plan for routine cleaning, and choose a paint sheen that relates to the surrounding trim rather than making the stair wall look like it belongs to a different room. Indoor humidity conditions and wall location should also inform the material mix, especially at exterior-adjacent walls or other areas with changing conditions.
Finish carpentry in Palmer Ranch earns its polished appearance during preparation: joints are filled and sanded smooth, primer is applied consistently, caulk lines are narrow and controlled, and the final paint sheen reads evenly across MDF, wood, and the existing staircase elements. A broad bead of caulk, visible seam, or mismatched gloss will draw more attention than the panel design itself.
Quality Signals to Look for in Stair Finish Carpentry
The most revealing details are often visible before anyone steps back to admire the full staircase. At panel corners, miter joints should meet crisply rather than leave open seams or uneven angles. The narrow gap, or reveal, around adjoining trim pieces should remain consistent; it creates a deliberate shadow line instead of a patchwork of pieces pressed together at slightly different depths.
- Balanced views: Panel bays should read evenly from both the entry and landing. Exact dimensions may change along a sloped wall, but drifting spacing or a noticeably pinched final panel makes the layout feel accidental.
- Resolved intersections: Wall caps should align cleanly through turns and landing transitions, while baseboards should return into the stair treatment with a purposeful end rather than a bulky block or abrupt cutoff.
- Clean stair interfaces: A skirt board should follow the tread-and-riser pattern closely, with tidy scribing and controlled gaps where it meets adjacent trim.
- Paint-ready preparation: Filled joints, smooth sanding, narrow caulk lines, and an even surface keep the paint from emphasizing seams, nail holes, or mismatched profiles.
In staircase finish carpentry Palmer Ranch homeowners can evaluate, the strongest work looks coordinated at close range and from across the foyer. That requires field measurement rather than assuming the walls, stair steps, landing, and existing baseboards are perfectly uniform. A complete layout treats the rising run, level landing, cap, panels, and returns as one connected composition. When profiles relate to the surrounding casing and baseboard, terminations are planned, and each panel is adjusted for the actual wall, the finished trim feels built into the home rather than applied afterward.
Planning a Stair Trim Project in Palmer Ranch
A productive in-home conversation begins by measuring the stair run, landing wall, ceiling breaks, and door openings rather than choosing a trim package first. Those dimensions show where a cap can end, whether the final panel will be compressed near a doorway, and how a rising treatment can meet the level landing without an awkward interruption. Wall inspection also identifies patched areas, pronounced texture, out-of-square corners, and existing trim removal that may affect the finished layout.
The review should place new work beside the baseboards and door casings visible from the foyer, then look closely at the handrail, newel posts, and balusters. A painted stair treatment can unify a white or neutral trim package; where stained rail components remain prominent, profile width and paint color need to create a deliberate contrast rather than a near-match. Sightlines into the entry hall, dining area, or upper corridor help determine whether the work should stop at a clean landing termination or continue as coordinated millwork.
For stair trim Palmer Ranch homeowners are considering, bring inspiration that shows the preferred formality and review completed projects with a comparable sloped wall, landing turn, or open foyer, not generic flat-wall paneling. The consultation should define the treated walls, skirt-board and baseboard transitions, paint or stain direction, and any custom adjustments needed around openings. That design-and-scope conversation makes staircase wainscoting in Palmer Ranch a tailored refresh or a broader millwork plan, rather than a fixed-price template.
Plan the next step
Compare the broader Stair Trim and Wainscoting service.
Review the Palmer Ranch, FL service area for local planning context.
When you are ready, request a free estimate with the rooms, trim goals, city, and available photos.
FAQs
What type of wainscoting works best on a staircase?
Skirt-board-only trim works best for contemporary or narrow stair halls, while broad picture-frame molding suits transitional interiors and board and batten adds rhythm to tall foyers. Raised-panel wainscoting is best reserved for larger, more traditional entries with substantial baseboards and detailed casing.
Can wainscoting be installed on a sloped stair wall?
Yes, wainscoting can be installed on a sloped stair wall when the cap follows the stair pitch or transitions from a pitched line to a level line at the landing. Panel openings may vary slightly in size so they look balanced from the bottom of the stairs and do not create narrow slivers or pinched wedges.
How high should wainscoting be on a stairway?
The cap height should be based on the stair geometry, handrail location, landing wall, door openings, and nearby casing rather than a fixed measurement. A level cap needs enough wall height below it to avoid wedge-shaped panels, while a pitched cap can follow the stair angle along a long run.
Do stair skirt boards need to match baseboards?
Stair skirt boards do not need to be identical to baseboards, but they should connect through a clean baseboard return with compatible thickness, profile, and paint finish. The skirt board should be tightly scribed to the tread-and-riser pattern, with controlled reveals where baseboards, caps, and panel rails meet it.
Is MDF or wood better for staircase wall paneling in Florida?
Paint-grade MDF is a strong choice for straight, interior wall-mounted rails, caps, and panel molding because it provides a smooth, uniform painted surface. Poplar or other paint-grade wood is better for custom-shaped pieces, tighter edge details, stain-grade finishes, and locations where humidity or wall conditions require a more tailored material choice.