

Interior Trim Installation for More Finished North Port Homes
For North Port homeowners, trim installation North Port FL can be one of the most visible ways to move a room beyond a basic, builder-grade finish. It is a practical update when baseboards look undersized or worn, a room has been repainted or remodeled, or new flooring and existing door openings no longer feel visually connected.
Interior trim does two jobs at once. Baseboards cover and protect the joint where the wall meets the floor; door and window casing finishes the gap around an opening; crown molding shapes the transition between wall and ceiling. Decorative wall treatments add intentional pattern and proportion to broad, plain walls. Together, these details create clean boundaries that help individual surfaces read as one designed room rather than a collection of separate updates.
The difference is especially clear in a renovation: new floors can look incomplete against damaged old baseboards, while fresh paint may make narrow casing and uneven wall-to-door transitions stand out more. A coordinated trim plan gives those edges a consistent visual language.
Well-executed finish work is not just a matter of adding more molding. Look for baseboards scribed to follow slight floor variation, miters that meet cleanly at corners, even spacing around doors and windows, and smooth, paint-ready caulk lines where trim meets the wall. Those small details are what make an upgraded interior feel settled and intentional.
Trim Upgrades Available and What Each One Changes
The best starting point is often the edge that feels most unfinished, or the room where a change will be noticed every day. Practical trim upgrades solve transition and wear issues first; decorative upgrades build character once those basics are in place.
Baseboards: a stronger floor-to-wall finish
Baseboards run along the bottom of the wall, covering the perimeter where flooring meets drywall. They are a strong investment for rooms with worn, undersized, or mismatched existing trim, especially after a flooring update. A taller or more substantial profile can make a living room, hallway, bedroom, or open-plan space feel more grounded without adding visual pattern to every wall. For baseboard installation North Port FL, the important visual checkpoint is a continuous line: the trim should sit cleanly against the floor, follow minor floor variation gracefully, and transition neatly at door jambs.
Door and window casing: more definition around openings
Casing is the trim that frames doors and windows. It covers the joint around an opening while giving it a deliberate border, making it a better first upgrade than crown molding when interior doors look plain or new paint has made uneven opening edges more noticeable. Consistent casing can connect bedrooms, bathrooms, halls, and shared living areas, particularly where several doorways are visible from one spot. Clean, even reveals, the narrow exposed border between the jamb and casing, and tight corner miters keep the framing from looking crowded or irregular.
Crown molding: a more finished ceiling line
Crown molding spans the wall-to-ceiling junction. Unlike baseboards and casing, it is primarily a decorative choice: it draws the eye upward and gives dining rooms, living rooms, primary bedrooms, or foyers a more tailored ceiling transition. Crown molding North Port FL is usually a stronger investment when the room already has adequate baseboards and casing but still feels visually flat at the top. In a compact room or a low, busy ceiling area, a simpler profile may create a calmer result than a large, layered one.
Wall treatments and coordinated packages
Picture-frame molding adds outlined panels; board-and-batten uses vertical battens with a horizontal rail; a feature wall concentrates trim detail on one focal surface. These treatments bring architectural rhythm to dining rooms, entries, stair walls, bedrooms, and media spaces, but they are not substitutes for repairing weak floor or door transitions. For a renovation involving several rooms, a coordinated remodel trim package can combine baseboards, casing, crown, and selected wall treatments in related profiles. That approach gives the finish carpentry a consistent scale from room to room while allowing decorative detail to stay focused where it has the most impact.
Choosing Trim Profiles, Materials, and a Style That Fits the Room
Match the profile to the room's visual weight
A profile should relate to what is already in the room: ceiling height, door style, cabinet lines, flooring, and how much detail the walls carry. Square-edge or lightly eased-edge trim has a flat, restrained face that suits clean contemporary interiors and lets paint color, flooring, or furnishings take the lead. Stepped profiles add small layers and shadow lines, making them a comfortable middle ground for transitional spaces. More curved or traditional profiles bring stronger ornament and tend to work best where larger openings, taller ceilings, or existing traditional details can support that visual weight. A wide, elaborate molding in a modest room can feel crowded; a very narrow, plain profile can disappear beside substantial doors or cabinetry.
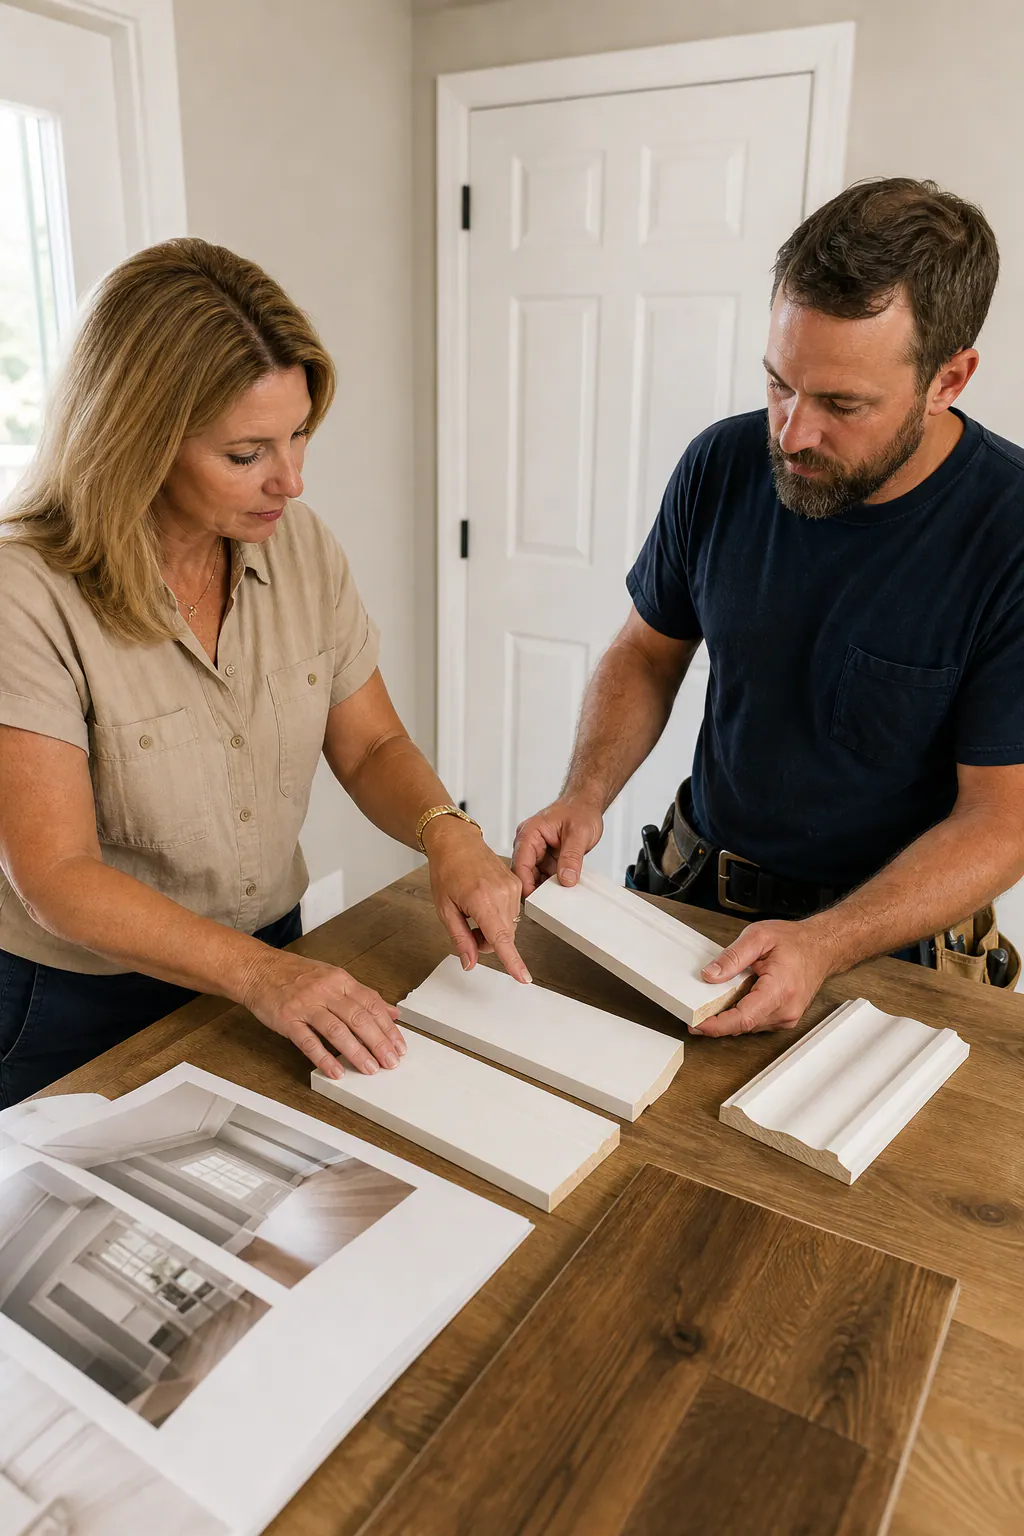
Choose material for the intended finish and location
MDF trim is a smooth, paint-oriented engineered option that can give a crisp, uniform appearance for painted baseboards and casing. Primed pine is also paint-friendly while retaining the option of a wood-based trim material; it can be a practical choice where a homeowner wants more resistance to everyday bumps than a softer profile may offer. Hardwood trim is generally chosen when the wood itself will remain visible under stain or clear finish, because its grain becomes part of the design. Moisture-resistant trim options are useful where occasional humidity or damp conditions make material selection more important, such as certain baths, laundry areas, or entry-adjacent spaces. The right choice is less about a universal "best" material than whether the room calls for paint, stain, a particular level of impact resistance, or added moisture tolerance.
Build a related trim family
Baseboard profiles, casing, and crown look more intentional when they share a similar level of detail and proportion. That does not mean every piece must match exactly: a simple casing can pair well with a slightly more detailed crown if both have clean lines and compatible scale. Mixing a heavily ornate crown with ultra-modern flat casing, however, can make the room feel assembled from separate projects. Selecting paint sheen and color as a group helps, too, consistent trim color creates a unified border, while a deliberate contrast makes the profiles more architectural.
Planning Trim Work Around Floors, Walls, Doors, and Renovations
Plan the interfaces before choosing the scope
Start by listing what will stay and what will change in each room. Baseboards can often be replaced while existing flooring remains in place, but the remaining floor-to-wall gap determines whether the new profile will cover it cleanly. Tile, vinyl, wood, and carpet each leave a different edge condition: a finished tile edge may need a tidy reveal, while carpet may require a coordinated tuck at the new baseboard. Slightly uneven floors or walls call for baseboards that are carefully fitted to the surface rather than forced into a straight line that leaves visible gaps.
Door and window casing deserves the same early review. New drywall, a changed wall thickness, replacement doors, or window work can alter how far a jamb sits from the finished wall. The goal is a consistent reveal, the narrow, even line between casing and jamb, rather than a casing edge that looks pinched on one side or overly wide on another.
A useful estimate should separate removal of old trim, wall and surface preparation, installation, patching, caulking and paint-ready finishing, and final painting responsibilities. Pulling old baseboards can expose nail holes, torn paint, or wall damage; patching creates a sound surface, while smooth caulk lines make the wall-to-trim joint ready for paint rather than leaving a dark shadow line.
For a remodel, flooring, wall repairs, doors or windows, and trim should be sequenced as one plan so later work does not damage completed pieces. A one-room upgrade is sensible when that room has a self-contained flooring and paint plan. When adjoining rooms share sightlines, open passages, or matching doors, a whole-home trim plan usually produces a more connected result and avoids visibly mixed profiles at transitions.
What Quality Finish Carpentry Looks Like in Installed Trim
Look closely at the details that stay visible
Finish carpentry is precision work for the parts of a room people see at eye level: corners, opening edges, seams, and long painted lines. It differs from broad general carpentry because the success of the work is judged by alignment and fit, not simply whether the pieces are installed.
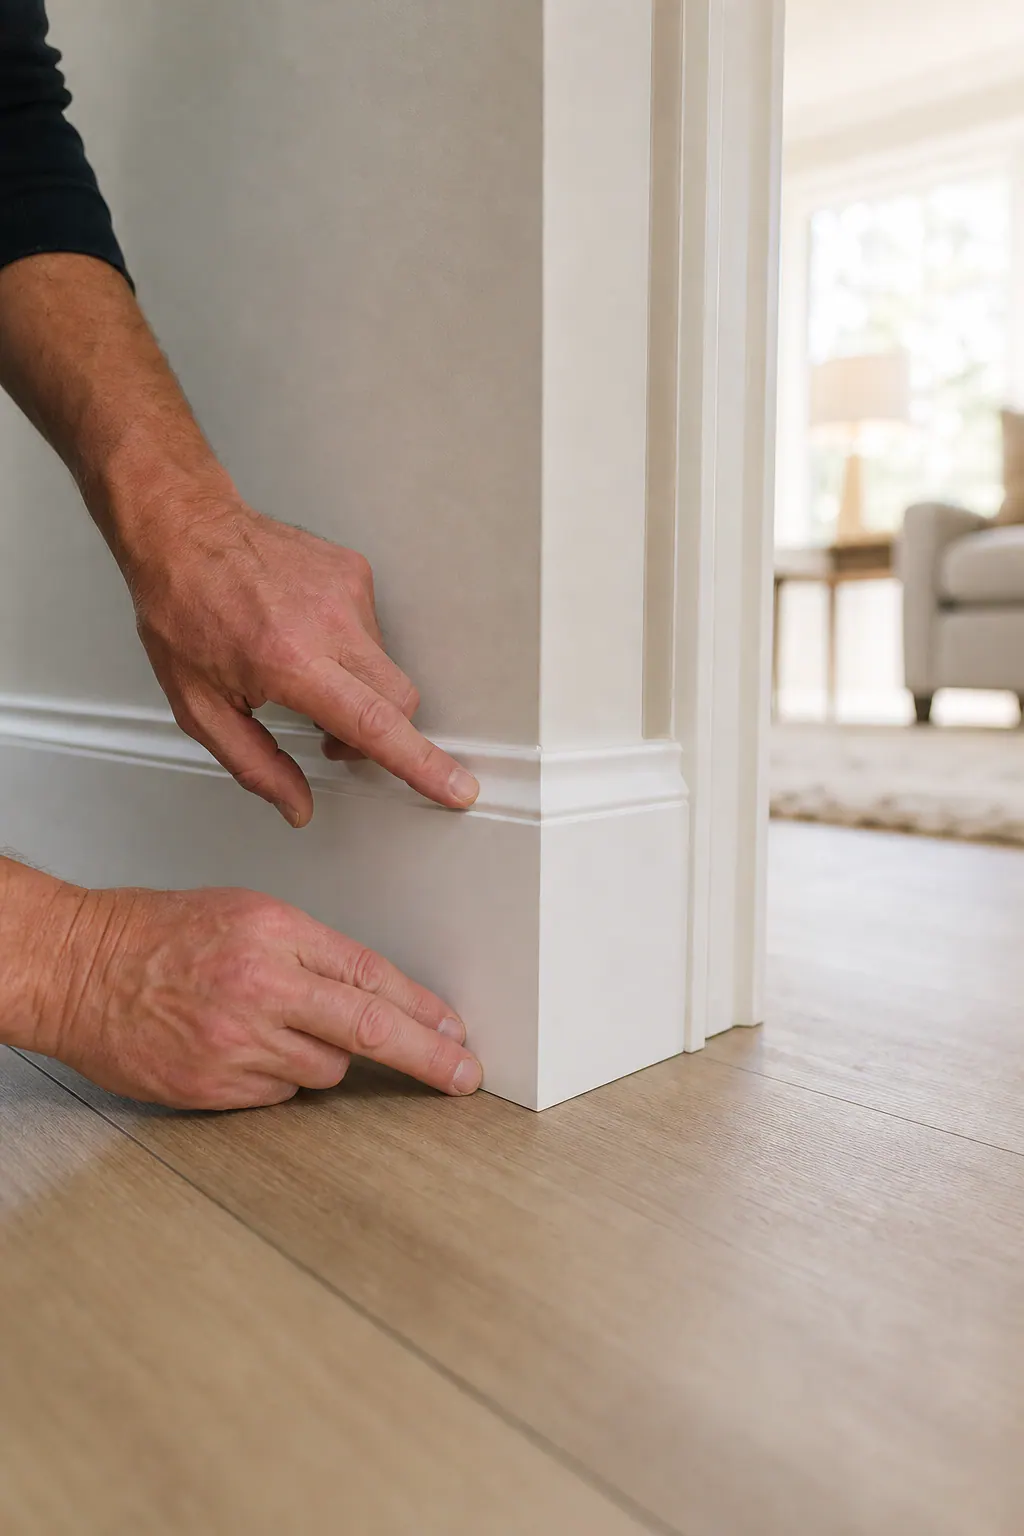
Accurate measuring establishes the layout, while consistent reveals keep casing visually even around a door or window. Long baseboard runs and crown should read as level and continuous to the eye. At outside corners, clean miter joints meet without an obvious open point or mismatched profile. Inside corners should fit closely rather than relying on a heavy bead of caulk to disguise a gap.
Older walls, floors, and ceilings are not always square or straight. A careful installer works with those conditions: scribe cuts shape the edge of baseboard to follow an irregular surface, and small adjustments can keep a run looking balanced. The goal is a controlled visual line and tight contact where it matters, not a promise that every existing surface can be made perfectly straight.
Secure fastening keeps trim seated against the wall, while restrained caulking fills minor paintable seams without creating thick, wavy lines. Before paint, look for smooth joints, filled fastener holes, tidy transitions at jambs and flooring, and caulk that is limited to the narrow gaps it is meant to finish.
When reviewing finish carpentry North Port FL examples, ask to see close-up photos rather than only wide room shots. Corner joints, casing reveals, end returns, seams, and pre-paint caulk lines reveal far more than a distant finished image. It also helps to discuss how irregular walls or ceiling lines will be handled and to have those finish expectations included in the installation scope.
How to Choose a Capable Trim Carpenter in North Port
Compare the evidence behind the estimate
A capable trim carpenter should be able to show work that is specific to trim, not just a gallery of broad remodeling photos. Ask for both room-wide images, which show proportion and layout, and close-ups, which show whether joints, transitions, and paint preparation hold up under scrutiny. A few consistently clear images are more useful than heavily edited or distant photos that conceal the details.
Use the conversation to map responsibilities from start to finish. Ask who measures each room, helps select profiles and materials, removes existing trim, handles wall or floor-edge preparation, installs the new pieces, caulks paintable seams, and coordinates painting. Those tasks can be divided among different people, but the handoffs should be clear so preparation or finishing is not assumed by everyone and owned by no one.
Request a written scope before comparing proposals. It should identify the rooms included, the baseboard, casing, crown, or wall-treatment profiles selected, material type, removal and disposal work, expected preparation, and finishing responsibilities. Exclusions matter too: for example, wall repair, flooring touch-up, paint, or changes to damaged jambs may be outside the stated work. A clear scope makes two estimates comparable rather than merely putting two totals side by side.
A strong North Port FL trim carpenter will discuss visible existing conditions realistically and explain the finish standard being planned. Be cautious with vague service lists, a single lump-sum estimate that omits materials and prep, or promises that leave no room for the uneven surfaces common in an already-finished home. The best fit is the provider whose photos, proposal, and communication all describe the same careful level of work.
Start With a Trim Plan That Fits Your Home
Bring a clear starting point to the conversation
Begin by listing the rooms involved and noting what will remain: flooring, wall color, doors, cabinets, and any trim worth matching. Photos of each wall, along with a few saved style images, give the discussion a useful visual baseline.
- Decide whether the priority is one focused change, such as new baseboards in a living room, or a coordinated package that carries related trim through connected spaces.
- Identify the desired effect: understated profiles keep attention on furnishings and finishes, while wider or layered profiles create a stronger architectural presence.
- Discuss material, removal, preparation, installation, caulking, and painting as separate parts of the scope.
A productive consultation should leave you with a defined trim type, appropriate profile scale, material choice, room-by-room scope, and clear finishing expectations, not a vague promise to "upgrade" the space. Bring your priorities, then request an estimate built around the finished look you want.
Plan the next step
Compare the broader Trim Installation service.
Review the North Port, FL service area for local planning context.
When you are ready, request a free estimate with the rooms, trim goals, city, and available photos.
FAQs
Can new baseboards be installed without replacing flooring?
Yes. New baseboards can often be installed with existing flooring in place if the new profile covers the floor-to-wall gap cleanly. Tile, vinyl, wood, and carpet each require different edge details, and uneven floors may need scribed baseboards for a tight fit.
What is the best baseboard material for a Florida home?
MDF is a smooth option for painted trim, primed pine is paint-friendly and offers practical resistance to everyday bumps, and hardwood is best when a stained or clear wood finish is desired. Moisture-resistant trim is a strong choice for humid or damp-prone areas such as bathrooms, laundry rooms, and entry-adjacent spaces.
Should crown molding match door and window casing?
Crown molding and casing do not need to match exactly, but they should have compatible scale and a similar level of detail. Simple casing can pair with slightly more detailed crown, while heavily ornate crown beside ultra-modern flat casing can look mismatched.
What is the difference between finish carpentry and general carpentry?
Finish carpentry focuses on visible details such as trim corners, casing reveals, seams, long painted lines, and caulk joints. Its quality is judged by precise alignment, tight miters, smooth filled fastener holes, and clean transitions rather than only whether the pieces are installed.
How do I choose a trim carpenter in North Port, FL?
Ask for close-up photos of corner joints, casing reveals, end returns, seams, and pre-paint caulk lines, not only wide room photos. Request a written scope listing rooms, trim profiles, materials, removal, preparation, installation, caulking, paint responsibilities, and exclusions such as wall repair or flooring touch-up.