
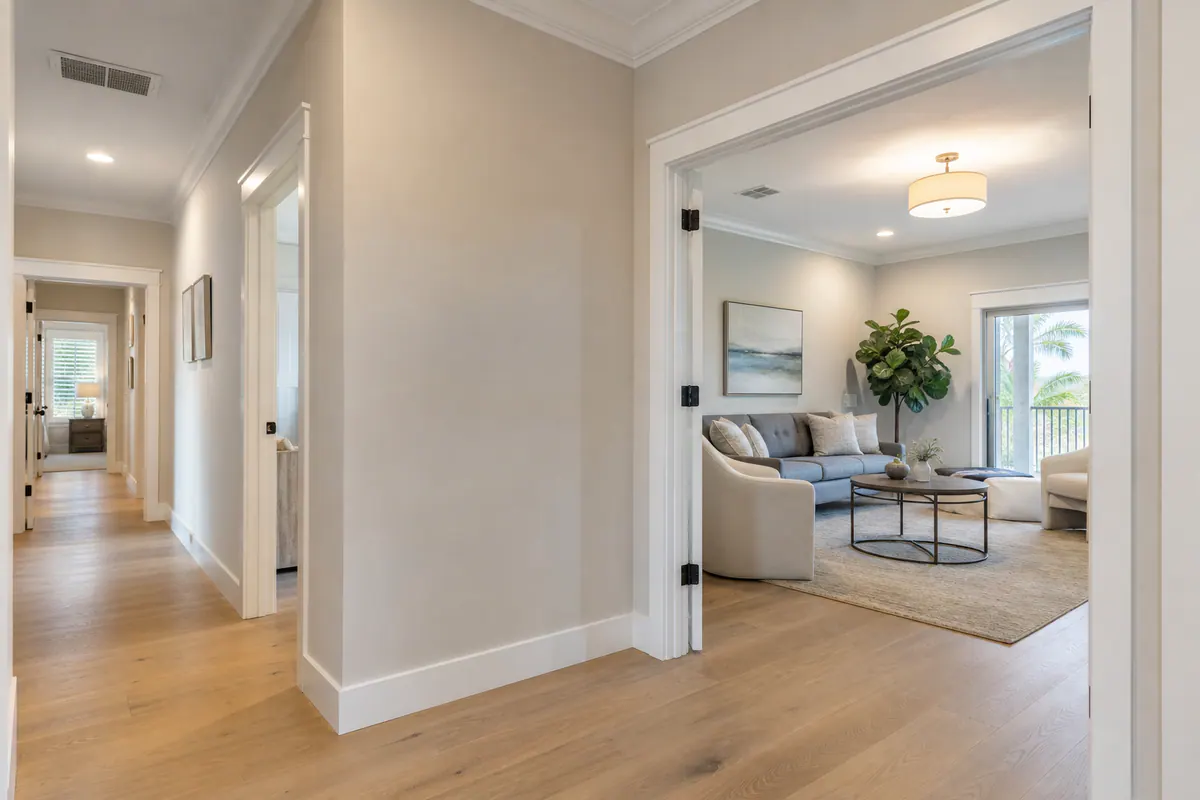
At each doorway, the casing-to-baseboard junction is an early test of whether the rooms belong together: the baseboard should terminate cleanly into the casing rather than leave a short, awkward strip of wall. Repeating that relationship at hall entries, bedrooms, and common areas gives the interior a deliberate rhythm.
Baseboards cover the wall-to-floor joint and establish a consistent lower edge around each room. Door and window casing frames openings with the same profile family, while crown molding creates a finished ceiling transition where its scale suits the room. Smaller details, including return pieces at exposed ends, end caps, and trim at flooring changes, prevent a run of molding from stopping abruptly.
Coordination is especially useful after separate updates have left a 3-inch baseboard in one room, a taller profile in an addition, or a different casing shape around a replacement door. A room-by-room plan can repeat one baseboard height and casing profile through connected spaces while reserving intentional exceptions for a bathroom, built-in, or focal room.
An upper-mid residential result is not simply more molding. It comes from choosing profiles that fit ceiling height and room scale, matching materials to the intended painted finish and room conditions, and installing each run with even reveals, tight joints, clean transitions, properly placed fasteners, filled nail holes, and paint-ready caulking where appropriate. That level of coordination is what separates individual trim jobs from a cohesive whole home trim Laurel FL package.
What a Whole-Home Trim Package Can Include
A practical scope starts by separating the pieces that establish the everyday framework from the details that complete its edges. Baseboards run along the floor line, protecting the lower wall from routine contact while covering the wall-to-floor joint. Door and window casing finishes the gap around rough openings and gives repeated openings a common outline. Together, those elements usually form the foundation of a whole-home trim package in Laurel.
Crown molding is an optional ceiling-line treatment rather than an automatic inclusion. It can give a formal living area, dining room, or taller-ceilinged space a more resolved top edge, while a simpler room may look better without it. Shoe molding and quarter round are smaller floor-edge pieces: both can cover a narrow gap between baseboard and finished flooring, but shoe molding has a taller, more flexible profile, while quarter round has the familiar quarter-circle face.
Small finish pieces deserve a place on the scope sheet. Returns turn an exposed trim end back into the wall instead of leaving a raw cut visible. Transitions address changes at flooring, stair details, cabinetry, or places where one trim run ends and another begins. Caulking closes appropriate paintable seams, and filled nail holes keep fasteners from reading through the final paint finish.
- Standard components: baseboards, casing at selected doors and windows, removal or retention notes for existing trim, and paint-ready finishing.
- Optional upgrades: crown molding, shoe molding or quarter round, enhanced window treatment, specialty returns, and trim at built-ins or focal walls.
The right package follows the home rather than forcing every detail into every room. A floor plan with open common areas may benefit from one repeated set of baseboard profiles and casing, while bathrooms, existing architectural features, or a distinct focal space can receive intentional exceptions. A room-by-room checklist and marked photos or drawings make those choices visible before full home trim installation begins.
Planning Profiles, Proportions, and Room-to-Room Consistency
Proportion is where a trim plan starts to look intentional rather than simply new. Baseboard profiles should have enough visual weight for the ceiling height and room scale without making a compact bedroom feel bottom-heavy. A taller, more layered baseboard can suit an open main area or taller wall, while a simpler, lower-profile choice may keep smaller rooms composed. Viewing full-length samples against the wall, not just a small chip in hand, makes the difference easier to judge.

Door and window casing should relate to the doors it frames and the wall space around each opening. A broad, built-up casing can give substantial doors and generous openings a stronger outline; a slimmer, cleaner casing may be the better fit where an opening sits close to a corner, cabinet, or adjoining wall. The useful goal is a repeated face detail and consistent reveal around similar openings, rather than forcing one oversized treatment into every tight location.
For whole-house trim in Laurel, one baseboard and casing family can usually carry through connected living areas, halls, and bedrooms. Intentional variation works best when it has a visible reason: crown molding in a formal room, a different ceiling treatment at a vaulted space, moisture-conscious selections in a bathroom, or a simplified detail inside closets. Existing built-ins or retained millwork may also set a profile language worth echoing instead of competing with.
- At hallways and cased openings, decide which profile continues through the sightline so the trim does not appear to change without purpose.
- At stair openings, align baseboard terminations and casing edges with the stair trim design; an awkwardly stopped run is a weak visual signal.
- At flooring changes, plan the baseboard, shoe molding, and transition piece together so flooring edges read as a deliberate junction rather than a patch.
A room-by-room elevation or marked photo set helps compare these decisions before work begins. It should show profile selections, planned exceptions, crown locations, and how new trim meets retained details, especially at the transitions a person sees while moving through the home.
Choosing Trim Materials and Paint Finishes for Florida Interiors
Material choice is most noticeable once light hits the finished trim: a crisp painted edge, visible wood grain, or a surface selected for a harder-working room changes the character of the same profile.
Paint-grade MDF trim is a common option for smooth, painted baseboards, casing, and crown. Its uniform face can suit clean-lined profiles and a consistent paint color across dry living areas. Primed wood trim brings a similar paint-ready starting point while retaining the character of real wood; it can be a useful match where existing painted woodwork stays in place. For either choice, sample pieces should be viewed after primer and the intended sheen, since paint can soften fine profile detail or highlight surface imperfections.
Stain-grade wood is the different path when natural grain is meant to remain visible. Species, grain pattern, and color variation become part of the finished design, so it generally belongs beside retained stained doors, beams, or cabinetry rather than in a package otherwise designed around opaque paint. It also calls for more careful sample matching than a painted finish.
PVC trim and other moisture-resistant options can make sense at interior locations with repeated moisture exposure, such as certain bath or laundry details. They offer a practical alternative where the room conditions make conventional paint-grade choices less appealing, although the selected profile and finish should still read consistently with nearby trim.
- Use the room's exposure, the desired finish, existing woodwork, and budget range together, not a one-material rule.
- Compare full-length samples for straightness, edge detail, paint appearance, and resistance to everyday contact where baseboards are likely to be bumped.
- Record material exceptions on the room-by-room scope so a moisture-conscious choice looks intentional rather than mismatched.
Installation Details That Make Whole-House Trim Look Finished
The last inch of fit is often what separates trim that merely looks new from trim that reads as part of the house. Before removal begins, a careful whole house trim replacement in Laurel maps wall lengths, door openings, floor heights, and profile changes. Protecting nearby floors and wall finishes during removal also keeps the new work from creating avoidable repair work around it.
Walls and floors are not always straight or level, so pieces should be laid out and fitted to the room rather than forced into a nominal measurement. A scribe fit follows an uneven wall or floor edge so the trim sits closely against it. At door jambs, casing needs an even reveal, the narrow, intentional line between the casing and jamb, while baseboard terminations should meet the casing cleanly instead of leaving a small, improvised gap.
Corner work deserves a close look. Miter joints are angled cuts that meet at an outside corner; their faces should align without a visible step. Coping joints shape one piece to follow the profile of another at an inside corner, creating a more controlled connection than simply pressing two angled cuts together. Where baseboard meets flooring, installers can plan a shoe-molding detail or another intentional finish piece when a floor-edge gap needs coverage.
Fasteners should hold each piece without leaving conspicuous damage, followed by filled nail holes and sanding for a paint-ready surface. Caulk belongs in narrow, controlled wall-to-trim seams and at select transitions, not as a heavy substitute for poor fitting. Before paint, inspect outside corners, casing returns, room-to-room profile changes, and joints along irregular walls. These details help the trim sit properly against the surfaces it finishes while keeping the visual lines calm and consistent.
How to Plan a Full-Home Trim Installation Around Other Updates
Start with a walkthrough that records each room, every door and window opening, floor type, ceiling detail, and any trim that may remain. Mark which pieces are being removed, which retained features must receive a compatible new profile, and where cabinetry, tile, or built-ins create stopping points. This turns a full home baseboard installation in Laurel from a linear-foot estimate into a room-by-room plan.

- Select the baseboard, casing, crown, and small finish profiles before installation begins. A full-length sample at an actual doorway or wall corner makes it easier to see whether the pieces relate properly to existing doors, cabinets, and ceiling lines.
- Sequence the surrounding work. New flooring should generally be in place before baseboards are fitted, allowing the trim to follow the final floor height and cover the finished perimeter cleanly. Quarter round can be included where a planned floor-edge detail needs coverage rather than added as an afterthought.
- Coordinate door replacement before casing is installed, and complete major wall repairs before finish trim goes up. New doors can change jamb depth and opening conditions; repaired walls may reveal dents, old adhesive, or uneven surfaces that need attention before a crisp trim line is possible.
- Identify transitions in advance: flooring changes at doorways, baseboard stops at cabinets, crown endings, and locations where a retained detail meets the new package. Each should have a deliberate termination or return, not a field-made compromise.
An early site review also exposes uneven floors, damaged drywall, and inconsistent existing jamb conditions while there is still time to assign removal, patching, touch-up, and finish-paint responsibilities. The scope should state who prepares walls after demolition and whether trim receives primer, final paint, or both, so the completed rooms do not stall between installation and finishing.
Start With a Whole-Home Trim Plan for Your Laurel Property
The most useful next step is a conversation built around your actual rooms, not a generic trim menu. For a whole home trim project in Laurel, FL, an on-site assessment can turn the choices already outlined into a defined package: where baseboards continue, which openings receive new casing, where crown adds value, and which returns, transitions, and touch-up details belong in the finished scope.
Come prepared with an approximate room count, photos of the existing trim, and the status of flooring, doors, cabinetry, and wall repairs. Share the look you prefer, clean painted profiles, visible stain-grade grain, or a more detailed focal-room treatment, and point out bathrooms, laundry areas, or other moisture-prone locations. Those conditions influence whether one material and finish can carry throughout or whether an intentional exception makes more sense.
A strong project discussion should also identify the desired finish responsibility: paint-ready installed trim, primed trim, or a completed paint or stain finish. The practical goal is a room-by-room scope that records selected profiles, retained details, removal needs, and the finishing work required to make joints, fasteners, and transitions read cleanly.
Request a whole-home trim package assessment for your Laurel property to develop a coordinated plan with the right level of detail for the home, not a collection of disconnected molding decisions.
Plan the next step
Compare the broader Whole-Home Trim Packages service.
Review the Laurel, FL service area for local planning context.
When you are ready, request a free estimate with the rooms, trim goals, city, and available photos.
FAQs
What is included in a whole-home trim package in Laurel, FL?
Standard components typically include baseboards, casing at selected doors and windows, notes on removing or retaining existing trim, and paint-ready finishing. Optional upgrades include crown molding, shoe molding or quarter round, enhanced window trim, specialty returns, and trim at built-ins or focal walls.
Should baseboards, door casing, and crown molding match throughout a house?
Baseboards and casing should generally use one coordinated profile family through connected living areas, halls, and bedrooms. Crown molding is optional and works best in formal rooms or taller-ceilinged spaces, while bathrooms, closets, and retained architectural details can use intentional exceptions.
How do you choose the right baseboard height for each room?
Choose a baseboard with enough visual weight for the ceiling height and room scale without making smaller rooms feel bottom-heavy. Taller, layered profiles suit open main areas and taller walls, while simpler, lower profiles often fit compact bedrooms; compare full-length samples against the wall.
Can new baseboards be installed after flooring replacement?
New flooring should generally be installed before baseboards so the trim can follow the final floor height and cover the finished perimeter cleanly. Shoe molding or quarter round can cover a planned narrow floor-edge gap, with shoe molding offering a taller and more flexible profile than quarter round.
What trim material is best for Florida homes with humidity?
Paint-grade MDF is a common smooth option for painted trim in dry living areas, while primed wood can match retained painted woodwork. PVC or other moisture-resistant trim is better for repeated-moisture locations such as certain bathroom and laundry details, while stain-grade wood is best when natural grain must remain visible.