
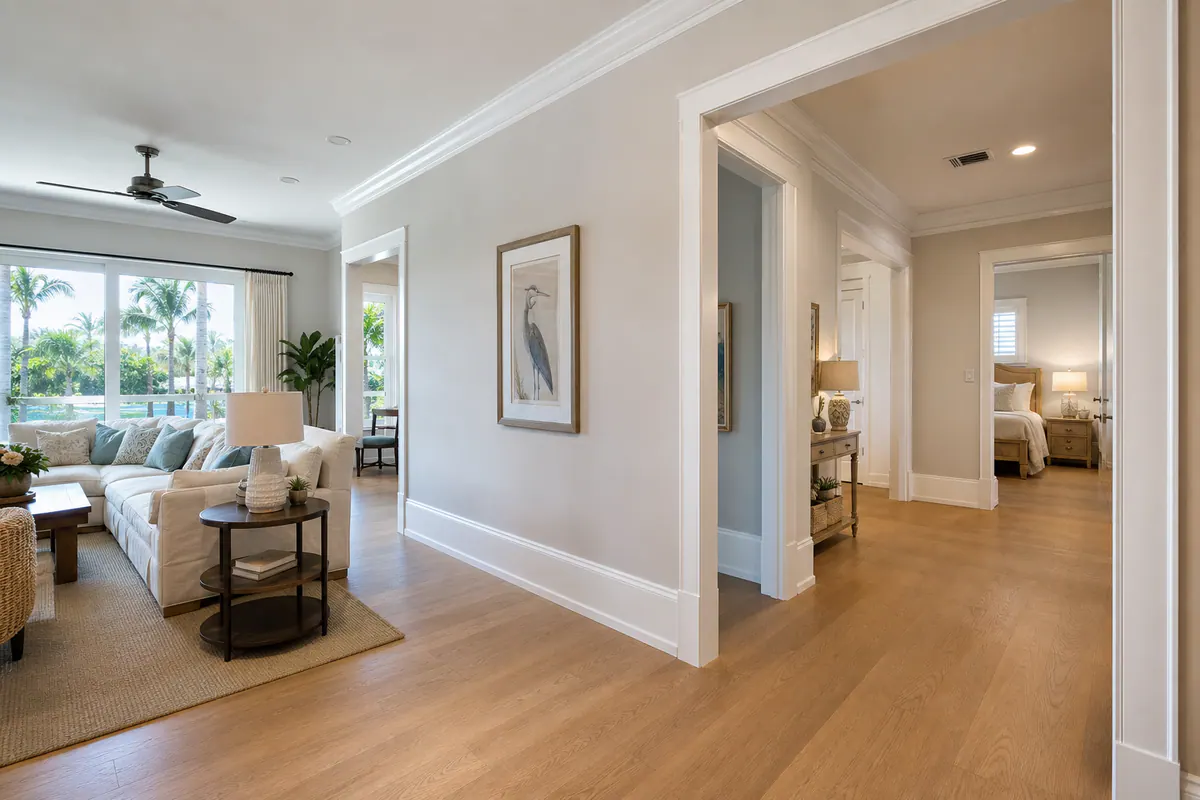
A Coordinated Whole-Home Trim Upgrade for Venice Homes
Start at the doorway and floor line: a taller, more formal baseboard in one living room can make the adjoining hall or bedroom feel unfinished if its casing and lower-wall trim remain smaller or mismatched. For Venice homeowners preparing for a renovation, flooring update, or move-in refresh, mapping those transitions first creates a clearer visual thread from the entry through bedrooms, living areas, and hallways.
Coordinated interior millwork can include baseboards along the walls, door and window casing that frames openings, crown molding where it suits the room, and shoe molding at the floor edge. Baseboards establish the lower line of each room; casing gives doors and windows a deliberate border; crown finishes the wall-to-ceiling transition; and shoe molding can cover a small perimeter gap beside finished flooring. Paint-ready finishing brings those pieces together with filled fastener holes, caulked seams, and a consistent final color plan. A package may also include replacement of damaged or mismatched trim, while crown, window casing, and painting can remain optional depending on the rooms and goals.
The difference is easiest to see between rooms. Choosing one compatible profile family across the main areas, then deciding intentionally where crown belongs, gives the home a more settled appearance than treating each room as a separate job. Flooring plans matter early: baseboard height and placement should be coordinated with the finished floor height, while shoe molding may be selected when it helps complete an existing-floor refresh. Thoughtful trim packages turn those room-by-room decisions into one coordinated scope.
What Can Be Included in a Whole-House Trim Package?
The most useful way to define the work is room by room, rather than treating every wall and opening alike. A written scope can identify which spaces receive new trim, which existing pieces stay in place, and where a different condition calls for a separate decision.
- Baseboards: A full home baseboard installation in Venice may cover living areas, halls, bedrooms, closets, and other selected spaces. The scope should note rooms with built-ins, tile edges, or walls that need repair before the new lower-wall trim is installed.
- Crown molding: Crown can be assigned to public rooms, a primary suite, or selected ceilings rather than automatically carried through every room. This lets homeowners choose where a more finished ceiling line supports the look they want.
- Door and window casing: Existing casing can remain when its profile, condition, and placement fit the new plan. Replacement makes more sense when openings have damaged pieces, inconsistent profiles, or a look that conflicts with the intended baseboards and crown.
- Floor-edge and transition details: Shoe molding or quarter round may be included where it completes the edge between flooring and baseboard. Threshold areas, closets, and changes between flooring types should be listed individually so they do not become afterthoughts.
- Finishing work: The package can also define preparation and paint-ready details, including filling fastener holes, treating seams, and setting a consistent color approach for new and retained trim.
A whole house trim replacement in Venice does not have to mean removing every existing piece. For example, a home may keep clean, compatible bedroom casing while replacing baseboards throughout and adding crown only in the living room and dining area. The final scope should reflect each room's condition, the finished-floor plan, the millwork worth preserving, and the homeowner's priorities for where the upgrade will make the biggest visual difference.
Choosing Baseboard, Crown, and Casing Profiles That Work Together
Profile selection is where individual rooms start to read as parts of the same home. Rather than choosing trim from isolated samples, compare baseboard, casing, and crown side by side against a photo of the room, ceiling height, door style, window depth, and the level of formality you want.

Baseboard profiles establish the visual weight at floor level. A lower, simpler baseboard tends to suit compact rooms, lower ceilings, and clean contemporary interiors because it creates a defined edge without calling attention to itself. A taller baseboard adds more presence and can give larger rooms or taller walls a more finished, traditional, or transitional character. The useful takeaway is proportion: a substantial baseboard can look intentional beneath a tall ceiling, while the same profile may feel heavy in a small room with modest wall height.
Crown molding profiles make the ceiling line more formal or more restrained. A simple crown, one uncomplicated angled profile, can bridge wall and ceiling without competing with modern doors, simple lighting, or streamlined casing. Built-up crown combines multiple pieces to create a deeper, layered treatment; it can suit generous ceiling height and more traditional architectural details, but it needs enough visual space to avoid looking crowded. For crown molding installation in Venice, FL, public rooms may merit a more prominent ceiling treatment while bedrooms retain a simpler version from the same profile family.
- Simple contemporary: square or lightly eased casing, a clean-lined baseboard, and restrained crown or no crown create a calm, tailored look.
- Transitional: a moderately tall baseboard, eased-edge or small-step casing, and a single-piece crown add definition without ornate curves.
- Traditional: wider casing with a shaped edge, taller baseboards, and layered crown can work when doors, windows, and ceiling height already support that detail.
Casing deserves equal attention because it frames every opening. Streamlined casing keeps doors and windows visually quiet; wider or more detailed casing makes each opening a stronger architectural feature. A weak combination might pair thin, flat door casing with very elaborate crown and oversized baseboards: each element speaks a different design language. A stronger combination repeats a shared detail, such as a small stepped edge or softened radius, across the trim, then adjusts width and height only where the room's scale calls for it.
Trim Materials and Finish Choices for Florida Interiors
The finish you want should guide the material conversation early, because a crisp painted profile and a visible wood-grain profile ask different things of the trim beneath them. Paint-grade trim is intended to be primed and painted for an even color; it is a natural fit when baseboards, casing, and crown will share the same wall or accent color.
MDF trim has a smooth, grain-free face that can give painted profiles a uniform appearance, particularly across long runs of baseboard or detailed crown. It does not offer the grain character needed for a stained finish, and edges or damaged areas may require more involved touch-up than solid wood. It can be a sensible conversation for dry living rooms, bedrooms, and halls when the goal is a consistent painted surface.
Finger-jointed pine joins shorter pieces of pine into longer lengths. It is commonly considered for paint-grade trim because it can provide a wood substrate with a paintable face, though the joint pattern and natural grain make it less suited to a clear or lightly stained look. For a home where future dents or small nail holes are a concern, wood trim can offer a more familiar repair path through filling, sanding, and repainting.
Hardwood is the option to consider when stained wood trim is central to the design. Its visible grain can coordinate with existing wood doors, built-ins, or stair parts, but species, grain direction, and stain color should be sampled together rather than selected from a bare board. A dark stain may emphasize grain variation; an opaque paint deliberately minimizes it.
- In a dry, painted main living area, MDF trim or finger-jointed pine may support a clean, continuous finish.
- Near baths, laundry spaces, exterior-adjacent entries, or other areas that see more moisture and frequent wiping, material selection should account for the room's actual exposure, ventilation, and the condition of nearby walls and floors.
- Where existing stained doors or cabinetry remain, hardwood casing or a carefully matched wood species may create a more convincing transition than introducing painted trim without a clear visual reason.
Compare full-length samples under the intended paint or stain, not just a small unfinished chip. That simple step reveals whether the color hides joints, highlights grain, and carries the same finish expectation from public rooms into quieter spaces.
Planning Installation Around Flooring, Rooms, and Daily Life
A clear installation plan prevents small site decisions from disrupting the finished look. Before work begins, measure each room, opening, return, closet, and transition; then lock in the selected profiles, materials, paint or stain plan, and the rooms included. A written pre-installation checklist should also identify flooring status, furniture that needs moving, pets, daily access routes, and the order in which rooms will be opened for work.
Flooring is a major sequencing decision. When new hard flooring is still being installed, baseboards are commonly fitted after the finished floor is in place so the trim can cover the perimeter expansion space cleanly. When existing flooring stays, removal and replacement call for more protection at the floor edge and a realistic conversation about marks, gaps, or wall repair that old trim may reveal. Shoe molding can be useful where it is part of the intended look and helps accommodate minor irregularities; it should not be used to disguise an unresolved flooring decision.
For a full home baseboard installation in Venice, completing the house in one coordinated run makes it easier to keep material, profile, and finishing decisions aligned. Phased work is still a practical option when homeowners need to preserve bedrooms, workspaces, or a kitchen in use. The tradeoff is that each later phase needs the same agreed profile, finish standard, and transition plan so it does not look like a separate project.
- In an occupied home, plan a room-by-room rotation: clear the work zone, protect floors and nearby furnishings, establish a contained cutting area, and leave routes to essential rooms accessible.
- Reserve touch-up access after installation. Caulk, filled fastener holes, and finish coats need a final pass once all pieces are in place and the room can be viewed as a whole.
- In a vacant home, broader access can simplify staging and sequencing, but finished floors, cabinets, and freshly painted walls still need deliberate protection.
The right sequence for a whole home molding installation in Venice is not a fixed calendar. Home size, rooms that remain occupied, flooring progress, material availability, and the level of finish work all shape the order of operations.
The Details That Make Replacement Trim Look Finished
The final impression is decided at the joints and edges. A consistent reveal, the narrow, intentional gap between casing and a door jamb or window frame, keeps openings aligned instead of making each room look adjusted by eye. Outside corners should meet in clean miter joints, while inside corners are often coped: one profile is shaped to fit tightly over the face of the adjoining piece. Both approaches aim for a corner line that looks deliberate after paint, not merely acceptable before it.
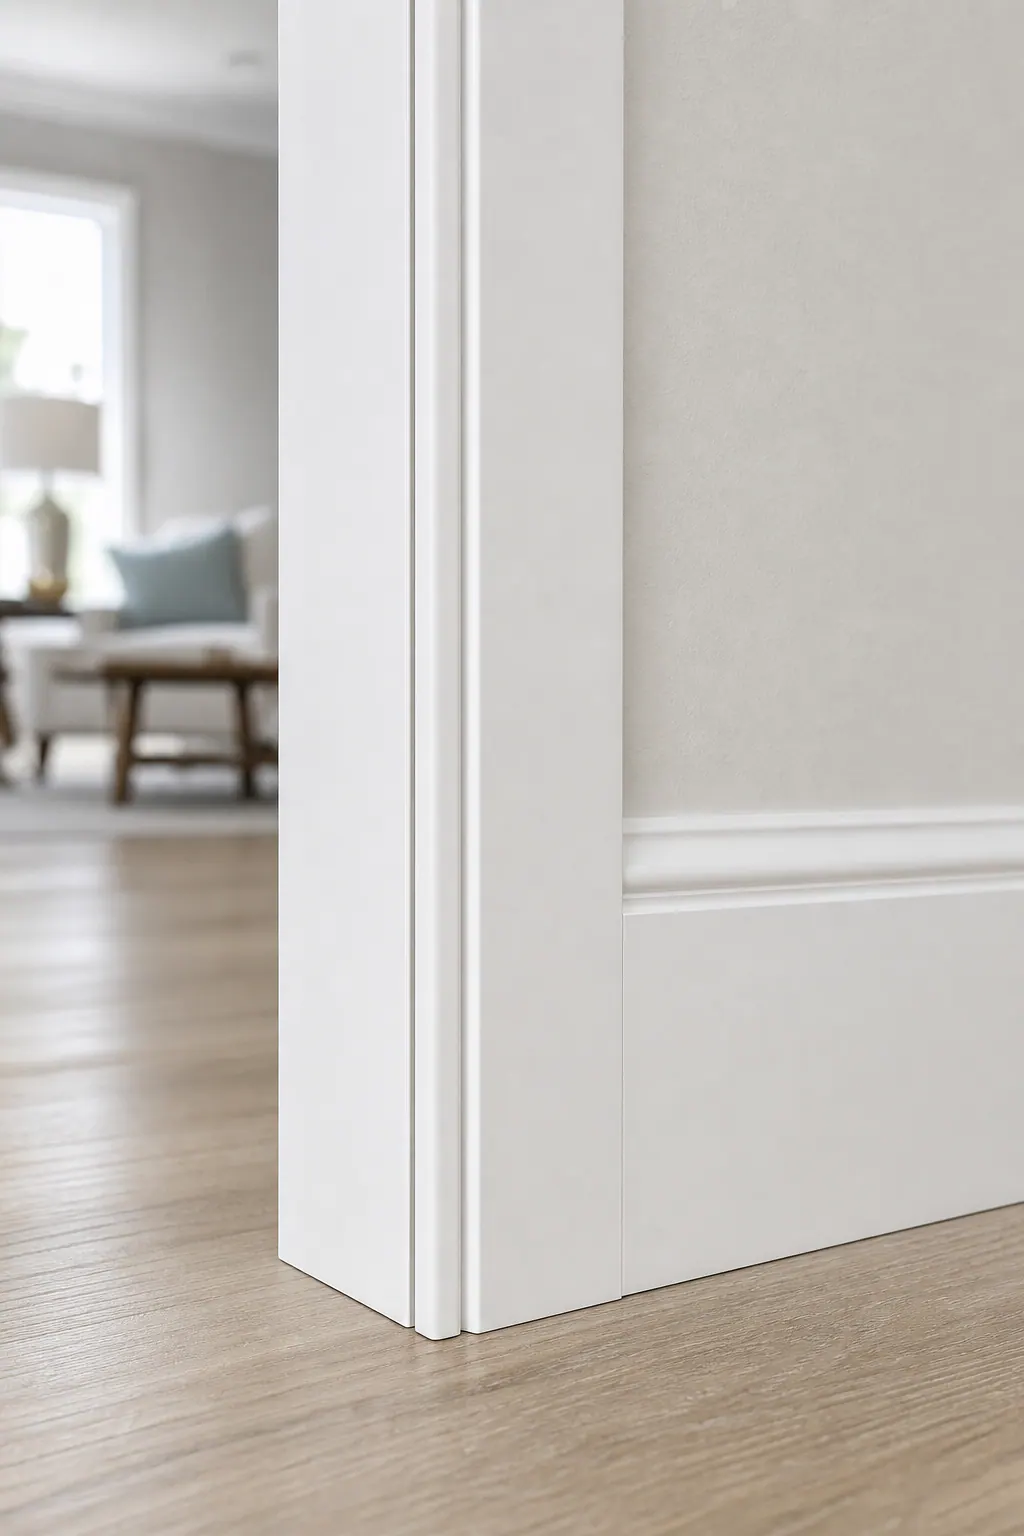
Fasteners need to hold the trim securely without leaving distracting damage. Filled nail holes, smoothly sanded repairs, and controlled caulking at the wall-to-trim edge help the profile read as one continuous element. Caulk is for closing small paintable seams; it is not a fix for a bowed wall, a loose piece, or a wide gap created by an unresolved condition.
Replacement work can reveal what the old trim concealed: chipped paint, uneven drywall, missing floor-edge coverage, or a casing transition that no longer lines up with the new profile. Those conditions should be noted before installation so the scope can assign responsibility for wall repair, trim adjustments, caulking, and final paint touch-ups.
Look closely at inside corners, outside corners, and the point where baseboard meets casing. In a coordinated whole-home trim package, those small checkpoints carry the same finish standard from room to room, making the completed home feel continuous rather than pieced together.
Plan Your Whole-Home Trim Package in Venice, FL
Bring a room list, a few inspiration photos, and the decisions that are still open to an in-home conversation. Identify the spaces to include, the existing baseboards or casing worth retaining, flooring that is planned but not yet installed, and whether the home will remain occupied during the work.
Style and finish choices belong in that discussion as well. A simple painted package may call for restrained profiles throughout, while a more formal plan may reserve crown and wider casing for main living areas. Deciding whether the work happens in one coordinated project or in phases also changes how transitions, material matching, and unfinished areas should be planned.
For whole home trim Venice FL homeowners, a site-specific review turns those choices into a practical scope: what is included, what needs preparation, and how each room connects to the next. Request an assessment to discuss your trim package, finish goals, and a realistic plan for your home.
Plan the next step
Compare the broader Whole-Home Trim Packages service.
Review the Venice, FL service area for local planning context.
When you are ready, request a free estimate with the rooms, trim goals, city, and available photos.
FAQs
What is included in a whole-home trim package in Venice, FL?
A whole-home trim package can include baseboards, door and window casing, crown molding, shoe molding, and paint-ready finishing. The written scope should identify included rooms, retained trim, damaged pieces to replace, flooring transitions, filled fastener holes, caulked seams, and final paint plans.
Can baseboards, crown molding, and door casing be replaced at the same time?
Yes, baseboards, crown molding, and door or window casing can be replaced in one coordinated project. Existing casing can remain where its profile and condition fit the plan, while crown may be reserved for living areas, dining rooms, or a primary suite.
How do I choose matching baseboard, crown molding, and casing profiles?
Compare baseboard, casing, and crown samples side by side with the room’s ceiling height, door style, window depth, and desired level of formality. Use a shared detail, such as a small stepped edge or softened radius, across the profile family while adjusting widths and heights for each room’s scale.
Should whole-house trim be installed before or after new flooring?
Baseboards are commonly installed after new hard flooring is finished so they can cover the perimeter expansion gap cleanly. When existing flooring remains, replacement requires floor-edge protection and may reveal wall damage, gaps, or marks hidden by the old trim.
Is MDF or wood better for painted interior trim in a Florida home?
MDF provides a smooth, grain-free surface for painted trim in dry living rooms, bedrooms, and halls, while finger-jointed pine offers a wood substrate that can be filled, sanded, and repainted after minor damage. Near baths, laundry rooms, and exterior-adjacent entries, material selection should account for moisture exposure, ventilation, and nearby wall and floor conditions.