
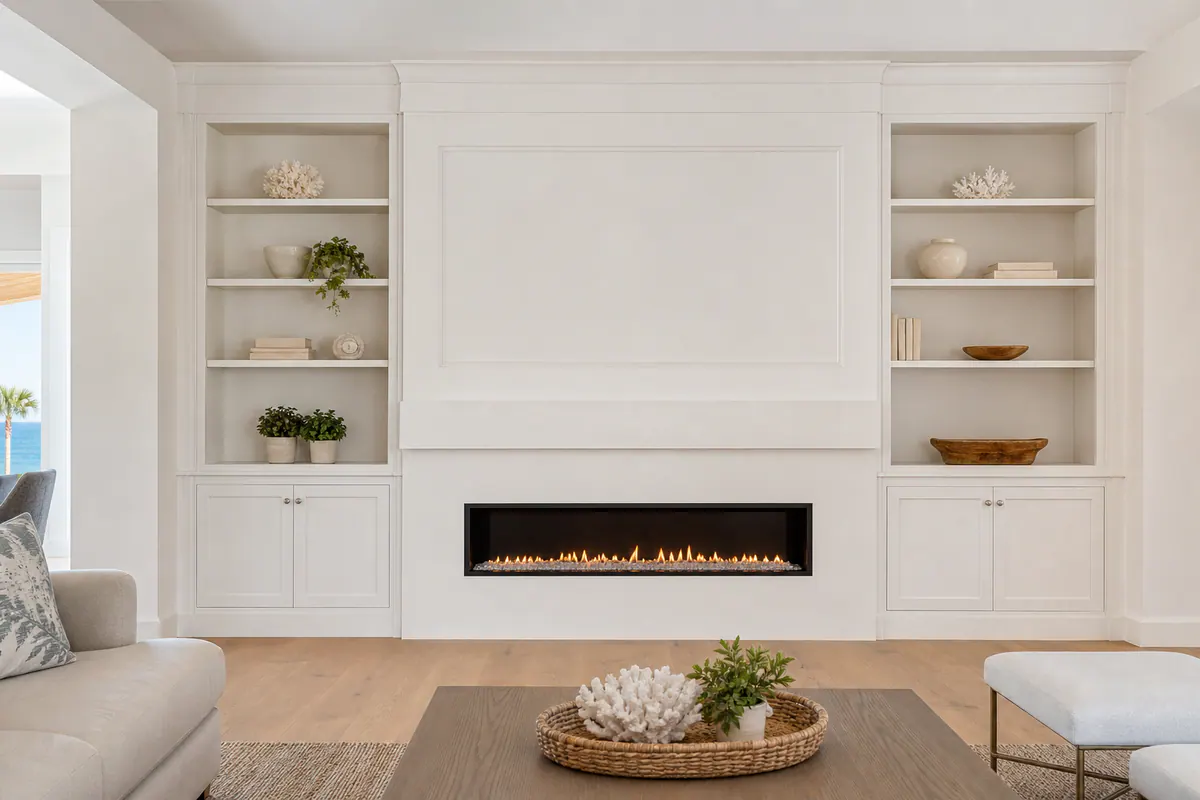
Cabinet trim in Casey Key is the finish carpentry that makes cabinetry look designed for the room rather than simply installed inside it. It closes distracting gaps, gives exposed cabinet sides a deliberate face, and carries a visual line from the built-in to nearby walls, ceilings, doors, and baseboards.
That work can be quietly tailored. A crown profile can bring upper kitchen cabinets into the ceiling plane, while a slim shadow reveal creates a cleaner, contemporary separation. Filler panels cover planned space beside a wall; a scribe is shaped to follow an uneven surface so the edge looks controlled rather than patched. Finished end panels turn a visible cabinet box into furniture-like millwork.
The same principles apply beyond the kitchen. Bookcases need consistent shelf and face-frame alignment; office built-ins benefit from trim that makes storage read as part of the wall; and fireplace cabinetry needs transitions that frame the feature without competing with it. A clean miter return, aligned profile, and intentional stopping point are strong signals of careful work. Abrupt profile changes, raw ends, and wide caulk-filled gaps make even good cabinetry feel incomplete.
Luxury finish carpentry in Casey Key does not require ornate molding. The right detail may be a substantial crown, a restrained flat panel, or a nearly flush reveal, chosen to suit the room's architecture and the way the built-in is meant to function.
What Custom Cabinet and Built-In Trim Actually Solves
A cabinet box can be square and well built yet still look like it stopped short of the room. The unfinished feeling usually appears at the perimeter: beside a wavy wall, below a ceiling that dips, along a floor that is out of level, or where new millwork meets existing baseboard, casing, or paneling.
Filler panels provide planned clearance at a wall or between doors, drawers, and an obstruction; they prevent bind and give the layout breathing room. A basic filler simply covers that space. A tailored filler can be proportioned to match surrounding rails or panels, while scribe molding is carefully shaped to follow an uneven wall so the visible edge remains tight. The stronger result is a controlled, consistent line, not a wide seam relying on caulk to disappear.
Visible cabinet sides deserve the same attention. A finished end panel gives an exposed run a furniture-like face, while aligned face frames establish a crisp front plane across doors, drawers, and open shelving. At the floor, a continuous toe kick recesses the base for foot room and avoids a collection of awkward cabinet-bottom edges that are harder to clean around.
Small separations can be deliberate design tools. A reveal or shadow line is a narrow, even gap that creates a clean break between a built-in and the wall, ceiling, or adjacent trim. It reads as intentional only when its width stays consistent and its stopping points are resolved. An irregular gap that widens at one end reads as an installation compromise instead.
Under upper cabinets, light rail conceals the bottom edge and can visually finish the transition above a backsplash or task lighting. Taken together, these choices let custom cabinet trim Casey Key work respond to actual field conditions rather than forcing cabinetry into a theoretical square room. The result is better proportion, fewer difficult-to-clean ledges, and millwork that feels anchored to its setting.
Kitchen Cabinet Crown Molding and Finish Details
The top of an upper-cabinet run is where a kitchen's intended style becomes especially visible. Ceiling-height cabinetry finished with cabinet crown molding creates a continuous architectural line and removes the dust-catching gap above the doors. A well-resolved transition keeps the crown level and proportionate even when the ceiling varies, with clean miter returns at an exposed side and a refrigerator surround that reads as part of the same composition rather than a separate tall box.
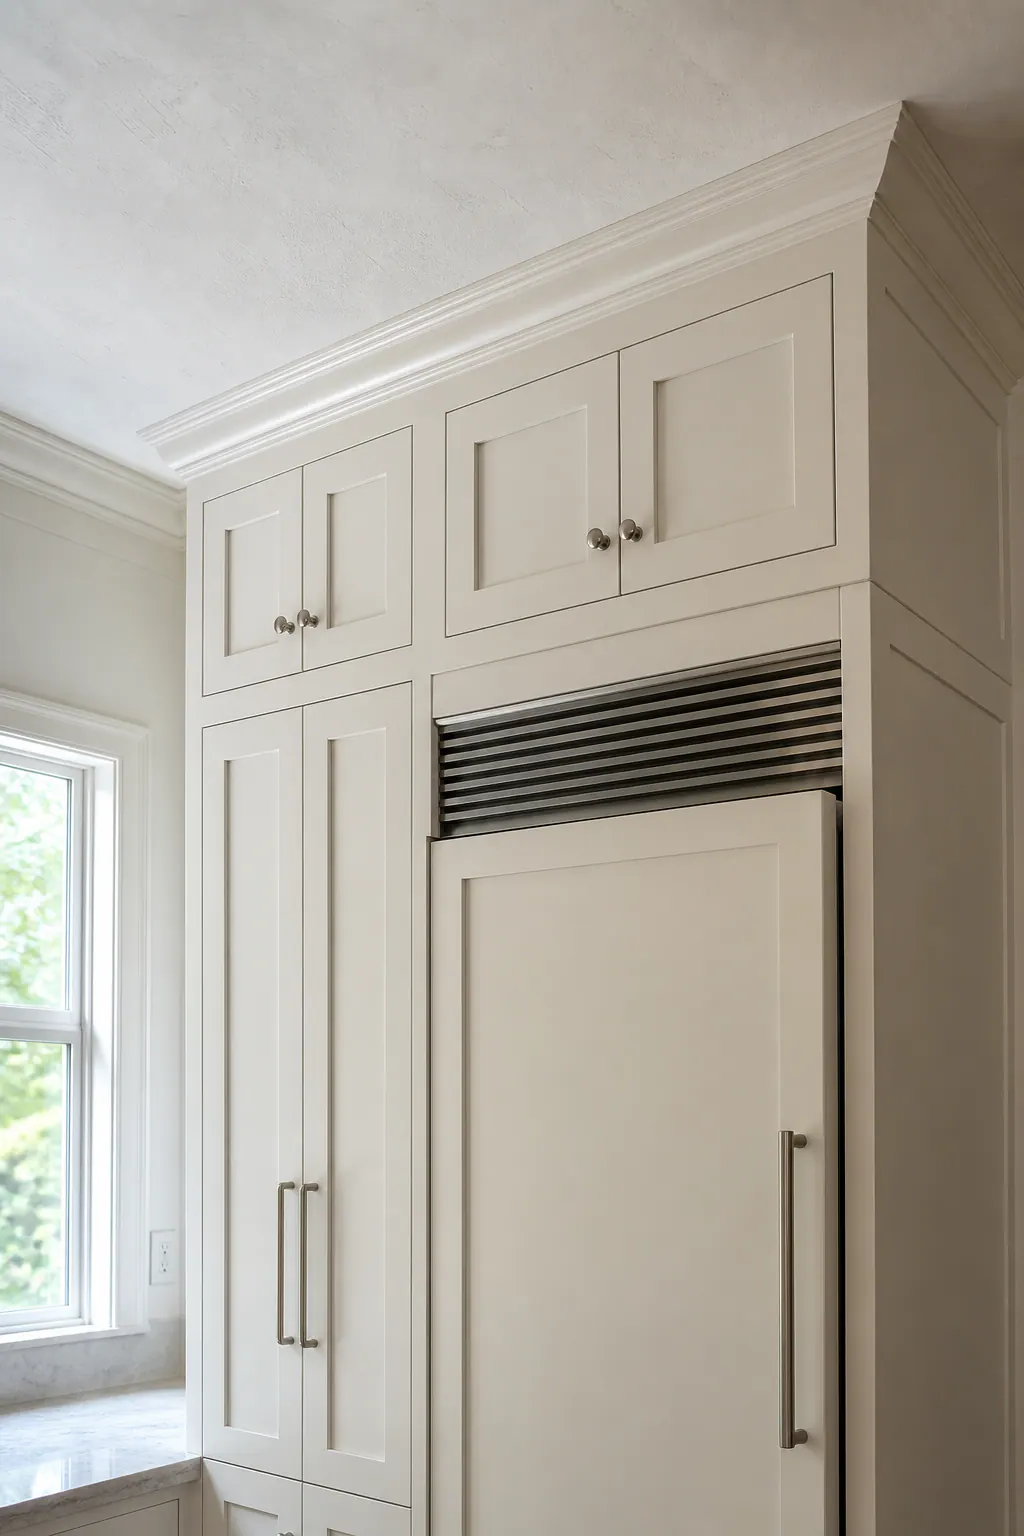
That approach is not the only polished option. A contemporary kitchen may intentionally stop the uppers below the ceiling and use a narrow, consistent reveal or shadow line instead of a fully trimmed top. The dark separation gives the cabinets a lighter, more floating appearance and leaves the ceiling plane visually uninterrupted. It works best when the line is even across the run and ends decisively at a wall, tall cabinet, or panel. A gap that changes width or is interrupted by mismatched trim looks accidental rather than modern.
For more traditional rooms, stacked moldings combine a larger crown with one or more smaller profiles below it. The layered build-up adds depth, gives tall cabinetry a stronger visual base at the ceiling, and can echo substantial door casing or ceiling molding elsewhere in the room. Cleaner kitchens often benefit from restrained flat trim or a simple square-edged band, which provides a finished edge without introducing curves or extra shadow lines.
Matching new cabinet crown molding in Casey Key means looking beyond a similar silhouette. The profile's scale should relate to the existing room molding; a thin cabinet crown beneath a broad perimeter crown can feel undersized, while an oversized stack can crowd a low ceiling. Paint color and sheen also matter: matching wall or ceiling trim can make the kitchen feel integrated, while a cabinet-color finish makes the crown read as part of the cabinetry. Alignment is the final checkpoint, profiles should meet at a deliberate height, carry through corners cleanly, and avoid abrupt offsets where cabinet trim meets nearby architectural molding.
Custom Trim for Bookcases, Home Offices, and Wall-to-Wall Storage
Bookcases and storage walls have more visible edges than a typical cabinet run, so their proportions do much of the work. A wall-to-wall bookcase should land deliberately at both ends, with trim or tailored scribe work absorbing wall variation instead of leaving a widening strip at one side. At the ceiling, a continuous cap, crown treatment, or intentionally even shadow reveal keeps the composition from looking like separate units pushed together. For built-in bookcases Casey Key homeowners often want, those perimeter decisions are what make a long wall feel balanced rather than crowded.
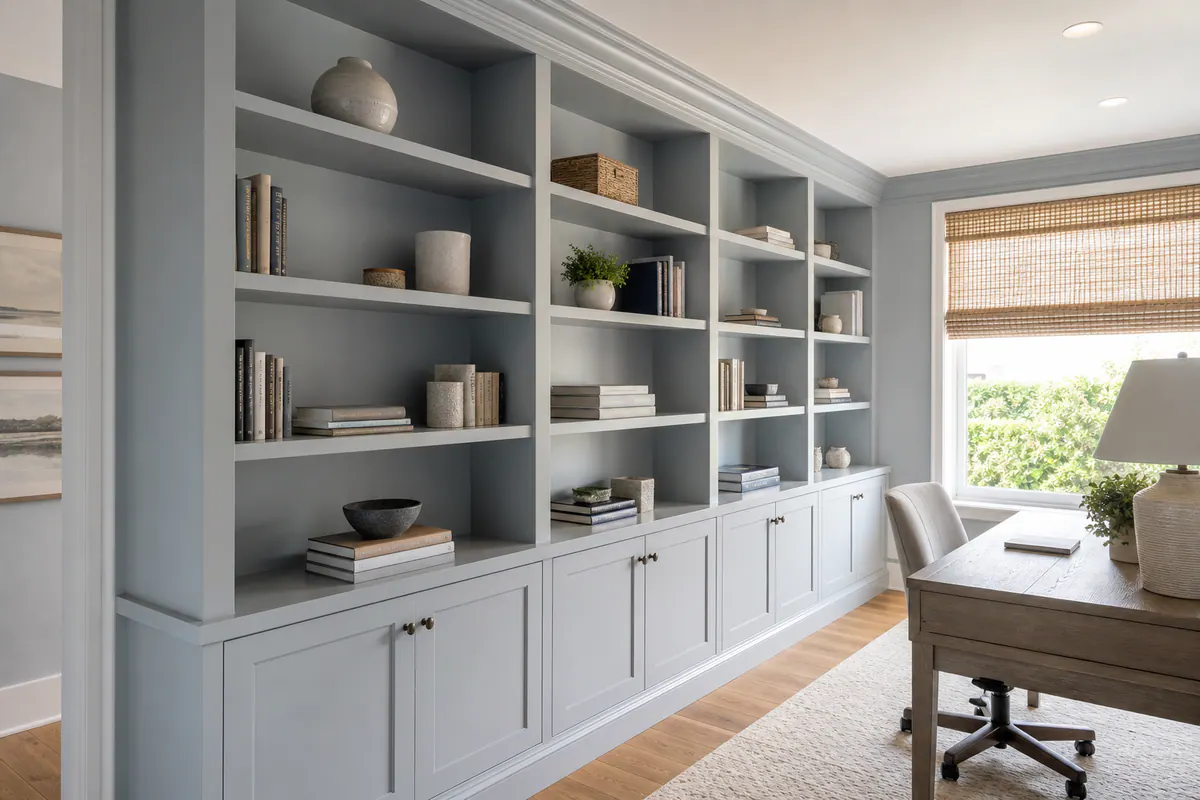
In a home office, the face frame, the finished border around doors, drawers, and open shelving, sets the visual rhythm. Narrow, consistent rails can keep a desk wall light and tailored; wider frames give doors and bookcase openings more traditional presence. Shelf spacing should look intentional as well: a strong horizontal line aligned with desktop height, window trim, or adjacent cabinetry is more convincing than shelves that appear to have been divided only by convenience. Concealed cabinets below open display shelves bring practical storage without turning the whole wall into a bank of doors.
More decorative custom built-in cabinetry Casey Key projects may use applied molding: thin trim pieces installed over flat door, panel, or wall surfaces to create framed rectangles and added shadow lines. This treatment suits rooms with substantial casing, paneled walls, or traditional furniture, especially on a library wall, window-seat front, or office cabinetry. A quieter approach uses flat end panels, simple square-edge bookcase trim, and flush-front doors that sit nearly in one plane. It tends to work well for media walls and contemporary offices, where fewer joints keep the television, cabinetry, and wall surface visually calm.
Baseboard integration is a small detail with outsized effect. The existing base can return cleanly into the built-in, or the built-in can carry a matching plinth so it appears grounded in the room. Intentional reveals, the slim, even gaps around cabinet doors, drawer fronts, and select panels, also distinguish a controlled modern design from an installation with irregular spacing. For home office built-ins Casey Key residents are planning, an elevation drawn around windows, outlets, vents, and door swing helps preserve those lines while keeping shelves, charging areas, and concealed storage usable.
Fireplace Built-Ins and Carefully Framed Feature Walls
A fireplace wall is most convincing when the firebox, surround, shelving, and storage read as one elevation rather than as separate features assembled in the same area. A flush contemporary treatment keeps the face nearly planar, using clean reveals and broad, uninterrupted panels to make the fireplace feel quiet and architectural. A framed fireplace wall adds a visible border, such as panel molding, a mantel band, or a stepped surround, to give the focal point more definition. A fully trimmed composition extends that language into bookcases or base cabinets on either side, creating a more formal, furniture-like presence.
For fireplace built-ins Casey Key homeowners are considering, proportion matters as much as profile choice. A centered firebox can anchor matching shelving bays, but symmetry is not mandatory: an intentionally wider cabinet bank on one side can accommodate storage or media equipment if panel breaks, shelf lines, and mantel height still create a balanced overall view. Strong work carries horizontal lines across cabinet doors, drawer fronts, shelf edges, and surrounding panels. Weak integration often shows up as a mantel that cuts across panel divisions awkwardly, crown that stops without a clean return, or side units that appear unrelated to the fireplace face.
Material changes deserve a deliberate edge. Stone, tile, plaster, painted millwork, and wood can meet through a restrained reveal, a mantel, or a framed trim transition rather than an improvised caulk line. The surround should also relate to nearby baseboard, crown, and cabinetry so it belongs to the room's established vocabulary. Before finalizing built-in trim Casey Key projects, the elevation should reserve practical access for fireplace equipment, controls, outlets, and any required adjacent systems; the fireplace supplier and applicable electrical or ventilation professionals can define the requirements that shape those openings.
Choosing Profiles, Paint-Grade Millwork, and the Right Level of Detail
Profile selection works best as an exercise in editing: decide which lines deserve emphasis and which should recede. Paint-grade millwork is intended for an opaque painted finish, making it a flexible choice for a unified wall of cabinetry, panels, and trim. Stain-grade wood leaves grain visible, so color, grain direction, and the way adjoining pieces meet become part of the look. A painted built-in can support crisp, tailored panel layouts; a stained installation often benefits from fewer interruptions and well-considered wood character.
Simple square edges and narrow, even reveals suit flat-front doors, contemporary casing, and rooms where the cabinetry should feel calm rather than ornamental. Shaped crown introduces a stronger shadow line at the top, while applied molding adds framed dimension across otherwise flat faces. Neither approach is automatically more refined. Broad crown or layered trim can give a tall, formal room presence, but may feel crowded above a low cabinet run. In a smaller office or display area, a flush panel with a controlled reveal can preserve visual breathing room.
The surrounding architecture should set the vocabulary. Compare door casing, baseboard height, perimeter crown, interior doors, and cabinet fronts before choosing a new profile. A good match does not require copying every contour; it means the new work shares a believable scale and level of formality. Clean miter returns, aligned profile heights, and consistent panel spacing read as intentional. A heavy crown beside minimal square casing, or decorative panel grids that ignore door and drawer divisions, can make the composition feel unsettled.
For kitchens, open shelving, and hardworking offices, favor details that remain comfortable to live with. Deep grooves, multiple ledges, and elaborate layered profiles create more places for dust, residue, and display clutter to collect. Keep decorative transitions where they can be seen and appreciated, while choosing smoother faces and accessible edges around daily-use cabinetry. Reviewing physical paint, wood, and profile samples in the room helps balance the desired character with practical upkeep.
Plan a Tailored Cabinet or Built-In Trim Upgrade
A productive trim conversation starts with the room as it exists, not a molding catalog. Share photos of the cabinetry or built-in, the surrounding walls and ceiling, nearby door trim, and the areas where the work must end or turn. That makes it easier to spot exposed sides, uneven-wall transitions, outlets, vents, and baseboard connections before a finish detail is chosen.
From there, the plan can establish which edges receive panels or returns, where a scribe should disappear into the wall, and whether the top calls for crown or a deliberate reveal. Finish direction matters too: paint can visually join new trim to cabinetry and wall panels, while a stained detail needs a more selective approach to grain and adjoining pieces.
The objective is not molding for its own sake. It is cabinetry that feels proportioned, fitted, and complete within the room. Casey Key homeowners considering cabinet and built-in trim can begin by discussing a kitchen, office, bookcase, fireplace wall, or another integrated storage space and the details they want the finished composition to resolve.
Plan the next step
Compare the broader Cabinet and Built-In Trim service.
Review the Casey Key, FL service area for local planning context.
When you are ready, request a free estimate with the rooms, trim goals, city, and available photos.
FAQs
What is included in cabinet trim for a Casey Key home?
Cabinet trim can include crown molding, filler panels, scribe molding, finished end panels, face-frame alignment, toe kicks, light rail, and deliberate reveals. These details cover gaps, finish exposed cabinet sides, and connect cabinetry to nearby walls, ceilings, baseboards, and door trim.
Can crown molding be added to existing kitchen cabinets?
Yes, crown molding can be added to upper kitchen cabinets to create a finished transition to the ceiling or a stronger top edge below it. The profile should match the scale of existing room molding, use clean miter returns at exposed sides, and align consistently across the cabinet run.
How do built-ins get fitted to uneven walls or ceilings?
Built-ins are fitted with tailored filler panels and scribe molding shaped to follow uneven walls, ceilings, or floors. This creates a tight, controlled edge instead of a wide gap filled with caulk, while planned clearance prevents doors and drawers from binding.
What trim details make built-in bookcases look custom?
Custom-looking bookcases use deliberate end treatments, a continuous cap or crown treatment, aligned face frames, consistent shelf spacing, and integrated baseboards or matching plinths. Narrow, even reveals and finished end panels also keep a wall-to-wall installation from looking like separate units pushed together.
Should fireplace built-ins be flush, framed, or fully trimmed out?
Choose a flush treatment for a contemporary, nearly planar fireplace wall with broad panels and clean reveals. Choose framed or fully trimmed built-ins when the room has more traditional casing, panel molding, or a mantel that should connect to shelving and storage on both sides; maintain aligned horizontal lines and provide access for equipment, controls, outlets, and required systems.