

For Casey Key homeowners, trim repair Casey Key work is about restoring the small architectural details that make a room feel finished, not simply covering damage. Worn baseboards, loose door casing, swollen window trim, separated crown molding, mismatched replacement pieces, and missing decorative sections can interrupt otherwise polished interiors.
Interior trim is finish carpentry: proportions must relate to the room, profiles must continue cleanly from one piece to the next, and joints need to look deliberate at close range. A strong result shows consistent reveals around doors and windows, aligned molding details, tight mitered corners, restrained caulk lines, and smooth transitions ready for paint or stain. Open miters, uneven casing gaps, thick caulk beads, or visible filler tend to make a repair read as a patch.
The scope can include baseboards at wall-and-floor transitions; crown molding where walls meet ceilings; door and window casing that frames openings; shoe molding and quarter round that finish flooring edges; and decorative molding used for panel details or other accents. Whether a section is repaired or replaced depends on its material condition, past moisture exposure, the availability of a matching profile, and the finish the room requires. When swelling or deterioration is tied to moisture, the source needs to be resolved before finish work moves forward.
When Damaged Molding Can Be Repaired, and When Replacement Is the Better Choice
A small defect is often repairable when the trim itself remains firm, dry, and true to its original shape. Shallow dents, small chips, nail holes, localized scuffs, a narrow seam that has opened, or limited caulk failure can usually be cleaned up with careful filling, sanding, recaulking where appropriate, and finish preparation. An isolated gap at a joint may also be a repair candidate when the adjoining pieces are still secure and their profile edges line up.
The deciding question is not simply whether damage can be hidden under filler and paint. A worthwhile repair needs sound material beneath the surface and a credible path back to visual continuity. On a prominent door casing, for example, a filled chip must disappear without flattening the molding detail or creating a different sheen after painting. Along a baseboard run, the repaired area should keep a straight top edge and a consistent relationship to the floor, wall, and neighboring pieces.
Replacement becomes the more reliable choice when damage signals material failure rather than a surface blemish. Crumbling MDF, repeated swelling, deep rot, warped boards, extensive splitting, missing sections, widespread water staining, or trim that will not hold a stable finish are poor candidates for a cosmetic patch. Filling may briefly mask those conditions, but it cannot restore a board that has lost its shape, density, or ability to maintain a clean edge and joint.
Moisture changes the decision quickly. If a window casing or baseboard has swollen more than once, the moisture path should be resolved before damaged molding repair in Casey Key moves ahead; otherwise, new or repaired finish work can be affected again. Once the underlying condition is stable, the replacement scope can be limited to the failed sections when surrounding trim remains sound and can be matched cleanly.
- Good repair signal: damage is shallow, isolated, stable, and can be blended without interrupting an adjacent profile or finish line.
- Replacement signal: damage extends through the material, repeats along a run, distorts the trim, or leaves a patch conspicuous beside intact molding.
For trim repair Casey Key homeowners can feel confident about, visibility matters as much as extent. A minor flaw behind furniture may tolerate a modest repair, while the same flaw beside a front entry, window, or decorative transition deserves a higher standard: matched contours, controlled seams, smooth filled areas, and no obvious patched edge once the finish is complete.
Profile Matching, Material Selection, and Paint-Grade or Stain-Grade Finish Work
Matching begins with the shape of the existing work, not just its face width. A careful comparison looks at height, thickness, edge rounds or beads, decorative curves, and any back cut, the relieved detail on the rear that affects how the molding sits against the wall. It also considers proportion: a replacement baseboard has to relate convincingly to nearby door casing, shoe molding, and transitions rather than looking like an unrelated strip added to one wall.

When an exact stock profile is unavailable, trim replacement Casey Key work can still look intentional through several practical paths. A close compatible profile may suit an isolated, low-contrast location; multiple simpler pieces can be built up to recreate a deeper profile; or replacing an entire visible run can prevent an abrupt change midway along a wall. For a distinctive historic or decorative detail, reproducing the profile may be feasible when its shape can be captured clearly. The sensible goal is visual continuity, not a promise that every aged molding can be made invisible beside the original.
- Paint-grade MDF: a smooth, uniform material that can make sense for stable, dry interior locations receiving opaque paint. Its consistent surface helps paint read evenly, but a damaged or moisture-affected edge is not a good place to rely on it.
- Paint-grade solid wood: a practical choice where a wood substrate, crisper routed detail, or a more resilient edge is wanted before painting. Natural grain is largely concealed under paint, so profile alignment and surface preparation carry much of the visual result.
- Solid wood for stain-grade work: the appropriate starting point when the grain will remain visible. Species, grain direction, board color, sheen, and joint placement all influence whether a new section belongs with adjacent woodwork.
- Moisture-conscious alternatives: may be considered near recurring humidity or splash exposure, but the underlying moisture path still needs to be resolved before new finish trim is installed.
Stain-grade work leaves far less to hide. A seam that might blend under paint can remain noticeable when grain changes direction, color varies from board to board, or a miter interrupts a continuous figure. Strong results use thoughtfully selected wood, tight joinery, and transition points that do not draw the eye. For baseboard replacement in Casey Key or a visible door casing repair, that extra attention helps the replacement read as part of the room rather than as a separate patch.
Interior Trim Components We Assess, Repair, and Replace
Each trim component has its own visual job, damage patterns, and fitting demands. The work stays focused on the interior finish details that meet floors, walls, ceilings, doors, and windows, not broad remodeling or exterior carpentry.
- Baseboards and shoe molding: Baseboards cover the wall-to-floor transition, while shoe molding or quarter round follows the flooring edge and helps close small irregular gaps. Scuffs, vacuum strikes, separated joints, swollen lower edges, and loose lengths are common concerns. A polished repair or replacement follows the floor cleanly, is scribed to an uneven wall where needed, and meets adjacent runs without a conspicuous step in height or profile.
- Crown molding: Crown defines the wall-to-ceiling transition and makes even small alignment issues visible from across the room. Separated seams, cracked corners, loose sections, and damage near ceiling movement need careful attention. Inside corners are best judged by the cope, the shaped cut that lets one profile nest into the other, rather than by a wide, caulk-heavy gap. Outside corners depend on controlled miter joints that align their profile details instead of opening at the face.
- Door casing and jamb-adjacent trim: Casing frames the opening and creates a consistent border between the wall, jamb, and door. Damage may include dents at lower legs, split miters at the header, loose returns, or trim disturbed during door or flooring work. The key finish checkpoint is a consistent reveal: the narrow, even portion of jamb left visible around the opening. Uneven reveals or casing that crowds the jamb can make an otherwise sound repair look off.
- Window casing, stools, and aprons: Where present, casing frames the window, the stool forms the interior ledge, and the apron runs beneath it. These parts must connect cleanly at corners and returns while sitting convincingly against walls that may not be perfectly flat. A scribe fit can remove a distracting wall-side gap without relying on excessive caulk. Any moisture cause affecting window-area trim should be resolved before finish work proceeds.
- Decorative molding: Panel molding, picture rails, chair rails, and built-up accent details need aligned runs, balanced spacing, and corners that preserve the intended pattern. A repair should restore the rhythm of the detail; a replacement should not introduce a slightly different profile or break a continuous line mid-feature.
What High-Finish Trim Repair and Replacement Involves
A high-finish result is built in the fitting stages, not rescued by the last coat of paint. The work starts by inspecting the damaged length, its adjoining runs, the wall or jamb behind it, and the likely cause, such as a loose fastener, an opened joint, a floor-level impact, or moisture exposure that must be addressed before replacement material is installed.
- Protect and remove thoughtfully. Floors, finished walls, nearby casing, and furnishings are covered or isolated before work begins. Where a section has failed, it is removed carefully in manageable lengths, working around usable neighboring trim and recognizing that old caulk, paint bonds, uneven drywall, or prior repairs can affect how cleanly material releases.
- Measure, cut, and test-fit the actual space. New material is measured against the opening and adjacent profiles, then held in place before fastening. A coped inside corner uses a shaped cut so one molding profile nests against the other; an outside miter joins two angled ends. The checkpoint is a profile that meets at its face without a wide opening disguised by caulk.
- Fasten, fill, and refine transitions. Straight baseboard runs should sit flat without rocking, and door casing should maintain an even jamb reveal from leg to header. Fasteners secure the piece, nail holes are filled, and filled areas are sanded flush so they do not telegraph through paint. A narrow caulk line can tidy a minor wall-side irregularity, but a heavy bead is a weak substitute for a scribed fit or aligned joint.
- Prepare for the selected finish. Paint-grade trim allows carefully filled seams and a uniform paint-ready surface. Stain-grade work leaves grain, color variation, and joinery more exposed, so wood selection, sanding direction, and joint placement carry greater visual weight. Normal wood movement and walls that are not perfectly flat can influence seams over time; the practical goal is a controlled fit, not an unrealistic promise of invisible joints.
That is the difference between a board that is merely attached and finish carpentry Casey Key homeowners can judge at close range: stable fastening, aligned details across a joint, smooth filled nail holes, restrained caulk, and transitions that read as part of the original room rather than a patch.
Addressing Water-Damaged, Swollen, or Moisture-Affected Trim
A fresh coat of paint cannot make moisture-compromised trim stable. Before damaged molding repair in Casey Key, the leak, condensation pattern, plumbing event, or repeated wet exposure should be corrected; otherwise, new fill, caulk, paint, or replacement material may be affected by the same condition.
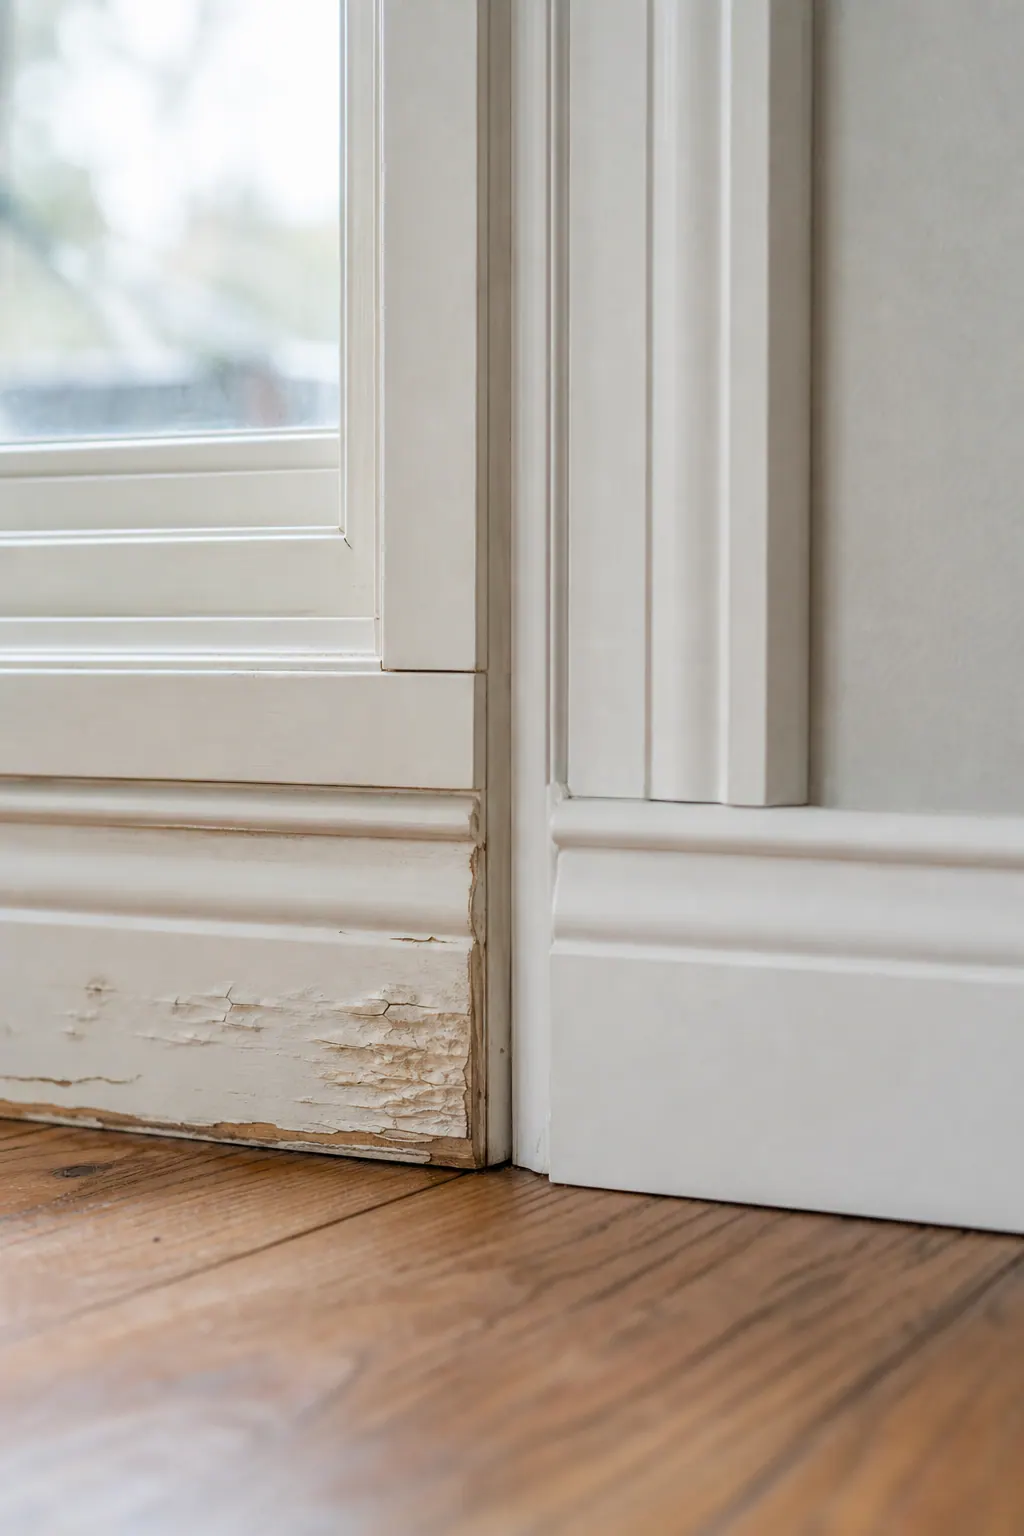
Visible warning signs deserve a closer look: MDF that has puffed at an edge or turned crumbly, wood that feels soft, staining that returns after touch-up, mold-like surface growth, or trim that has loosened from the wall. MDF is a smooth paint-grade product when dry, but swelling changes its shape and leaves a weak edge that usually will not sand back into a crisp profile. Solid wood may sometimes have localized damage that can be cut out or repaired if the surrounding fibers remain firm and dry.
The affected piece should not be considered alone. Nearby baseboards, door or window casing, shoe molding, and the wall-adjacent area can be reinspected for staining, separation, softness, or a change in profile alignment. Where replacement is appropriate, a paint-grade, moisture-conscious material may suit a location with occasional humidity exposure, while stain-grade work calls for sound wood selected to blend with the surrounding finish.
When loose material or recurring visual damage remains, removal is generally more convincing than a cosmetic patch. If conditions beyond the visible trim are suspected, further evaluation may be needed before interior trim repair in Casey Key moves ahead.
Plan a Trim Repair or Replacement Scope That Looks Intentional
Before requesting an assessment, gather a few details that make the scope easier to see: the affected rooms, whether the piece is baseboard, casing, crown, or decorative molding, the suspected cause, and whether that cause has been resolved. Photograph each damaged area along with an intact section immediately beside or across from it; the undamaged trim shows the profile, proportion, and finish the new work must relate to.
- Identify the finish goal. Paint-grade work can blend filled repairs and seams beneath a uniform coating, while stain-grade matching requires wood and joint placement that will look convincing with the grain visible.
- Say whether continuity matters across a full wall, doorway, or window opening. A short replacement can suit an isolated, hidden defect; replacing a longer run may create a cleaner continuous line where a joint would otherwise stand out.
- Share relevant history, including a leak, humidity exposure, impact, or flooring change, so the evaluation accounts for both the trim condition and the transition around it.
The right plan may be a localized repair when the surrounding material is sound and the profile can be retained, a partial-run replacement when a visible line needs to continue cleanly, or a broader coordinated replacement when condition or mismatched profiles would leave individual patches apparent. Request a detail-focused trim repair Casey Key evaluation to review intact profiles, adjacent transitions, and the finish standard you want before the work is scoped.
Plan the next step
Compare the broader Trim Repair and Replacement service.
Review the Casey Key, FL service area for local planning context.
When you are ready, request a free estimate with the rooms, trim goals, city, and available photos.
FAQs
Can damaged interior trim be repaired instead of replaced?
Yes, shallow dents, small chips, nail holes, localized scuffs, narrow opened seams, and limited caulk failure can be repaired when the trim remains firm, dry, and true to its original shape. The repair should preserve the molding profile, straight edges, and surrounding finish continuity.
How do you match existing baseboard or crown molding profiles?
Match the molding’s height, thickness, edge rounds or beads, decorative curves, and the back cut that determines how it sits against the wall. If an exact profile is unavailable, use a compatible profile in a low-visibility area, build up simpler pieces, or replace an entire visible run to avoid an abrupt mid-wall change.
What should you look for in a high-quality door casing or crown molding repair?
Door casing should maintain a consistent, narrow jamb reveal from the legs to the header, while crown molding should have tightly coped inside corners and aligned outside miters. Look for smooth filled nail holes, restrained caulk lines, aligned profile details, and no wide gaps hidden by filler or caulk.
Can trim be repaired after a leak or moisture damage?
The moisture source must be corrected before repairing or replacing trim. Swollen or crumbly MDF, soft wood, recurring stains, loose trim, deep rot, and repeated swelling usually require replacement because paint and filler cannot restore a stable profile or edge.
How do you choose between paint-grade and stain-grade trim replacement?
Use paint-grade MDF in stable, dry interior locations when a smooth opaque painted finish is planned, or paint-grade solid wood when crisper routed detail and stronger edges are needed. Choose solid wood for stain-grade work because grain, board color, sheen, grain direction, and joint placement remain visible and must blend with adjacent trim.